
Keeping students engaged with their learning materials has never been easy. Then, along came the pandemic in 2020 and, boom!, another roadblock showed up to challenge educators on how they engage with learners.
While many adults have adapted fairly well to working remotely and interacting primarily with computers, many students have not adjusted as well to Zoom school. Parents and educators alike have expressed concerns about the challenges of keeping students engaged while trying to support their learner’s educational needs.
We can’t promise that ArcGIS StoryMaps is a magic bullet to fix all the challenges learners face. However, we can help by teaching you a process to create your own custom educational stories. All ages and abilities of learners can interact with an appropriately written story to help support their educational goals, including language and literacy needs. A couple of examples of stories created for K–12 learners include this pair of leveled stories that are derived from the same original story but are tailored to different reading levels:
Storytelling Safari with a reading level score in the 4th grade range
Morning Safari with a reading level score in the 6th grade range
So, how can StoryMaps help support your learner, you ask? Great question! For those who are not familiar, StoryMaps is a web-based app that runs on Esri’s ArcGIS Online platform and allows you to create interactive stories by including multimedia content within your story. Multimedia support includes images, video, audio, and interactive 2D and 3D maps. This means you can contain or embed media, including your own video or audio files, within one story. You can also create a series of stories on different topics much like chapters in a book, and then organize those stories in a StoryMaps collection so that those chapters are all in one place.

While the StoryMaps team will always encourage the use of maps in a story because maps are a great tool to create a setting and add context to your learning objective, we won’t be offended if you don’t use them. StoryMaps also supports alternative text and has many features designed to meet accessibility needs to be inclusive for most learners. Additionally, StoryMaps can be viewed on computers, tablets, Chromebooks, and phones.
Though the StoryMaps team has worked hard to make the app intuitive to use, we also have many free resources to help new storytellers become comfortable with creating stories.
Now, let me walk you through the process I used to create the Meet the Grizzly Bear story, which includes viewer-controlled media and is geared toward readers who are developing their English literacy skills and supplements K–2 science standards.

What you need to put together an educational story
- Ideas for written content—maybe it’s already in lesson-plan form
- Sufficient time to put your story together
- Photos and videos that are good quality and follow best practices for licensing (tip: use license-free repositories such as Unsplash). See this blog post for advice on how to work with visuals in your story.
- A computer and an internet connection
- A smartphone or computer with voice recording software (Try cloudconvert.com if you need to convert files to MP3 or MPG)
- An account with a site such as Vimeo or YouTube to host media if you are using files that are over 20 Mb
- An ArcGIS Online account, ideally a free school account for K-12 educators, or club account
- A curious mind that is willing to experiment to see how creative you can get with storytelling!
What you don’t need:
- Fancy equipment
- GIS experience. Express maps should work for many purposes and can be put together with just a few clicks; you don’t need to be a cartography expert!
How to get started
Before we go through the workflow process it’s worth mentioning that some steps were concurrent and I did revisit a few stages of the process while producing this story.
Strategy and learning objectives
First, I started out with the goal of creating a story for an audience of emergent readers that could be used like a read-aloud book and engage the learner by asking them direct questions (see the research on why this is important). Asking questions includes the learner in the story and helps them understand how the learning concepts relate to them. Another key strategy was placing the buttons to play the audio after the text so the reader can try to read the text first. If they need support, they can choose to press the play button. At the end of the story, I placed an ArcGIS Survey123 that allows readers to provide feedback on the story. Teachers can also use Survey123, or even embed other online forms, to ask comprehension questions.
Next, I reviewed the K–2 Next Generation Science Standards, (NGSS) and decided that I could make an appealing story out of the living things concepts. As noted, teachers may have much of their content already contained in a lesson plan.
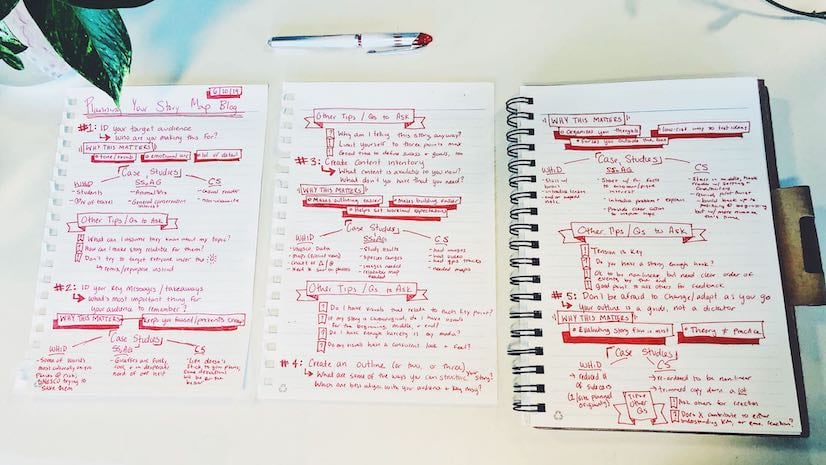
Planning and outlining
Then I did preliminary photo and video research to make sure appropriate visuals were available, as images often need to show the story when advanced vocabulary and long blocks of text are not accessible for the learner.
Next, I wrote an outline of the points I wanted to make and used planning resources, such as those found on the StoryMaps resources page, to organize my story goals.
Then, after outlining the story content, I did in-depth photo and video research.
After getting a stronger sense of available photo content, I wrote a draft in a Word document. The first draft was long. It had complicated words and complex sentences. I needed that long, messy flood of words on the screen to get the ideas organized and flowing. The draft helped to clarify what extra media support would be needed to help communicate the learning objectives and concepts. This original draft also included content that touched on other NGSS learning standards that we cut later in the editing process to keep the story contained.
Maps and data
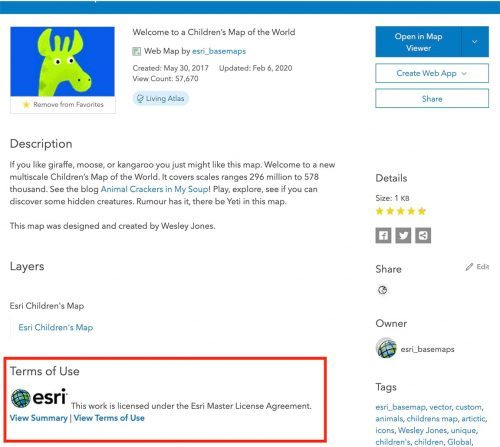
Then, I visited the topic of maps. While expert-level mapmaking skills are not required for a map to be functional for student understanding, my colleague, Mark Harrower, created a custom map using US Geological Survey data which is in the Public Domain. This map uses A Children’s Map basemap available in the ArcGIS Living Atlas of the World.
Diving into the story builder
Next up was exploring how to best format the story. My original vision included using a slideshow immersive block. However, as of July, 2021, the slideshow block did not yet support audio or the large paragraph text style. Because emergent readers find larger fonts more user-friendly, and audio is not yet available, both of which were critical to the story, sidecar became the best block option for much of the story.

Before going any further, my colleague, Cristina Cañizares provided feedback for cutting excess content and helped to point out weaknesses in the storyline. Feedback is a vital part of your story because you often don’t recognize weaknesses, especially if would normally present part or all your lesson content verbally in front of your student.
Next, after editing and cutting text it was clear a few concepts needed additional visual support. For example, the slide that shows a photo of bears raiding a camp site for food was originally a fairly long paragraph about sharing space with wildlife. After finding the campsite photo, I was able to cut the text down to a few sentences.

Next, I had another tag-team editing session with Cristina, as well as a bit of feedback from other team members and from a test audience before making the final edits.
Adding the read-aloud functions
After doing the final edits, I recorded the read-aloud audio. To do the recording, I went into a clothes closet that was insulated from outside noise and used the voice recorder function on my iPhone. (Pro-tip, inhale before you hit the record button so you don’t sound like you’re gasping in your recording.) It’s also easiest to edit the file within your voice recorder app to make sure it matches your text before transferring your files to your computer. Naming the files with a number, or something related to your story structure, will help you keep organized when adding your files into the story.
Finally, I uploaded the audio files to the story. It’s worth mentioning that as of July 2021, the ArcGIS StoryMaps builder supports MP3, WAV, MP4, and MPG files. If you are using an Apple product to record your media, you’ll need to convert the files before you upload them to the story. After proofreading the story and playing all the audio clips I was 100 percent satisfied, and hit the publish button. Now we have a multimedia story to help support striving learners!
Remember that you can always go back and edit the story later if needed. You can also duplicate a story to create additional versions that are accessible for different audiences, as we did with the pair of safari stories mentioned at the beginning of this post.


Article Discussion: