Administrators coordinating both field and back-office work may find tracking difficult, especially when tasks are assigned across multiple crews and at different stages of completion. Managing task updates and communication across multiple points of contact can be challenging and time-consuming. ArcGIS Field Maps is essential for organizations that conduct field operations and deal with these issues. It provides a comprehensive app for viewing maps, collecting data for activities such as maintenance records and inspections, completing tasks, and maintaining situational awareness in the field. Your field crews use Field Maps to receive and complete on-site work, while the data they collect is passed to the back office for next steps such as quality control, ingestion into the authoritative database, or other related work.
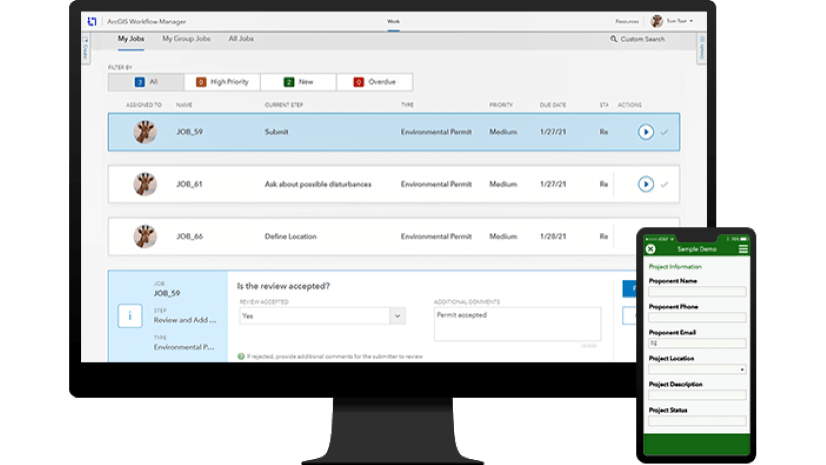
ArcGIS Workflow Manager is a centralized work management system for ArcGIS that helps coordinate work across products, systems, and teams. When Field Maps and Workflow Manager are used together, organizations can manage field operations from a single system, simplifying workflows by reducing handoff gaps, lost paperwork, and manual data re-entry between systems.
With the June 2026 update of ArcGIS Online, Workflow Manager includes a new Create Field Maps Task step and the ability to configure webhook connections. These enhancements address the challenges described above by connecting workflows directly to Field Maps, so field work can be created and tracked automatically. Together, these capabilities serve two main purposes in your workflows:
- Create a task for field crews from an existing job in Workflow Manager.
- Automatically continue back-office work after field work is complete.
Ready to streamline work between the field and office? Let’s dive in!
Background: Create Field Maps Task step, webhook connections, and webhook dependencies
Let’s take a closer look at how the Create Field Maps task step, webhook connections, and webhook dependencies work together to easily orchestrate processes across ArcGIS Field Maps and ArcGIS Workflow Manager.
The Create Field Maps Task step
This step’s name states its purpose precisely. When you run the Create Field Maps Task step, it will create a task in the task-enabled layer you are using to manage field work, which will correspond with the Workflow Manager job you are working on. The Create Field Maps Task step passes custom information to the task-enabled layer, to make the handoff from your back-office team to your field crew as seamless as possible. Assigned crew members can then carry out the task and report on their work using the ArcGIS Field Maps app.
Webhook connections
Webhooks are a lightweight system for web applications to communicate with one another. In ArcGIS Online, you can configure webhooks to share information and automatically trigger actions across your organization’s users and content. Webhook connections establish a protocol for direct communication between feature services and your workflow item – which feature service to listen to, which events will trigger a message, and what credentials Workflow Manager will use to carry out subsequent actions.
Creating webhook connections to your task-enabled layers enables the Create Field Maps Task step to block the subsequent step until field work is complete. This gives you greater control and synchronization between field crews and your back-office team. The back-office team is prevented from starting their portion of the work prematurely, and at the same time they don’t have to remember to manually resume the job once field work is done.
Webhook dependencies
Webhook dependencies are the mechanism the Create Field Maps Task step uses to block the subsequent step. If you configure the step to add a webhook dependency, the next step will be blocked until the status of the field work meets a set of release-conditions you have configured. Workflow Manager will receive updates on the field work through the webhook connection. When the task-enabled layer sends a webhook payload to Workflow Manager which meets your conditions, the dependency will be automatically released, and back-office work will proceed seamlessly.
The Workflow Manager Advanced organization extension is required for you to create webhook connections, which are needed for webhook dependencies to be available with the Create Field Maps Task step. If you have the Workflow Manager Standard organization extension, you will still be able to configure and run the Create Field Maps Task step, just without webhook dependencies.
Let’s explore a real-world scenario.
Use Case: Inventory Management
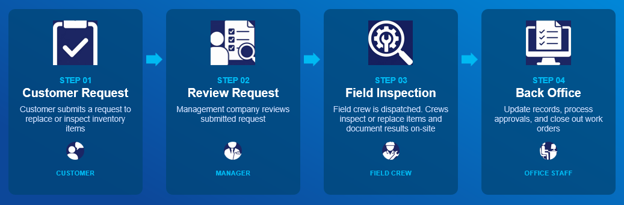
You are a regional office manager at a company that supplies and maintains Automated External Defibrillators (AEDs) for healthcare facilities across the country. When customers need their AEDs inspected or replaced, they submit a request to the management company using an ArcGIS Survey123 form. This triggers the creation of a job in Workflow Manager for the management company to assign to the appropriate regional office, review the incoming request and provide additional details as necessary before dispatching a field crew to the site. Once the crew completes all assigned tasks and updates the status in Field Maps, the work transitions back to the regional office to perform the necessary steps to close out the job and send appropriate notifications.
Check out this short demonstration to see this scenario in action!
This same pattern applies to numerous situations, like preventative maintenance, scheduled inspections, storm cleanup, asset management, and more! Because the underlying pattern and required steps are similar, once you’ve set up the workflow for one use case, extending it to the others is straightforward.
Now, let’s dig into how to set up this process in Workflow Manager.
1. Receiving the customer request
In the demonstration, you saw that the customer submitted an AED inventory request using a Survey123 form. A webhook was configured on the regional office’s ArcGIS Survey123 website, which enabled the survey submission to create a job in the workflow item automatically. To learn more on how to set this up, please visit this blog.
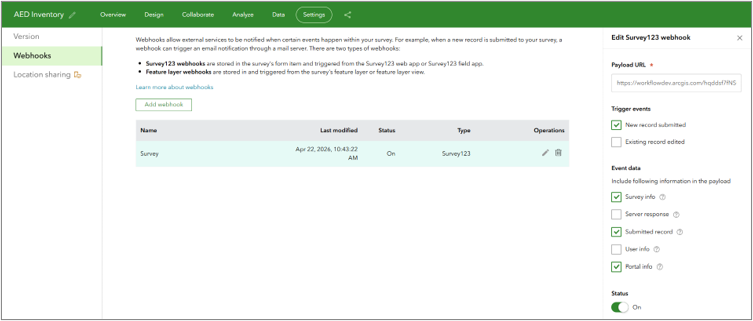
The advantage of this setup is that the process for initiating the request is fully customer-facing, and there is no opportunity for it to accidentally be missed or forgotten. Depending on your use case, there are many other approaches to initiating the process. Jobs can be created on-demand in the back-office, scheduled automatically to fulfill a recurring need, or generated programmatically using the Workflow Manager APIs.
2. Reviewing the request
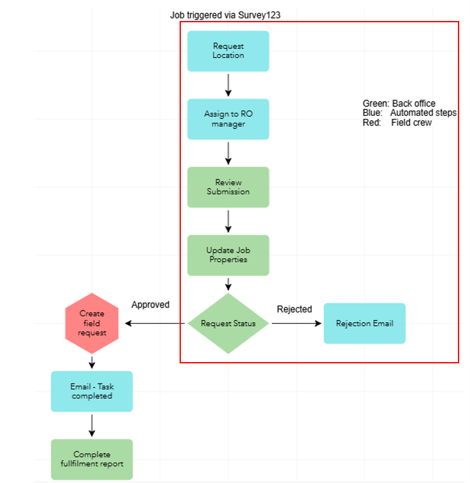
This is where the work begins at the regional office and where our configured workflow guides the user through a series of steps to review the submission. The review process consists of the first six steps enclosed in the red box in the above diagram.
- Request Location: A Define Locationstep receives the geometry specified in the customer’s survey submission and sets it as the job’s location. The step can retrieve the location from your job’s extended properties using an Arcade expression like this one: jobExtendedProperty($job, ‘aed_inventory’, ‘shape’).
- Assign RO manager: An Advanced Assignmentstep then automatically assigns the job to a regional office based on its location.
- Review Submission: After receiving an email triggered by the job’s reassignment, The RO manager reviews the request in a Survey123 step.
- Update Job Properties: The RO manager determines the type of ArcGIS Field Maps task to create using an Update Job Properties
- Request Status: The RO manager then approves or rejects the request with a Question If the request is approved, the job will proceed to the field portion. If the request is rejected, the customer will receive an email notification.
The process you see here may not quite reflect the exact field-to-office workflow you want to implement, and that’s alright – you have plenty of options. Workflow Manager’s available features provide many approaches you can take to the problem of data submission workflows. We encourage you to check out the documentation linked above as well as our other blogs and learning resources to learn more about how to apply these tools to your unique work.
3. Field Inspection
The next stage of our workflow will handle having a field crew complete the AED inspection. It includes the Create Field Maps Task step, but there are a few other components to set up as well. Here is what you will need before we get back to the workflow diagram:
- An ArcGIS Field Maps deployment where field crews can complete their work
- A task-enabled layer configured with your ArcGIS Field Maps deployment
- Required for ArcGIS Workflow Manager to control the progression of jobs using webhook dependencies:
- A webhook connection between your workflow item and your task-enabled layer
- Authorize Workflow Manager to automatically resume jobs as the assigned user when a dependency is released
If you’re new to ArcGIS Field Maps, this blog provides a helpful overview of the basic tools. It introduces you to the Field Maps Designer web app, where you will build the forms and tasks that your field crews will be using, as well as the Field Maps mobile app. Once you’re all-set with ArcGIS Field Maps, we can return to our workflow item.
Configure the Create Field Maps Task step
Once your task-enabled layer and webhook connection are prepared, you’re ready to complete the diagram. Once the task-enabled layer is added to the diagram as a data reference, we can configure the field inspection and wrap-up portion of the workflow.
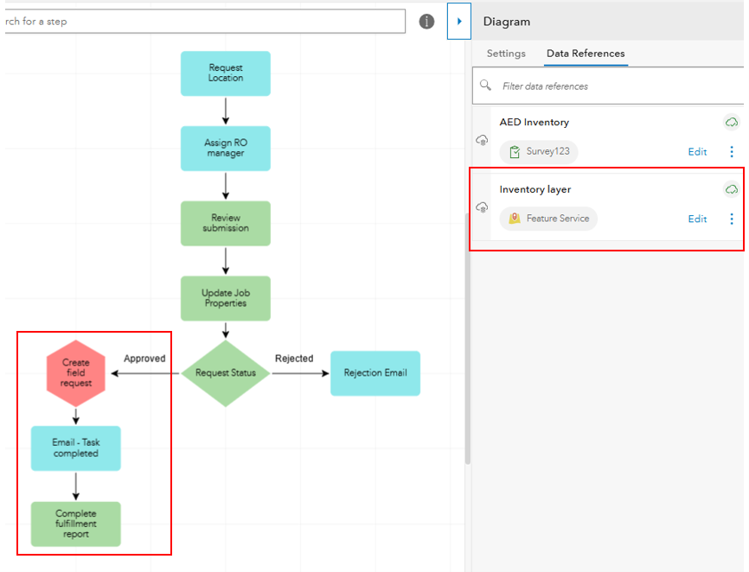
The Create Field Maps Task step is available in the Advanced section of the Step Library in the Workflow Manager web application. First, you can select the feature service containing your task-enabled layer under Feature Service, as long as you have already added it as a data reference. If not, you have another opportunity to add it while configuring the step details.
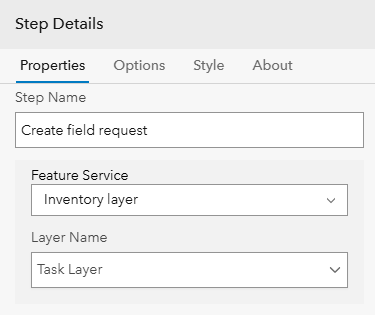
Next, choose the task-enabled layer where you want to create the task from the Layer Name drop-down menu.
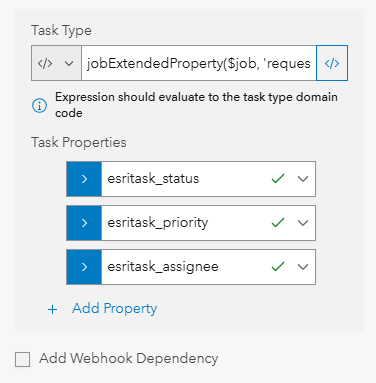
Now, we can configure our task properties which are initially set for your task when it is created. At a minimum, Task Type, Task Status, and Task Priority must be configured for the task to be created successfully but you can add more if required.
If you created a webhook connection to your task-enabled layer you will be able to configure your step to add webhook dependencies to the subsequent steps.
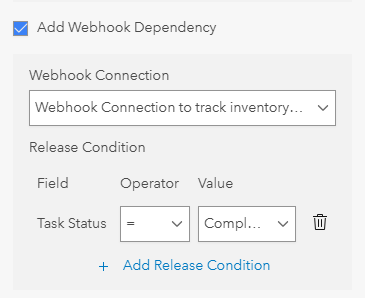
Choose a webhook connection from the Webhook Connection drop-down menu. Then, under Release Condition, define the criteria that the task must meet for the dependency to be released. In our case, we have configured the step to release the webhook dependency when the status of our inventory task is ‘Completed’. When we run the Create Field Maps Task step, this will be the sequence of events:
- The step will run and create an inventory task with the properties we have configured. Once the task is created, the Create Field Maps Task step will be completed, and the job will proceed to the subsequent Send Email step in our diagram. Workflow Manager will place a webhook dependency on the Send Email step until our release condition is met.
- The field crew will complete the inventory task and update the layer using the ArcGIS Field Maps app.
- When the field crew makes their update and marks their task status as ‘Completed’, our feature service will send a webhook payload to Workflow Manager that meets the release condition we have configured.
- When this happens, the webhook dependency on the Send Email step will be released. The appropriate members of our organization will be notified that the field work is complete, and we will be able to complete our report and close the job.
Conclusion
Using the Create Field Maps Task step, you can let Workflow Manager handle the coordination between your field crews and back-office work, avoiding common difficulties like miscommunication and complex tracking. The AED inspection we saw here is just one example of how you can leverage new and existing features to tie together end-to-end workflows involving field work. It highlights a set of tools you can use to ease the management of field work and boost your team’s productivity.



Article Discussion: