Geodatabases organize real-world features using a collection of tables, feature classes, and raster datasets. In addition, geodatabases allow you to extend these fundamental datasets to model spatial relationships, add behavior, and improve data integrity with the goal of facilitating simple and efficient display, editing, and analysis.
In this blog, you will investigate zoning and land use data for the City Of Vienna, Austria and learn how to use subtypes and domains to enforce data integrity while updating data. In this way, you can maintain attribute accuracy and consistency by reducing the likelihood of misspelling or providing incorrect attribute values resulting in coding inconsistencies.
Explore attribute fields
1. Go to the Explore Vienna data page in ArcGIS Online and choose Open in ArcGIS Pro.
The project is downloaded as a .ppkx file. Double-click the file to unpack the project and open ArcGIS Pro.
Note: You can separately download the project package then copy and move the file to a suitable location before unpacking and starting ArcGIS Pro.
2. In ArcGIS Pro, if prompted, sign in using your licensed ArcGIS account.
Note: If you don’t have ArcGIS Pro or an ArcGIS account, sign up for an ArcGIS free trial.
The ExploreVienna ArcGIS Pro project opens and displays a map named City of Vienna. The project contains zoning and land use layers for the city of Vienna, Austria.
3. In the Contents pane, right-click City Of Vienna and choose View Metadata.
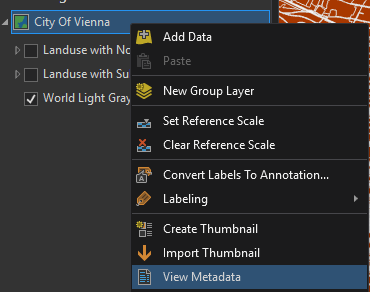
4. In the Catalog view, investigate the map’s metadata.
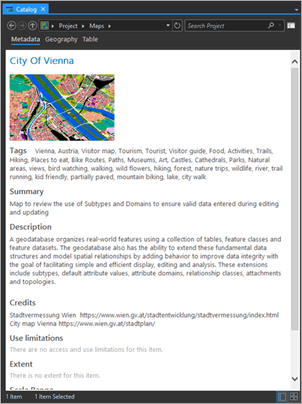
Notice the map description, describing the role of this map, and review the credits and the extent setting.
Learn more about adding metadata to a project.
5. Close the Catalog view.
6. In the Catalog pane, expand the Databases folder and click ExploreVienna.gdb.
7. Right-click Zoning and choose Add to Current Map
Note: The Zoning feature class has an alias name and will display as the Zoning No Attribute Validation layer in the map.
The Zoning features display with default generic symbology. Your symbology will differ.
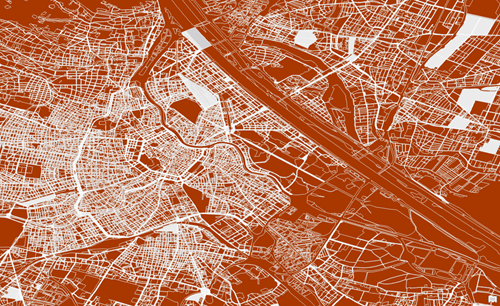
8. In the City of Vienna map, Contents pane, review the Zoning No Attribute Validation
Because this layer has no attribute validation, the layer displays using Single Symbol display.
9. In the Contents pane, right click the Zoning No Attribute Validation layer, and choose Attribute Table.

10. Optionally, move and dock the attribute table below the map.
Attribute information in a table is organized into rows and columns. In ArcGIS, rows are known as records and columns are referred to as fields.
11. Review the Zoning No Attribute Validation attribute table and note the field names.
Notice that the layer’s field names are generic and have no additional field properties defined. To make layer attributes useful, you can hide, highlight, and apply formatting as needed.
12.With the Zoning No Attribute Validation attribute table active, click the Data tab on the Features Layer ribbon.
13. On the Data tab, in the Design group, click Fields.
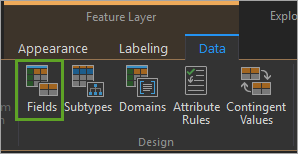
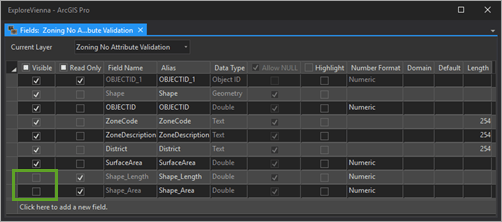
The Fields view displays a layer’s attribute fields and properties. From the Fields view you can create fields and delete or modify existing fields by navigating within the tabular view and typing or using clipboard functions.
14. In the Fields view, review the current field properties.
Notice that the Shape_Length and Shape_Area fields are visible and, as a result, are displayed when viewing the attribute table.
15. In the Fields view, uncheck Visible for the Shape_Length and Shape_Area.
16. On the Fields tab, in the Changes group, click Save.

17. Review the Zoning No Attribute Validation attribute table and note that the Shape_Length and Shape_Area no longer appear.
Note that updating a field property does not affect the source data in the geodatabase, this is a layer property and only affects what and how the layer displays in the map.
18. Close the Zoning No Attribute Validation attribute table and the Fields view.
19. In the Contents pane, turn off the Zoning No Attribute Validation layer.
Next let’s review the Zoning with Subtypes/Domains layer.
20. In the Catalog pane, expand the Databases folder and click ExploreVienna.gdb.
21.Right-click Zoning with Subtypes/Domains and choose Add to Current Map.
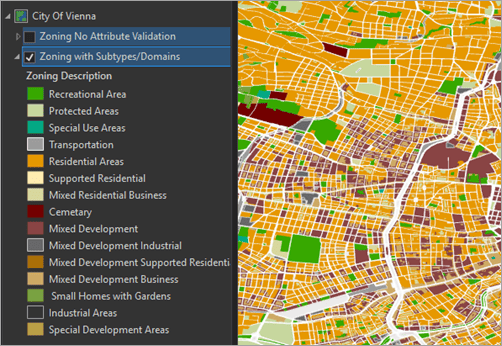
Notice that the layer is categorized and symbolized. The categorization is automatically applied when ArcGIS Pro detects that the layer contains a subtype field.
22.In the Contents pane, right-click the Zoning with Subtypes/Domains layer, and choose Attribute Table.
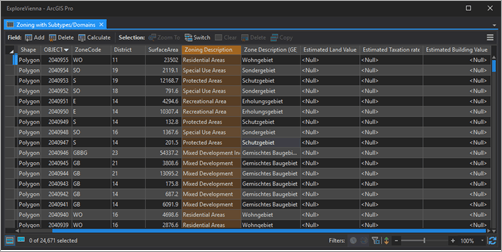
Notice that the field names are more descriptive and contain multiple words and spaces.
23. On the ribbon, in the Table group, click the View tab. In the Field group, click Aliases.

Notice how the field names switch from displaying aliases to displaying database field names.

24. Switch Aliases to observe the original and alias field names.
Aliases are a useful way to provide descriptive field name, without compromising database rules with regard to length and the use of spaces and special characters in a field name.

25. In the Zoning with Subtypes/Domains table, review the Zone Description field.
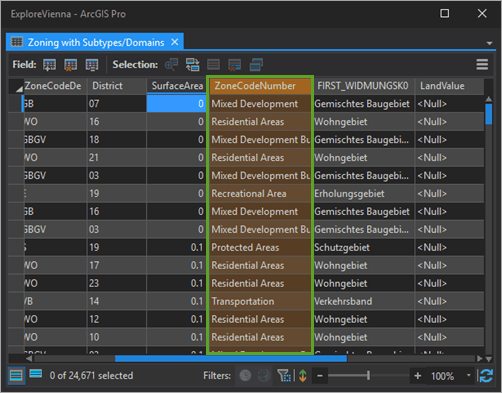
In this table, Zoning Description is the subtype field used to categorize features in the layer. A subtype may only be defined for one field in a feature class or table, and the field must be a short or long integer field.
26. In the Zoning with Subtypes/Domains table, click the More Options button to reveal table display options.
27. In table options, click Show domains and subtype descriptions to switch between displaying the subtype code and description.
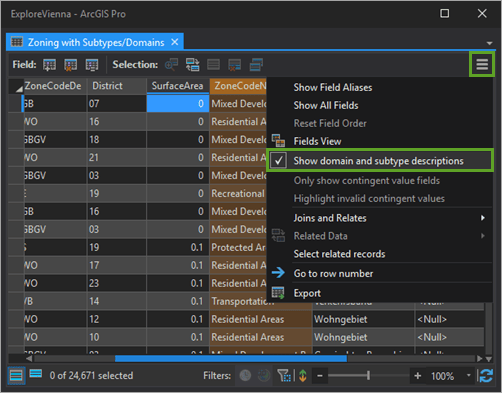
28. The Zoning with Subtypes/Domains table updates to reveal the subtype codes instead of the descriptions.
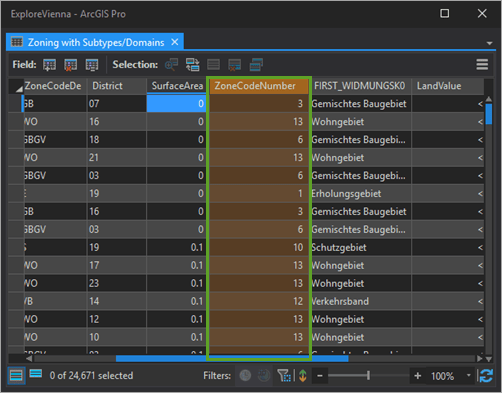
For efficiency, the subtype field stores an integer value for each feature and maintains an internal associated lookup table that stores the descriptions. In this manner the geodatabase does not maintain multiple copies of the same subtype description but uses a many-to-one relationship to associate a description to all features categorized in the same subtype.
29. In the table options menu, click Show domains and subtype descriptions to switch the subtype description back on.
30. With the Zoning with Subtypes/Domains attribute table active, click the Data tab on the Feature Layer ribbon.
31. On the ribbon, click the Data tab. In the Design group, click Fields.
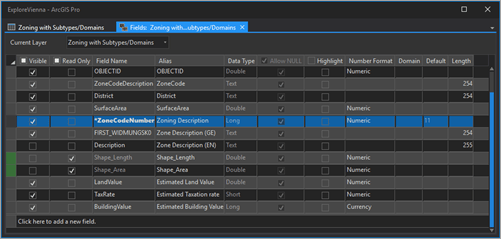
In the Fields view, you can identify the subtype field because its name is in bold and has an asterisk in front of the name.
Using the Fields view, you can apply the following:
-
- Visible to show or hide a field.
- Read Only to define whether a field is editable.
- Alias to apply an alternative name for a field.
- Highlight to accentuate the field when displayed.
- Number Format to change display formatting for numeric fields.
- Domain to apply a domain to a field.
- Default to set a default value to a field.
- Length to set the maximum number of characters allowed.
Next, review the Number Format column.
32. In the Fields view, for the BuildingValue attribute, click Number Format.
33. In the Number Format pane, click the Category menu.
From the drop-down, notice that there are several predefined formatting options. Applying formatting does not affect stored attribute values in the geodatabase; formatting is cosmetic and is a layer property. Therefore, if the layer, map, or project is saved and shared, the formatting associated with the layer is also saved and shared.
34. For Category, choose Currency.

35. In the Number Format pane, click OK to keep the Currency formatting for the BuildingValue field.
36. On the ribbon, on the Fields tab, in the Changes group, click Save.
37. Close the Fields
Next, you will review the subtypes applied to the Zoning with Subtypes/Domains layer.
Investigate geodatabase domains
Domains are similar to subtypes in that they enforce data integrity by providing a list of valid values to choose from while populating attribute fields. Unlike subtypes, domains do not categorize data, are not limited to a single field in the geodatabase, and are not specific to integer fields. You can apply a domain to most field types and implement a valid set of values for an attribute or a valid range of values for a numeric attribute.
1. On the ribbon, in the Feature Layer, click the Data tab, then in the Design group, click Domains.
ArcGIS Pro, domains are created and edited with their own tabular-style view called the Domains view. In the Domains view you can review existing domains, edit their properties and values, and create domains


2. In the Domains view, note the properties of the domains. Each domain consists of a name and description plus a field type to which the domain can be applied. In addition, the domain is identified as either a coded value or a range domain.
Attribute domains are a property of the geodatabase and can be shared across feature classes, tables, and subtypes in a geodatabase. They provide an effective way of enforcing data integrity by limiting what can be inserted into a field using the codes in a coded value domain or the minimum-maximum range in a range domain.
3. In the Domains view, if necessary, click the Accessed_Land_Value

The Accessed_Land_Value domain is an example of a coded value domain. The choice of assessed land values are restricted to four choices in this domain. Each choice consists of a numeric code and a textual description.
4. In the Domains view, if necessary, click the StructureValue domain.

The StructureValue domain is an example of a domain, where a value set for a field is checked against a minimum and maximum range and if the value is out of range, a warning is given to the user.
5. Investigate additional domains and close the Domains view when you are done.
Investigate subtype settings
Subtypes allow you to categorize a layer into groups of features that share the same attribute. Using the Subtype view, you can review the subtypes associated with layers, make edits to the properties of the subtypes, or create subtypes for a layer.
1. In the Contents pane, click the Zoning with Subtypes/Domains
2. On the ribbon, in the Feature Layer group, click the Data.
3. In the Design group, click Subtypes

In the Subtype view, notice that each subtype category has its own group of columns, allowing you to set a domain and a default value for each field per subtype.

In the Subtype view, you can separately apply default values and domains for each subtype. In other words, when you update a specific zoning type, the range of estimated building values may differ based on whether the zoning is residential or industrial.
4. Click the Domain cell for the LandValue
Notice that the drop-down allows you to add a new domain or select an existing domain to apply to this field. Choices are filtered based on the field type. In this case, only domains that may be associated with a double field are displayed.

5. Click the Default Value cell for the LandValue
Notice that you are constrained by the Accessed_Land_Value domain applied to the field and can only choose one of the domain codes to apply as a default value for the Landvalue field for the Recreational Area subtype.

6. On your own, investigate the domains and default values applied to additional subtype categories.
7. When you are done, close the Zoning with Subtypes/Domains attribute table and the Subtypes
Editing with subtypes and domains.
1. In the Contents pane, click the Zoning with Subtypes/Domains layer to select it for editing.
2. On the ribbon click the Edit
3. On the Edit tab in the Selection group, click Select.

4. In the map, choose a Zoning polygon.
5. On the Edit tab in the Selection group, click Attributes.
The Attributes pane appears, allowing you to update attribute field values for the selected Zoning polygon.
6. In the Attributes pane, click the ZoneCodeNumber This is the field with a subtype.

The field is highlighted in green indicating that you can update or change the current subtype.
7. From the drop-down list, select Mixed Residential Business subtype.

Notice how you are warned that you are about to update the subtype. You can also choose to update the default attribute values assigned to the new subtype.
8. In the Change Subtype pane, click Yes.
Notice how field values that have a default value applied are updated automatically, thereby improving editing efficiency and maintaining data integrity.

You can update attributes independently as needed and override the values set by the default. Lets override the default setting for Estimated land Value.
9. In the Attributes pane, click Estimated Land Value.
The drop-down list displays the land value options, as defined in the coded value domain applied to this field.

Optionally change the current value.
10. In the Attributes pane, click Estimated Building Value.
This field has a range domain applied and does not have a list of valid values for you to choose from.
In this case, you can type a value, and the range domain will compare the value with the minimum and maximum values set.
11. For Estimated Building Value, type 100000000 and press Enter.

In the Attributes pane, notice the red highlights applied to the field and the warning at the top of the pane. The warning clearly shows the minimum and maximum values associated with the domain applied to the field, indicating your new value is out-of-range.
12. In the Attributes pane, for the Estimated Building Value field, type 250000 and press Enter.
The warning is removed and the field will display a green indicator to show it is now valid.
13. In the Attributes pane, click Apply.
14. On the Edit tab, in the Manage Edits group, click Save.

15. On the Save Edits dialog box, click Yes.
16. Close the Attributes pane and save the project.
On your own
- Explore the attributes of the Landuse with No Subtypes layer.
- Explore the attributes of the Landuse with Subtypes Applied layer.
- Review the subtype applied to the Landuse with Subtypes Applied layer.
- If necessary, add fields to the Landuse with Subtypes Applied layer to support domains.
- Review the current Geodatabase domains, as these can be reused for mutiple fields in other feature classes.
- Apply domains to the Landuse with Subtypes Applied layer fields.
- Edit Landuse features.
Conclusion
Errors can sneak into any dataset, but once your feature count exceeds a few hundred, it becomes very difficult to manually sort through and ensure that you don’t have any typos or other errors. Sometimes multiple people will be editing the same feature class, increasing the opportunity for errors.
Assigning domains to attribute fields creates restrictions on the allowable values, so you can’t enter misspelled words, or numeric values outside a defined range. Domains help to ensure that your feature classes and tables remains consistent and accurate.
Subtypes can also apply restrictions on allowable attribute values, but only on one integer field per feature class. The true power of subtypes is their ability to classify or group your data and make it perform faster by storing information more efficiently as an integer instead or storing large numbers of the same descriptive strings.


Commenting is not enabled for this article.