Use the Pixel Editor to improve your imagery. You can replace clouds with clear imagery, and replace outdated areas of your image map with new updated imagery. A primary requirement for imagery updates is that the new image data is seamlessly integrated into your existing image map. The Pixel Editor can perform color matching and blending with the new imagery to reduce color differences and seamlines between the new imagery and the existing reference image map.
Note: It is important for the replacement imagery to have the same seasonality of the reference imagery. If your reference image was collected in the early spring during leaf-off conditions, a replacement image collected in the summer with vegetation in leaf-on conditions will not result in a seamless image.
Different lighting conditions and sensor view angles may make imagery look different, but can usually be compensated for to create a seamless reference image. You can explicitly apply color matching and blending for imagery that is difficult to assimilate seamlessly.
How to blend in
Of course you want your updated image map to be seamless, where new or replaced content does not stand out like a sore thumb. The Pixel Editor allows you to choose different ways to seamlessly integrate your new imagery, including color matching and blending on the region to minimize color differences and seamlines. The functionality to do this is found in the Capture group, using the Copy and Replace tools on the Pixel Editor tab.
Start a Pixel Editor session
- Open ArcGIS Pro and load both the reference image and the replacement imagery.
- In the Contents pane, highlight the reference image.
- Click the Imagery tab, then click the Pixel Editor button.
Replace the region of interest
- Zoom in to the reference image where you want to replace an area.
- On the Pixel Editor tab on the main ribbon, click the drop-down arrow below Region Mode, and choose New.
- Click the drop-down arrow below Region, and choose Polygon.
- Draw a polygon around the area to be replaced. I recommend that you digitize along linear features such as streets to help facilitate a seamless replacement.
- Click the drop-down arrow under Source Layer and select the layer containing the updated imagery.
- Click the drop-down arrow below Capture, and choose Replace.
- Click anywhere on the map display to accept the update.

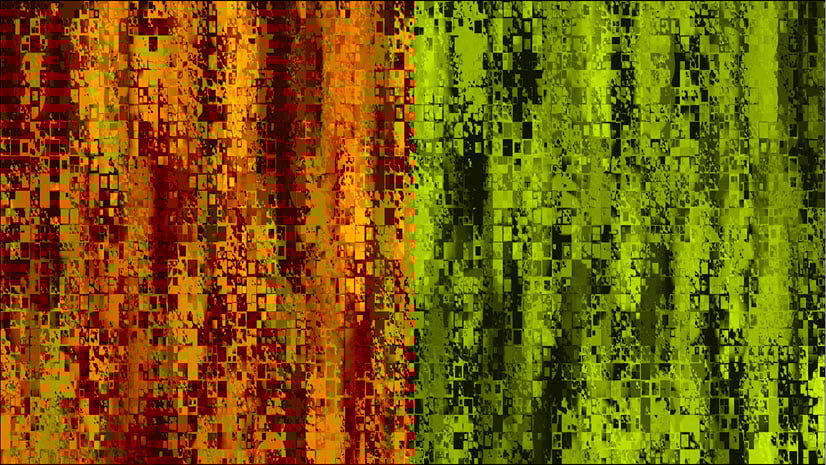
The replaced regions above did not employ any color matching. The image on the right used blending along the perimeter of the new region.
Perform color matching and blending
To fix the color differences, we need to employ color matching and edge blending.
Color matching refers to color adjustment of the whole region of interest, where the adjusted color is determined by either all the pixels in the region, or just using the pixels along the perimeter of the region. Blending refers to the color adjustment along the perimeter of the of the region, also called “feathering”.
The color matching and blending functionality is executed with the use of hotkeys, as summarized below:
| Color Matching | Blending | Hotkeys required |
| None | None | None |
| None | Blend | Spacebar |
| All pixels used | None | Shift |
| All pixels used | Blend | Shift + Spacebar |
| Perimeter pixels used | None | Shift + S |
| Perimeter pixels used | Blend | Shift + S + Spacebar |
These hotkeys are used together with the Copy and Replace tools.
Note: after adding the new imagery by clicking the Capture tools Replace or Copy, you apply the color matching and blend edits by holding the proper hotkeys while clicking anywhere in the map.
The types of color matching and edge blending are illustrated below.

The image above employed color matching using all the pixels in the region (keyboard SHIFT key while using the Capture tools).
The image below color matched the whole region using only the pixels values along the perimeter (keyboard SHIFT + S keys while using the Capture tools).

Furthermore, you can perform an color match and a blend at the same time using the keyboard SHIFT + S + SPACEBAR while using the Capture tools.

The Pixel Editor enables you to improve and update your imagery seamlessly. Color matching adjusts the appearance of your new imagery to match the appearance of your reference image. And gradual color blending along the edges of your reference and updated imagery helps ensure a smooth and continuous transition across your improved imagery.


Commenting is not enabled for this article.