A picture is worth a thousand words.
How often have we all heard that old adage? Cliché as it might be, it’s spot on. Ninety-nine times out of 100, photos can create a sense of place, personality, or emotion more clearly and quickly than the written word. That’s why we‘re so drawn to stories that include photography—the images powerfully confirm and expand upon what we discover in the text.
Plus, they give us a mental break. As we pause to admire a landscape or study a face, our brains have a moment to process the text we just went through, better enabling us to focus on the words we’ll read next.
I could go on for a while about the importance of working photos into your narratives, but if you’re reading this article, you likely don’t need much more convincing. So instead, let’s get to the main event—how you can best leverage photography to connect your readers to your message. Below I’ll go over why you should:
- Create context with establishing shots
- Incorporate a variety of shot types
- Use multiple perspectives
- Keep a consistent style
- Strike the right balance
Create context with establishing shots
Stories generally begin with some place or someone. Don’t leave your readers guessing about that subject, show it to them early on! An up-front visual will help establish a mental—and possibly emotional—connection that will entice your reader to keep going.
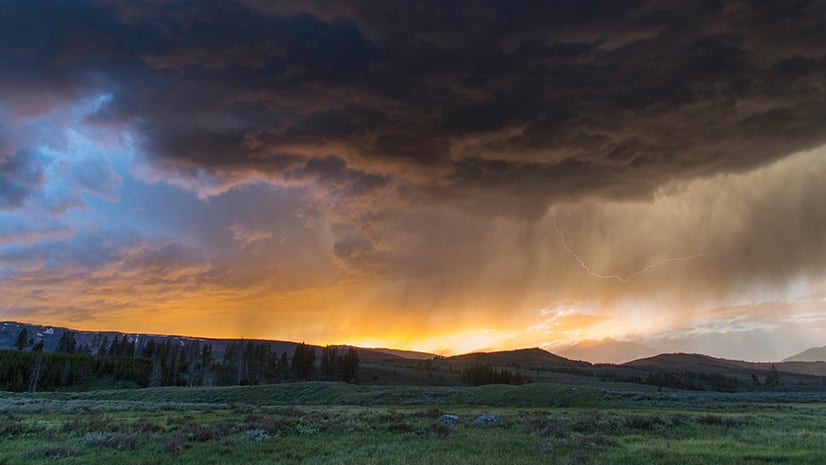
The trick with establishing images is that they need to situate your subject in its surrounding context. This is best accomplished with wide shots, or shots that reveal a lot of the setting. If you’re writing about a national park, don’t start with a close up of the wildflowers found there, show the sweeping landscape that awaits a would-be visitor. If you’re profiling a community organizer, show her out in the neighborhood she’s serving. These wide shots help readers set expectations about the subject. Without them, your audience may feel confused or unsure, and confusing your reader is the fastest way to lose them.

Incorporate a variety of shot types to round out your subject
Once you’ve established an overall sense of the subject, it’s time to start filling in the gaps. Establishing shots can do a lot, but they can’t convey the little details that make a person or place really come alive. You’ll want to build on them by adding tight and medium shots, too.
Tight shots are dialed in on very specific elements: those wildflowers I mentioned, the callouses on a farmer’s hands, the intricate beading on a handmade garment. They provide the textures and details that make a subject feel authentic. Medium shots settle in between establishing and tight images, helping focus a reader on the setting and subject, so the details feel at home within the broader context. These shots are more like your classic portraits, a photo showing just one corner of a room, or a surfer and her board filling the frame.

Think about how you might experience a diner for the first time. When you walk in, the first things you’ll notice are the atmosphere, whether it’s busy or empty, vibrant or dull. You’re taking in the establishing details. Next you might notice that the booths are designed to look like vintage cars, or that a red and blue checkered pattern persists across the floors, counter tops, and menus. These are medium-shot details. Finally, as you’re seated, you see some autographed photos with famous athletes on the wall, or that the car theme has been applied to the forks and knives, too. These are the details best communicated through tight shots. Now that you’ve taken them all in, you have a much better sense of what the place is about. The goal in digital storytelling is to give your readers this same experience through the photos you include.

Use multiple perspectives from the same scene
This goes hand-in-hand with the previous tip. We don’t experience the world through one fixed perspective; we move through it, seeing places, people, and events unfold before us from a variety of different angles. Let your readers have that same experience in your stories.
If you’re writing about a family and plan to include images of them in their living room, you could just show them all sitting on a couch in a single photo. Or you could go further, showing a combination of them talking on the couch, a ground-level shot of the toddler playing on the floor in front of them, a photo from behind the couch revealing what’s on TV. These images will work together to make that setting feel more real and relatable, which will keep your readers invested in the story.
There are a number of ways you can show related images together in the ArcGIS StoryMaps builder. You can use a slideshow for a laterally navigated set of photos, or feature your most important image in the media panel of a sidecar with the supporting images stacked in the accompanying narrative panel. There’s also the option of adding up to five images for a single location in the map tour block.
And then there is the recently added image gallery block, perhaps one of my all-time favorite additions to the story builder. With an image gallery you can bring together a number of photos in a single collage, choosing from a couple different layouts depending on the look you’re after. The finished gallery looks really polished, in my opinion. It’s a great way to include a cohesive set of related images that build on each other and make the subject come alive for your audience.

Keep a consistent style
A key part of effective storytelling with photography is having your images work together, so you’ll want them to look like they all belong to the same original body of work (even if they were taken on different days or by entirely different people). If you’ve included a very faded, vintage-looking photo in your story, and then a few paragraphs later you’ve added a bright, hyper-saturated one, odds are the contrast will be so jarring it will interrupt your readers’ flow. That’s something you want to avoid at all costs.
Instead, you want images to reflect a common visual style—similar tones, saturation, grain, sharpness, etc.—to strengthen the sense of familiarity you’re evoking within your readers. If you’re editing your own images, this can be as simple as applying presets, or pasting edit settings between photos and refining as needed. If you’re working with contracted photographers, you might want to hire individuals that have similar styles to make your job easier.
If you’re sourcing photos online, this part can get a little trickier, but it’s far from impossible (my colleagues and I have to do this all the time!). Just be choosy about the images you end up using. You may have found the most charming photo of a Parisian café, only to find it is far too warm and punchy compared to the more muted street scenes that will make up the bulk of your story’s images. There will definitely be spectacular photos that ultimately don’t mix with the larger body of work you’re building; while it may be emotionally challenging, you’ll be doing your story a favor to pass on them for that particular project.
Strike the right balance
I started this article by singing the praises of photography in digital stories, but there is such a thing as too much—too many images in a single section, too much of the same subject matter, too many floated or full-width images, or just too many photos for a single story. You need to be just as intentional with choosing your images, and how they’re displayed, as you are with the words you’re writing. And you need to be willing to dial it back in some instances.
While it’s important to give readers a chance to take a mental break by including photos, you don’t want to overdo it. Your audience needs to be able to get into the flow of your narrative, letting the unfolding details pull them along. If every single paragraph is followed by a photo, it will be near impossible for them to get into the groove they’ll need to make it to the end. Let your written ideas build momentum, then use photos to really drive the point home.
In the same vein, choose the size of your image blocks thoughtfully. Full-width images demand a lot of attention, so make sure they’re worth it for your readers. Is the image an epic establishing shot, or does it reflect a truly dramatic moment? That could be a great edge-to-edge image. Did you just finish making a critical point in your narrative, and want your reader to think on it for a moment? That’s another excellent time for a large photo. But in most other cases, you’ll be better served with a photo that’s set to the float, small, or medium sizes.

Again, it’s about supporting a reader’s flow, not getting in the way of it. I have yet to write a story where I’ve included every single photo I gathered as I was preparing to write it. While it may be tough for me to leave some on the cutting room floor, the stories always end up better for it.
Still have questions about telling stories with photos? Want to learn more about other multimedia storytelling techniques? Let me know with a comment below and I’ll answer as best I can!


Article Discussion: