ArcUser
Fall 2011 Edition
Use ArcGIS Online to Manage Your Own Custom Map Gallery
By Keith Mann, Esri
This article as a PDF.
Wouldn't it be great if you could create a dynamic gallery of maps and layers for your website and yet maintain all the geospatial content for it in a cloud-based geocontent management system?
Start customizing the template by changing the graphics and the web page title.
The following tutorial teaches you to do just that using a free map gallery template and ArcGIS Online. You'll learn how to customize the look of this gallery and, more important, how to connect it to your ArcGIS Online content so that you can dynamically manage the maps and layers that it contains. All it will take is making a few edits to some of the template files and copying and pasting a couple of files. No special skills are required.
Getting Started
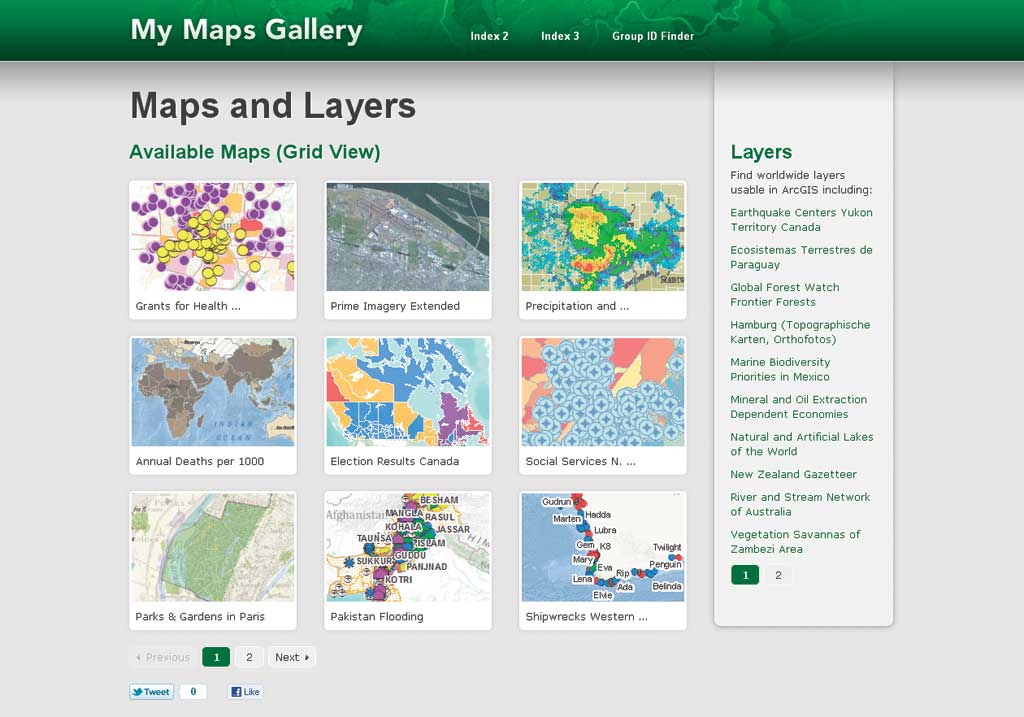
Before you begin, take a look at the gallery template by going to the Public Maps Gallery template description page on ArcGIS Online: esri.com/publicmapstemplate. Either click the thumbnail image or click the Open button and then click Open Application to launch the gallery template. The Public Maps Gallery is an all-in-one template that you can customize to match your personal style or your organization's branding. It has many features that make it easy to navigate and use.
To get started, download the gallery template and make sure it's working for you. Download the template archive for this tutorial. Extract the contents of the ZIP file to a new working folder (e.g., c:\gallery). This will create a subfolder named public-maps-gallery. Open the public-maps-gallery folder and test the gallery template by double-clicking the index.html file. This is the same gallery you looked at earlier, except this one is on your machine. Leave the browser window open.
Change the Gallery Banner
Use a simple text editor, such as Notepad++, to change the index.html and global.css files.
The first thing you'll do is make changes to the banner for this gallery. The title, Public Maps Gallery, is actually two images. To change it, you'll need new images. For this tutorial, two new images are provided in the download.
- Open public-maps-gallery and click index.html to open a local version of the template. Go to the public-maps-gallery\newgraphics folder and copy the home.gif and home.png files. Open the public-maps-gallery\graphics folder and paste the files in it. This will replace the existing files of the same name. To see the changes, refresh your browser by pressing the F5 key. Note: If you want to create your own custom title, you can edit the Photoshop file named home.psd provided in the resources folder, save the changed file as home.gif and home.png, and replace the home.gif and home.png files in the graphics folder.
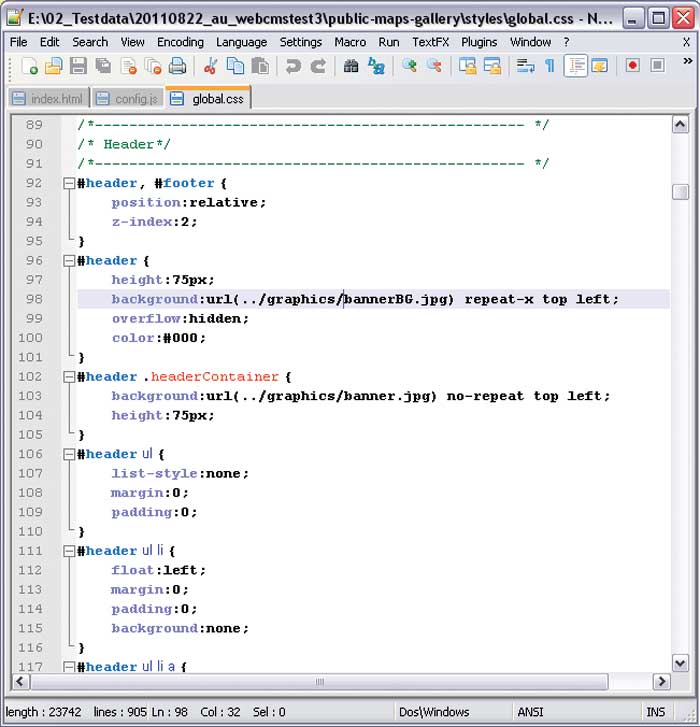
- Next, change the banner for the gallery by editing the global.css file and referencing two new banner graphics that are included with the download. Open the public-maps-gallery\styles\global.css file in a text editor (I like Notepad++ because it makes it easy to edit HTML and it's free). Search for the word Header. The global.css file will contain one reference for each graphic.
- Under that section, locate bannerBG.jpg and change bannerBG.jpg to newbannerBG.jpg. Next, locate banner.jpg and change banner.jpg to newbanner.jpg. The new graphics have been created for you and are already stored in the graphics folder. (Of course, you can create your own banner graphics. If you do, make sure to store them in the graphics folder.)
- Now search for the <title> tag and change the title for the page from Public Maps Gallery to My Maps Gallery.
- The Index 2 and Index 3 links in the banner point to different gallery types: a carousel-style gallery and a gallery for mobile apps, respectively. However, you won't need them for this tutorial, so open the public-maps-gallery/index.html file in the text editor, search for the word Header, and delete the two lines of code shown in Listing 1.
<li><a href="index2.html">Index 2</a></li>Listing 1: Lines to delete from index.html
<li><a href="index3.html">Index 3</a></li>
- Save your changes (and leave the text editor open). Refresh your browser. You can change other elements of the template by editing the files stored in the public-maps-gallery folder.
Create a New Group and Content Folder
You can add web maps you have already created, ones that have been created by others and shared on ArcGIS Online, or web maps you create in ArcGIS Online and save. Save maps to the Gallery Maps folder you created on My Content.
Next, you'll learn how to add your maps to the gallery using ArcGIS Online to manage your content. First, you need to create a new group and content folder in ArcGIS Online. Note: While creating new groups and folders isn't absolutely necessary, it is a good practice, especially if you plan to create more than one gallery.
- Go to ArcGIS Online and sign in. You will need an Esri Global Account. Create one if you don't already have one.
- Click Groups, create a new group, and give it a unique name such as Joe's Map Gallery. Fill out the metadata for the Details page. For now, use the text in Figure 1. You can always go back and edit it later. For Status, make sure Public is selected, but uncheck the box that allows the user to apply to join group.
Figure 1: Metadata for Details page of Gallery Maps groupItem Description Summary This is a group for my web maps. Description This is a group for my web maps. Tags web, map - Make sure you add an image next to the group name. The image must be in JPEG, PNG, or GIF format. Click Save.
- Now, click the My Content tab. Under the top folder (the one with your user name), create a new folder called Gallery Maps.
Adding Existing Maps to the Gallery
Once you have saved a map, share it with Everyone and with the <your name> Map Gallery you created.
Next, you'll prepare content for the web map portion of the gallery. If you already have web maps saved in your My Content items, you can check the box next to a map in My Content, click the Share button, and check the boxes to share it with Everyone and the Gallery Maps group that you just created. You can also search ArcGIS Online for web maps created by others and save them to the <your name> Maps Gallery group. Note: Because you are not the owner of those maps, you cannot edit the Details page.
Creating and Adding New Maps
Alternatively (or in addition), you can create new maps that you can manage with the <your name> Maps Gallery group.
- Click the Map tab or the Create Map button on the My Content page. If you want to change the default basemap, click the Basemap button and choose another map.
- Search for a layer to add to the basemap by entering a keyword (e.g., fire) in the Find box. You can search for layers on ArcGIS Online, the web, or a known GIS server. In this case, search ArcGIS Online.
- Before adding the layer to your map, click the map title in the list of results to invoke the map summary card. Click Item Details. The Details page diplays the metadata provided by the author. Pay particular attention to the Access and Use Constraints section to note any restrictions on using the map or required attributions.
- Under the thumbnail image of the map, click the Open button and click Open in ArcGIS.com Viewer. Now zoom in to a portion of the map so that the layer information you just added fills the map display.
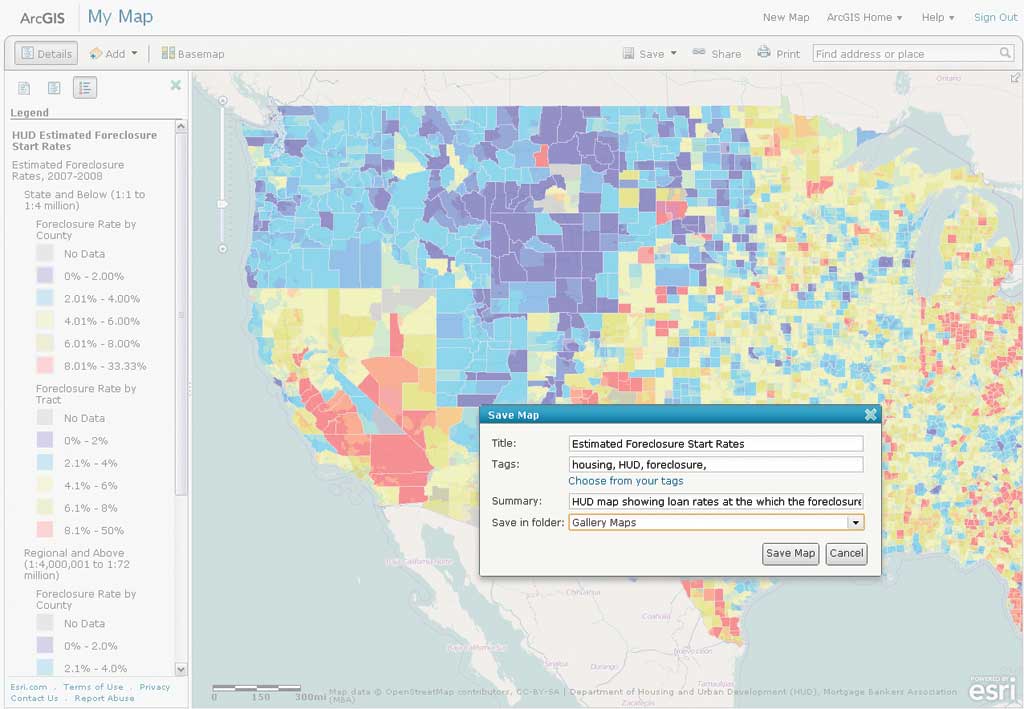
- Click the Save drop-down and click Save As. In the Save Map dialog box, enter a title, a few tags, and a brief summary.
- From the Save in drop-down, select Gallery Maps (the folder you created earlier). Click Save Map.
- Now click the ArcGIS Home drop-down and click My Content. Click the <your name> Maps Gallery group and click the title of the item you just saved. Notice that the thumbnail image is the map you composed before saving it. Clicking the Edit button will allow you to edit elements such as the title, summary, description, access and use constraints, and tags. Add a description if you want.
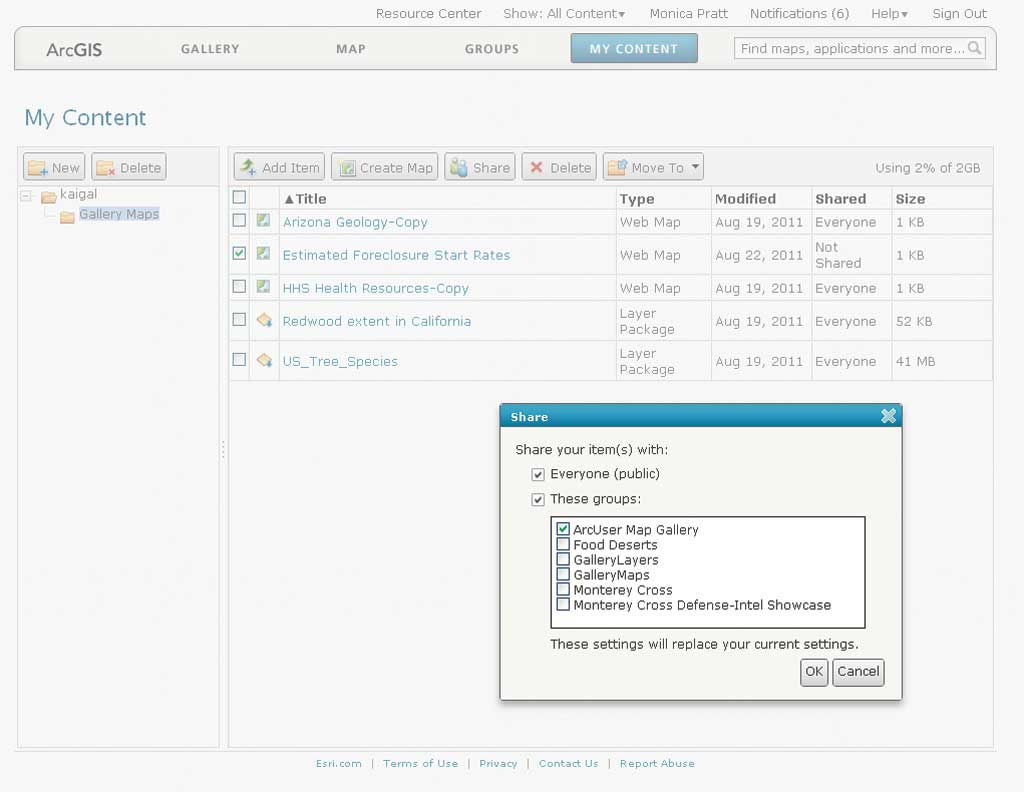
- Click the Share button and check the boxes for Everyone (public) and the <your name> Maps Gallery group. Click OK.
- Click the Groups tab and then click the <your name> Maps Gallery group in the list to verify that your map has been shared with this group. Leave this page open.
Syncing the Gallery with My Content
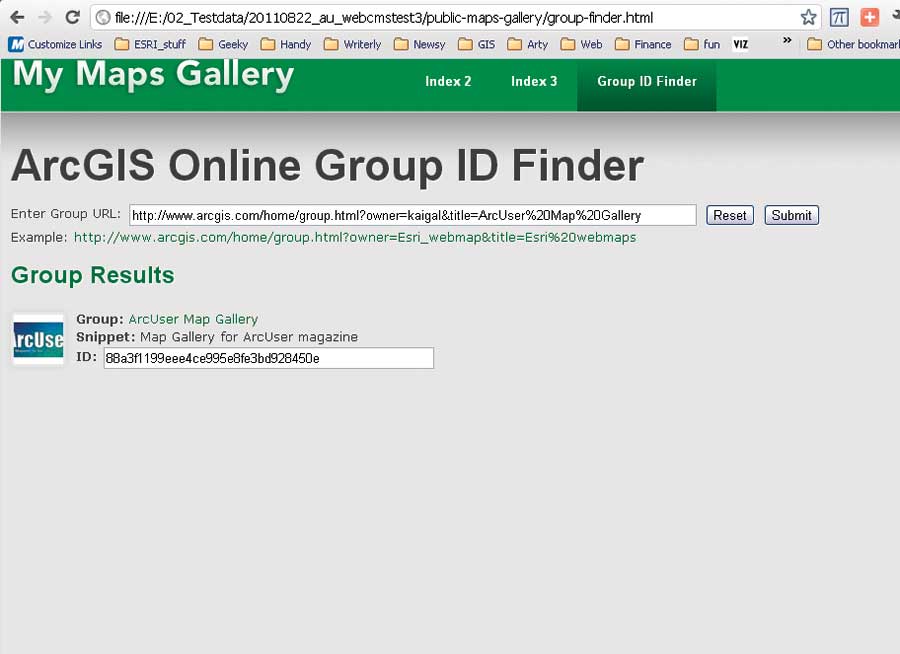
Use the utility in the template to find the Group ID and insert it as the mapsGroupID variable in the config.js file to sync your My Content maps with the <your name> Maps Gallery.
Now that you have at least one item in your group, you can sync the group with the gallery. To do this, you'll need to capture the group ID. This template includes a handy tool called Group ID Finder, located in the banner.
- In ArcGIS Online, make sure you're on the <your name> Maps Gallery group page, and copy the URL for that page.
- In the Public Maps Gallery (now called My Maps Gallery), click the Group ID Finder link, paste the group URL into the info box, and click Submit.
- Now copy the group ID that is returned. In the text editor, open the config.js file located in the public-maps-gallery\scripts folder. In the GLOBAL VARIABLES section, you'll see a variable named mapsGroupID. Highlight the group ID and paste the <your name> Maps Gallery group ID to replace it. Save your changes (leave the text editor open), return to the browser, and click the banner.
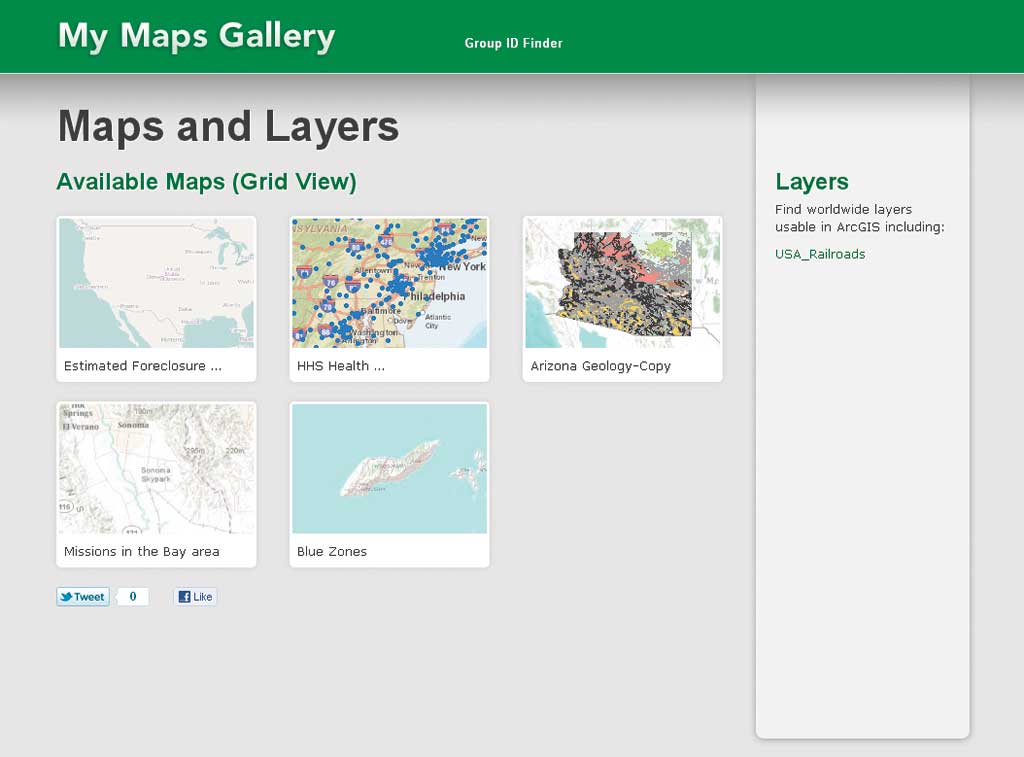
Only the maps you have in your group will show up in the gallery. Now that you've synced the gallery with the group, when you add web map items to the Gallery Maps folder and share those items with the <your name> Maps Gallery group, these new items will appear after you refresh your browser when your gallery is displayed. Because the template includes pagination, a new page will automatically be added to the gallery if you share more than nine web maps with the <your name> Maps Gallery group.
Adding Layer Packages to the Gallery
The right side of the gallery can display a list of layer packages, which are also pulled from an ArcGIS Online group. Unlike web maps, which can be opened and used within a browser, layer packages are downloaded and opened in ArcGIS for Desktop. In addition to layer packages you have, you can borrow layer packages, contributed to ArcGIS Online by other users, for your gallery.
Layer package links can also be added to the <your name> Maps Gallery and synced. Now whenever new maps or layer packages are added to My Content, they will automatically appear in the <your name> Maps Gallery.
You will use the same steps for adding web maps to your gallery to add layer package links to your gallery. You can save layer packages to the Gallery Maps folder or to another folder you create on your My Content page. Share these layers with the <your name> Maps Gallery group or with a new group. You can put web maps and layers in the <your name> Maps Gallery group because the template parses the web maps and layers and puts them in the right place in the gallery. If you store your layers in a new group (e.g., <your name> Layers Gallery), use the Group ID Finder tool and replace the group ID for the layersGroupID variable in the config.js file. [You'll need ArcGIS for Desktop to create your own layer packages.]
- Make sure you're signed in to ArcGIS Online, click the Gallery tab, and search for a topic (e.g., trees).
- Filter your search to limit results to map layers. Open the Details page for any layer you want to use and make sure the access and use constraints listed will allow its use.
- Click the Open button and click Download. Save the layer package to your computer.
- Now click the My Content tab, select the Gallery Maps folder, and click the Add Item button.
- In the Add Item dialog box, make sure On My Computer is selected. Click the Choose File button and navigate to the location where you downloaded the package, select it, and click Open.
- Enter a new title and tags for the item. It's a good idea to acknowledge the source of a borrowed layer. Click Add Item. Click the new item to open the Details page. Make any necessary edits. Click the Share button and share it with Everyone and the <your name> Maps Gallery group or your new Layers group. Click OK.
Syncing Layer Packages with the Gallery
- Click the Groups tab, open the Maps Gallery group that contains your layers, and again copy the URL for that page.
- On the My Maps Gallery page, click the Group ID Finder link, paste the group URL into the info box, and click Submit. Copy the group ID that is returned.
- In the text editor, open the config.js file located in the public-maps-gallery\scripts folder. In the GLOBAL VARIABLES section, you'll see a variable named layersGroupID. Highlight the group ID and paste the <your name> Maps Gallery group ID to replace it. Save your changes (leave the text editor open), return to the browser, and click the banner.
Now that you've synced the gallery with the group, or groups containing your content, just add and share items to this group, and any new items will show after refreshing the browser. To remove items from the gallery, simply stop sharing them. The template includes pagination, so a new page will automatically be added to the bottom of the gallery if your list of maps and layers exceeds the space available.
Deploying the Gallery
If you want to deploy your gallery so others can interact with it, just copy the public-maps-gallery folder to your web host. This may require assistance from your IT staff. Usually, this is done by using an FTP client to transfer the folder and its content to your remote web host. Once the files are transferred, your website is ready for viewing. No further customization is necessary for the gallery application to run. Just point a web browser to the index.html file at the location you copied the yourmaps files, and the application will work.
For more information, contact Keith Mann at kmann@esri.com.