When you look at the world around you, you don’t see it the same way that a camera does. Rather, you see it through the filter of your emotions. Often, I’ll take a photo of a flower and think it looked much more vibrant in real life. Or I’ll take a photo of some mountains and think they seemed a lot taller when I was there.
In art, colors and proportions are often exaggerated in ways that the viewer doesn’t notice. In making a less accurate depiction, the artist creates a more accurate impression. If the goal of your map is to express the feeling of a place, then you might want to act like an artist, and exaggerate a little.
I recently did some hiking along the Amargosa River at the very southern edge of Death Valley National Park. This is an intermittent river that only flows above ground after heavy rains, and it was a delight to see.

I was interested in mapping the entire course of the Amargosa, from its sources in Nellis Air Force Base in Nevada, to its terminus in Badwater Basin in California. In a place with so little water, this river has a real romance to it, so I wanted this map to express some more feeling than normal. A 3D perspective view seemed like just the thing.
Here’s how you can do it too.
In ArcGIS Pro, make a global scene and zoom to your area of interest. Switch the basemap to Terrain with Labels and pan the map to get a perspective view.

I’ve also added the river feature, which I extracted from the Living Atlas layer USA Rivers and Streams.
This view is not particularly exciting. When I was hiking I recall that the Panamint Mountains were far more impressive.
On the Contents pane, select Ground.

On the ribbon, on the Appearance tab, play with the Vertical Exaggeration control. I set mine to 5.

Now we have something more exciting:

Open the Catalog pane to the Portal tab. Under Living Atlas, search for elevation.

There are lots of useful things here, including multidirectional hillshades and aspect maps.
Drag the Terrain imagery layer onto your map. (You can also find it on ArcGIS Online)
This is elevation data for the entire world, so it takes some time to draw. Also, it is very dark, because the color ramp is stretched between elevation values covering the entire world.
The best way to deal with this is to export a raster that only covers your area of interest. (To map faster, export raster!) But first you need to define your area of interest.
On the ribbon, on the Insert tab, choose New Map. Defining an area of interest is easier to do in 2D than 3D.
Also on the Insert tab of the ribbon, choose Polygon Map Notes to add a new blank feature class to your map.

On the Edit tab of the ribbon you can launch the Create Features pane, and draw a polygon that covers the extent of your 3D scene. In order to catch all of the mountains in the distance, the polygon will probably have to be a lot larger than you think.

Add the polygon to your global scene, in the 2D Layers category of the Contents pane.
You can use a layout to make sure the polygon covers everything in your map area.
- Learn how to add a layout to your project.

Back on your scene, in the Contents pane, right-click Terrain, point to Data, and choose Export Raster.
For Clipping Geometry, choose Polygon Notes.
Under Cell Size, change X and Y to 1000 (or something similar, depending on your extent), otherwise you’ll get a warning that the file is too large.

Click Export and now you have a much more manageable elevation layer. Remove the original Terrain layer.
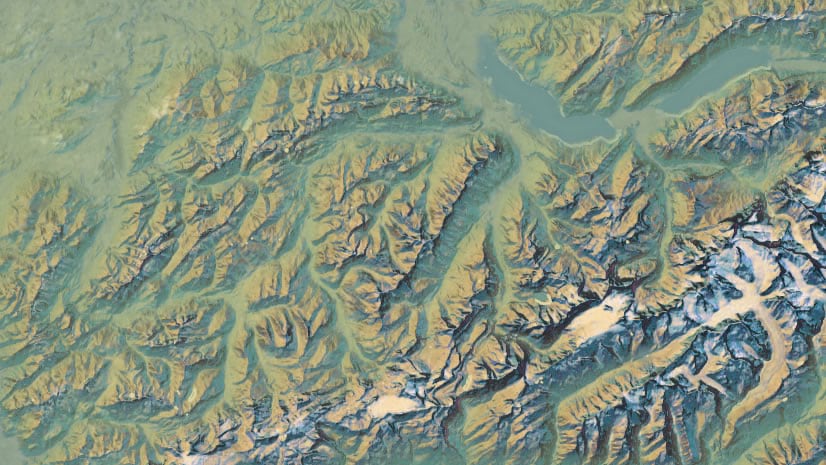
Now you can start experimenting with Format color scheme.

I ended up with something that looked like this:

It uses transparent colors so it does not hide the hillshaded terrain underneath. I chose these colors to try to mimic the sandy valleys, the pinkish glow of the barren hills, and the snow-capped peaks of the taller mountain ranges.

Pretty, right?
But don’t stop there!
Select Ground from the Contents pane again, and on the Appearance tab of the ribbon, check Shade Relative to Light Position.

Then you can open Map Properties for your scene (double click Map in the Contents pane), click on the Illumination tab, and specify the Date and Time for a more dramatic sun angle.


After this, it’s all play. Try adding layers like roads or lakes. Make sure to add them to the 2D Layers category of the Contents pane, so they are draped on top of the exaggerated surface.
You can also try adding aspect or multi-directional hillshade layers with more fancy color schemes to get just the right effect. For inspiration, ideas, or steal-able styles on this subject, check out this blog about Imhof-Like Topography.
I finished my map in Photoshop, making heavy use of the Cutout filter.


Commenting is not enabled for this article.