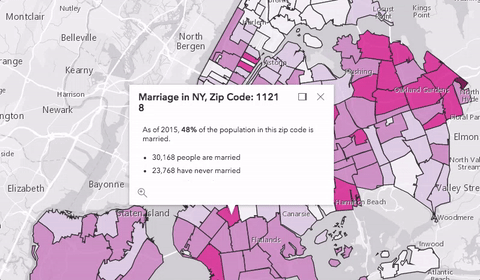
The 4.x series of the ArcGIS API for JavaScript introduced the concept of actions. An action is a task that can be triggered by a user by clicking its simple button interface. For example, clicking the magnifying glass button on the Popup widget triggers the zoom-in action.
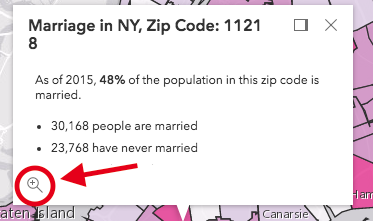
Actions provide a straightforward workflow for adding custom behavior to web apps and provide a simple UI for users to execute them. Developers can enhance their applications by allowing users to call custom functions through Actions. Actions are supported in both the LayerList or Popup widgets. By default the popup has a zoom-in action that allows users to zoom in to the selected feature.
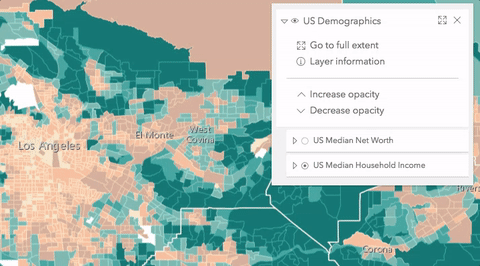
While the LayerList widget does not come equipped default actions, developers can add actions on a layer-by-layer basis. For example, you can provide an action that allows users to change the opacity of specific layers.
The following samples in the ArcGIS API for JavaScript documentation demonstrate how developers can create custom actions in these widgets:
- Define custom popup actions – adds an action to a popup that calculates the length of the selected feature and displays it in the popup.
- Custom popup actions per feature – adds an action to a popup that defines custom behavior for opening a new web page based on an attribute of the selected feature.
- Create a local scene – Adds an action to a popup that buffers the selected point and displays the number of features from another layer that intersect that buffer.
- LayerList widget with actions – adds multiple actions to a LayerList widget that allow the user to view service information for the given layer, zoom to the full extent of the layer, and change the opacity of the layer.
Adding actions to the LayerList widget
LayerList actions are associated with specific layers in the widget. The following sample provides another example of how LayerList actions can be used. Prior to creating this sample, I enriched a layer of municipal boundaries in Mexico with education and population attributes. I then added this layer to ArcGIS Online and copied it twelve times, assigning different renderers to each copy of the layer. Because I found these various visualizations interesting I decided to create an app that allows users to easily toggle these visualizations on the same layer without loading 12 separate layers of the same data and thus unnecessarily querying duplicate data.

To create this “renderer list” functionality, I added the LayerList widget to the sample, saved all twelve renderers to an object after loading the web map and removed all layers except for one before adding the map to the view. I then created a separate action for each renderer in the LayerList widget that allows the user to toggle the visualization of the single layer.
Create actions in two easy steps
You can create custom actions in two easy steps: 1.) configuring the title and icon/image to click, and 2.) Defining the custom behavior with function(s) executed in the trigger-action event listener. The Popup and LayerList widgets both require these steps.
1. Configure the title and icon/image
While the overall principles are the same, setting up actions in the LayerList widget are slightly different from doing so in a Popup or PopupTemplate. In LayerList, actions are created via a function you must pass to the createActionsFunction property. In the sample above where 12 actions are added to the LayerList, I pass the following function to create these actions:
function createLayerListActions(evt){
  if(evt.item.title = map.portalItem.title){
    return [ rendererInfos.map(function(rendererInfo){
      return {
        title: rendererInfo.title,
        className: "esri-icon-maps",
        id: "change-renderer"
      };
    }) ];
  }
}
This function has an event parameter evt that contains select properties related to the layer, such as the layer’s title. Since these actions only pertain to the layer kept from the web map, we only want the logic of the function to apply to that layer.
Once we verify the proper layer is referenced, we’ll return a two-dimensional array of action objects. In this case, we want one action for each rendererInfo object. So I call map on the collection of rendererInfos to return an action object for each renderer. The title of each action uniquely pertains to a corresponding renderer. The className and id properties assign the same icon and ids to each action so we know they refer to changing the layer’s renderer.
Why a two-dimensional array?
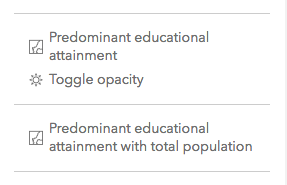
The array of action objects is two-dimensional to allow actions to be organized into groups. I modified this sample and added a toggle-opacity action associated with only the renderers that had an opacity visual variable to demonstrate how to set up this grouping. This allows the user to better understand regions where color may be washed out because of opacity.
In the UI, the actions are divided by breaking lines, which pair the
toggle-opacityaction with pertinentchange-rendereractions.
The modified
createLayerListActionsfunction now checks if the renderer contains a visual variable. If it does, then it is pushed as a separate element in the actions array.function createLayerListActions(evt){ if(evt.item.title = map.portalItem.title){ return rendererInfos.map(function(rendererInfo){ var actions = []; actions.push({ title: rendererInfo.title, className: "esri-icon-maps", id: "change-renderer", rendererTitle: rendererInfo.title }); var renderer = rendererInfo.renderer; var hasOpacityVV = renderer && renderer.visualVariables.some(function(variable){ return variable.type === "opacity"; }); if (hasOpacityVV){ actions.push({ title: "Toggle opacity", className: "esri-icon-environment-settings", id: "toggle-opacity", rendererTitle: rendererInfo.title }); } return actions; }); } }
2. Define the custom behavior
The next step is to define the custom behavior to execute when the trigger-action event fires. In this case, I wrote a function called toggleRenderer() that will fire each time an action is clicked.
function toggleRenderer(evt){
  if(evt.action.id === "change-renderer"){
    var matchingInfo = rendererInfos.find(function(info){
      return info.title === evt.action.title;
    });
    var renderer = matchingInfo.renderer.clone();
    var layer = view.map.layers.getItemAt(0);
    layer.renderer = renderer;
  }
}
That function is then set as the callback to the trigger-action event on the widget.
layerList.on("trigger-action", toggleRenderer);
Fundamentally, the logic is straightforward. First, we check to see if the action id matches the change-renderer id I assigned to each action. Then we find the renderer info that matches the title of the action that was clicked. The renderer associated with that info object is then applied to the layer.
Now we have a simple app that allows users to choose from multiple renderers and apply them to a single layer.
Conclusion
Actions provide a straightforward workflow for applying custom behavior to an app within a simple UI. This behavior can either be simple or more complex to provide users with a richer experience to explore and analyze geospatial data in web apps. So try it out! Be creative. Define your own actions and explore how you can apply them in your own apps.

Commenting is not enabled for this article.