Wouldn’t it be great to setup a script you created with the ArcGIS API for Python to run on a scheduled basis, or create webhooks that could monitor activity in your Enterprise organization, all without the additional resources and overhead that is needed in managing a server? That is where server-less computing enters the picture. Many cloud vendors provide the ability to run code without having to provision, administer, or maintain any infrastructure, whether it’s through Google Cloud Functions, AWS Lambda, or Azure Functions. Essentially, organizations can allow their developers to focus on building scripts and let the cloud vendors deploy, host, and scale the code for a fraction of the cost compared to standing up traditional servers.
This blog post will walk you through two solutions using Azure Functions with Visual Studio Code and provide some other tips and tricks along the way. The sample code used in this post can be found on GitHub.
- The first function will utilize the Timer Trigger to (1) ingest hazard feeds – fires, earthquakes, hurricanes etc – (2) determine if a particular building meets any specific distance criteria, and (3) add to or update a hosted feature service if said building meets the criteria every five minutes using the ArcGIS API for Python.
- The second function will utilize the HTTP Trigger to send an email notification when a response is submitted in Survey123.
Timer Trigger
A Timer Trigger lets you run functions (i.e. your code) on a schedule, like Task Scheduler on a traditional Windows server. Of course, the setup process for a Timer Trigger is very different compared to Task Scheduler.
- Once VS Code and the appropriate extensions are installed, you should see a new Azure icon in the Activity bar. Select this icon and sign into your Azure account in the Azure: Functions area.

2. In the same area, select Create Function. You will be prompted to create a new project. In the series of prompts that follow, be sure to select a folder location, Python interpreter, as well as Timer Trigger as your project’s first template. Next, provide a name for the trigger and the timer’s schedule as a cron expression (the default is every five minutes).

3. VS Code will automatically generate the required files including a template for your code. We will only be focusing on three files in particular.

- __init__.py is where the function code is placed. The hazard alert script will be copied in this location under the main function.
- local.settings.json is essentially an application configuration file. This is where you will place credentials for authentication to ArcGIS Online (the values are being referenced via
os.environ[‘key’]in the function code). It is only important for testing your script locally before publishing to Azure. - requirements.txt is used to specify the list of packages your script requires in order to run successfully. In order to use the ArcGIS API for Python, all you must do is enter the word
arcgis.

4. After you have edited the appropriate files, it is best to test the script locally before publishing. You can follow Microsoft’s documentation to get the function running locally.

5. It is now time to publish your function to Azure. Select Deploy to Function App and follow the prompts to create the function and any other resources in your Azure account.

6. Once the resources have been created in your Azure account, we need to add authentication credentials for ArcGIS Online to the application configuration settings under the App Service in Azure.
- Go to the Resource Group that was created and select your App Service
- On the left-hand side under Settings, select Configuration
- We will add three new application settings (key/value pairs) for our organization, username, and password following the same pattern as we did locally.
- Click Save (this will restart your service)
 added to the function in Azure.")
7. Verify the service is working
- On the left-hand side of your selected App Service, navigate to Log stream under Monitoring. This is where you can view the logs as the service is running.

HTTP Trigger
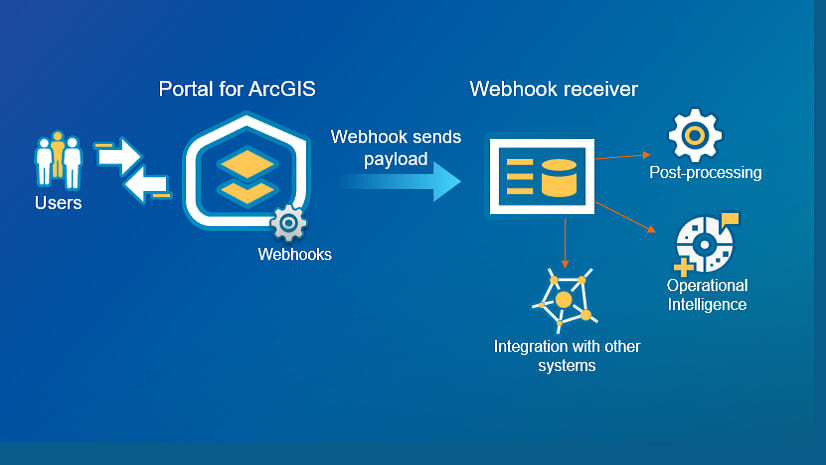
An HTTP Trigger allows you to respond to webhooks that are triggered via an HTTP request. Webhooks are incredibly valuable as they allow you to automate event-driven workflows, particularly in ArcGIS Enterprise and Survey123.
1. In VS Code, select Create Function, and proceed through all the steps as you did for the Timer Trigger, except select HTTP Trigger as your project’s template. VS Code will automatically generate the required files including a template for your code. Again, we will only focus on the same three files as we did above.
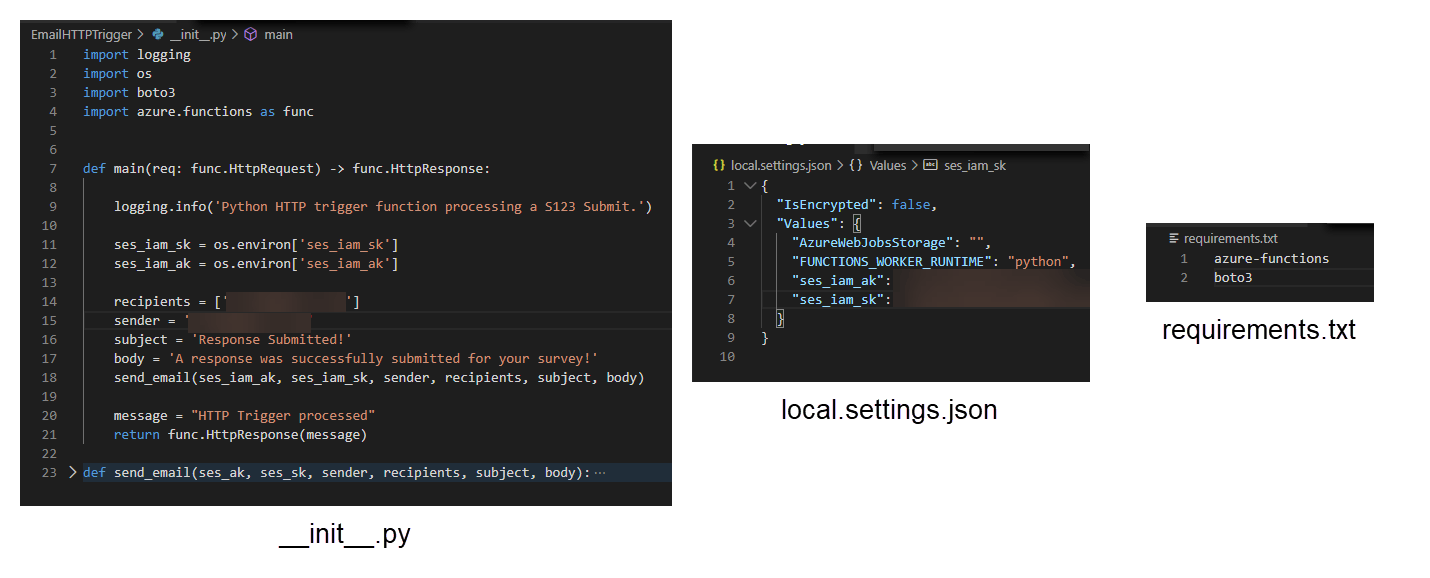
- __init__.py is where the email script will be copied under the main function.
- local.settings.json is where you will store credentials for the email script.
- requirements.txt is where the boto3 library will be called.
2. Next, let’s simulate the test locally following the same steps as above, except this time you will see a URL endpoint of your HTTP trigger in the Terminal. Navigate to the URL provided in the console to execute a GET request.


3. If everything is successful, select Deploy to Function App and follow the prompts to create the function in your Azure account.
4. After the service has been deployed, navigate to the application configuration for the service and add our authentication credentials.
 added to the function in Azure.")
5. Next, we must add the Survey123 website as an allowed origin for our service. This will ensure that only requests coming from https://survey123.arcgis.com will initiate the callback. In the left-hand side of the app service, select CORS under API and add the URL.

6. The last step in the process is to configure the webhook for your published survey.
- In Azure, navigate to the Function tab under the Functions section for your service and select your function. You should be routed to an overview page for the selected function. On this page, select Get Function URL and copy the URL to your clipboard.

- Navigate to the Survey123 website and login.
- Select your published survey, go to the Settings tab, and select Add Webhook.
- Provide a Name for the webhook and paste the URL you copied into the Payload URL.
- Select Save.

7. If everything was successfully configured, you should now receive an email notification when a survey is completed! You can also verify the trigger was successful by viewing the Log stream, like we did above for the Timer Trigger.


Conclusion
This blog post walked you through two different examples of how to integrate components of the ArcGIS platform with Azure Functions to enhance established workflows. We created and published a Timer Trigger to schedule a script written with the ArcGIS API for Python at specific time intervals. Afterwards we created a webhook using an HTTP Trigger to send us email notifications from Survey123. As you can see, server-less computing opens a world of endless possibilities to explore.

Can you help us understand what are the variables ‘ses_iam_sk’ and ‘ses_iam_ak’ in your script? Are these the username and password for the email? I am guessing these to be simple email service access key and secret key from AWS? Wondering how we can use them in Azure platform. Thank you
Hey Rohit, that is correct. Those are the SES access and secret keys from AWS. Azure does not provide a SES and requires third-party solutions, like Twilio’s SendGrid: https://docs.microsoft.com/en-us/azure/architecture/aws-professional/messaging.
@Taylor Teske This is very helpful – thank you so much for posting this. Any chance we can find a repository for your sample code used in this article? That would help out beginners like myself greatly.
Hey Ahjung, I don’t have anything in GitHub currently, but that is certainly a great idea! When I get some time, I’ll try to get something in GitHub. The first example was developed from a script for a customer, so I may need to modify it a bit.
Hey Ahjung, the following repo includes the sample code: https://github.com/tatornator12/Azure-Functions-ArcGIS-Examples. As mentioned, I had to remove most of the Timer Trigger code.
Hi Taylor. Is it possible to get the payload coming from the Survey123 entry? I would like to access the information being submitted in the form within my python Azure Function.
Thanks, Julian
i can’t seem to post a link here in the comments but if you are having issues publishing see community.esri.com and search for suddenly can’t build and deploy python azure