In the April 2021 release of ArcGIS Online, we’ve added the ability to create snapshots of your ArcGIS Notebooks. Snapshots are point-in-time copies of your notebooks that you can easily revert back to at any time. Being able to restore your notebooks at any point in which you saved a snapshot of them can help you save time, stay organized, and prevent against data loss. Here are some examples of use cases for snapshots:
- You may want to save your work at different phases or milestones of a project, especially in a large or complex notebook.
- You may want to save your work after executing a lengthy process, such as training/saving a deep learning model, so that you don’t have to retrain the model again prior to using it for inferencing or making predictions.
- You may want to save your progress prior to running a risky procedure or experiment which may alter your input data. We as data scientists love to experiment, prototype, and try different things out, and the data science notebook experience is designed to facilitate this type of on-the-fly interaction. We can use snapshots to ensure that we can always come back to a clean version of our data and code.
Jupyter Notebooks: “Autosave” vs. “Checkpoint”
If you are a Jupyter Notebook user, you may be familiar with the terms “Autosave” or “Checkpoint”. When you create a new Jupyter Notebook, it creates an initial .ipynb file and a hidden subdirectory named .ipynb_checkpoints, which also contains the checkpoint.ipynb file in your save location. Think of the initial .ipynb file as the notebook you are working in, and the checkpoint.ipynb file as the one you can revert back to if needed.


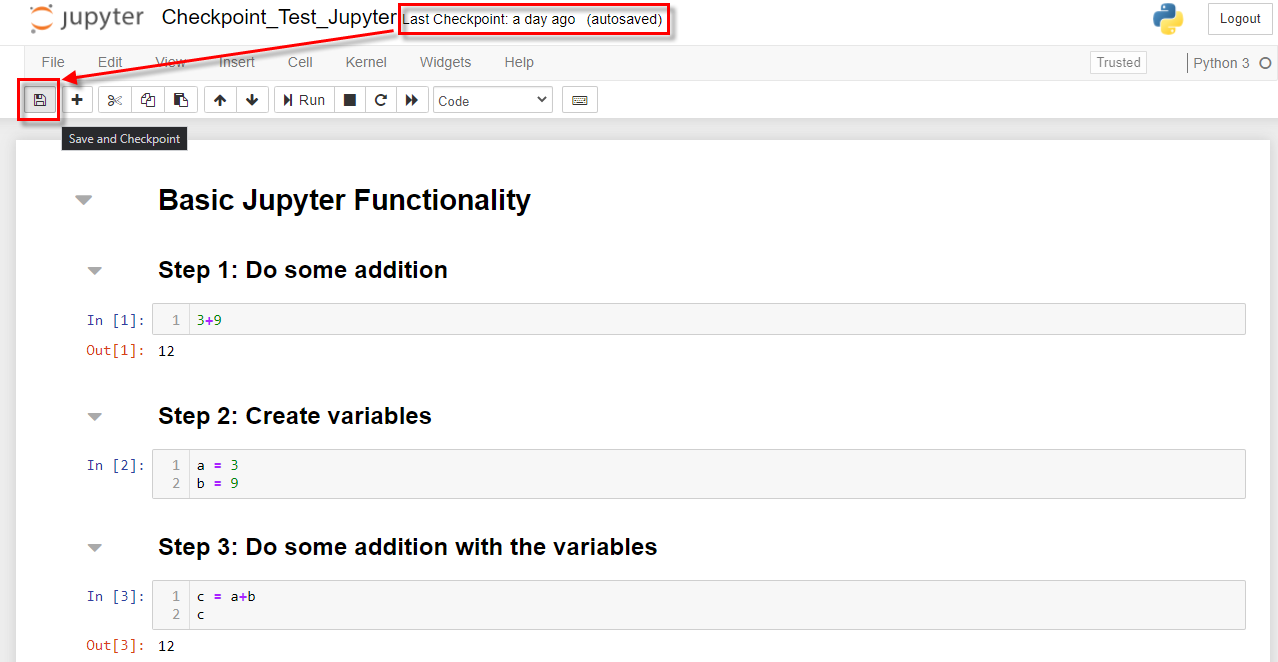
By default, all Jupyter Notebooks autosave every 120 seconds (2 minutes), which means that you can close the notebook without manually saving it, and you won’t lose any work. This autosave functionality saves only the initial .ipynb file, not the checkpoint file. If you want to update the checkpoint.ipynb file, you have to manually save your progress using the Save and Checkpoint button on the toolbar.
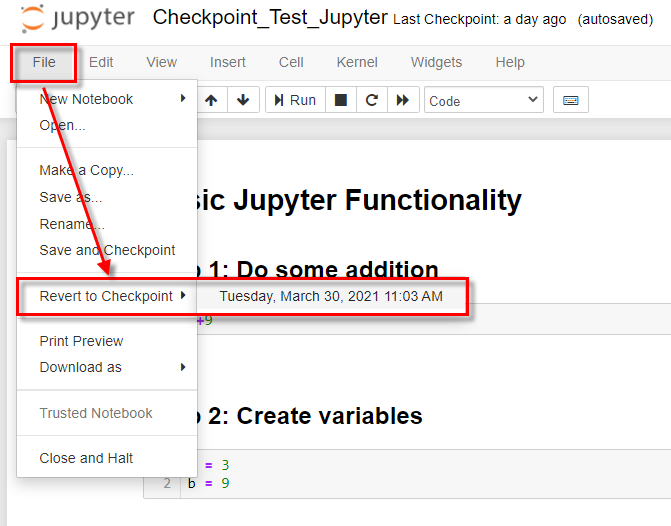
Let’s say that you’ve reached a good stopping point in your Jupyter Notebook, and chose to manually save it to update the checkpoint.ipynb file. You’ve then gone back into the notebook, edited some of your code, wrote some more code, executed it, and realized that your recent edits have changed your input data or broken your notebook. Not to worry! Simply click the File dropdown, and choose Revert to Checkpoint to go back to the state of the notebook at your most recent stopping point.
Each time you manually save your notebook to update the checkpoint .ipynb file, the previous checkpoint is overwritten. To keep multiple checkpoints of your notebook, go to the .ipynb_checkpoints subdirectory, and rename the existing “xxxx-checkpoint.ipynb” file to something like “xxxx-checkpoint_1.ipynb”. The next time you save the Notebook, the “xxxx-checkpoint.ipynb” will be the new checkpoint, and the “xxxx-checkpoint_1.ipynb” will point back to the previous checkpoint. If you want to restore “xxxx-checkpoint_1.ipynb” using the Revert to Checkpoint option, you have to rename it back to “xxxx-checkpoint.ipynb”.
Bottom line, it is possible to preserve multiple versions of your Jupyter Notebooks via checkpoints, but the process involves a lot of manual renaming and reorganization of files. Here is where the new ArcGIS Notebook snapshots might make your life a little easier…
ArcGIS Notebooks: “Snapshots”
The end-result of using an ArcGIS Notebook snapshot is the same as reverting back to a manually saved Jupyter Notebook checkpoint—you get a point-in-time version of your notebook. The main difference between using the Jupyter Notebook checkpoints and ArcGIS Notebook snapshots is that you can have multiple different snapshots for a single notebook, and you don’t have to go through the manual process of renaming different checkpoint.ipynb files. Each snapshot of a notebook is a full copy of the notebook file JSON, and is preserved as a resource file on the notebook item.
To create and manage snapshots in a notebook, you need to be a Creator or GIS Professional user type in your ArcGIS Online organization, and you need to have either an Administrator role or a custom role in which you’ve been granted privileges to create and edit Notebooks.
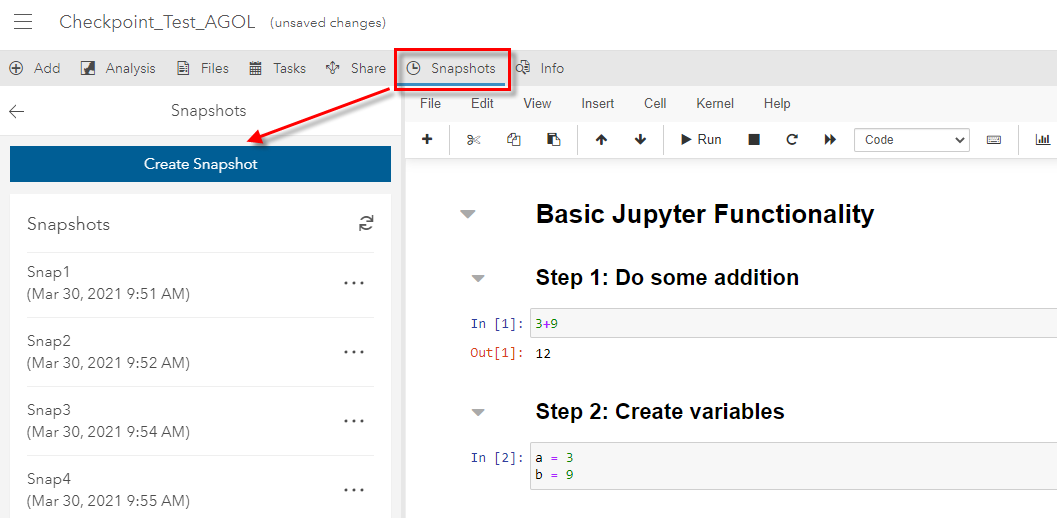
When you’ve reached a point when you are ready to take a snapshot of your notebook, you click Snapshots on the top ribbon of the notebook editor.
Note: If you’ve created a new notebook, you will only see Snapshots on the top ribbon after you’ve saved the notebook.
You can see that I already have several snapshots associated with this notebook, each pointing to a different phase of my work. A single notebook can have up to five snapshots associated with it.
Clicking the Options button (ellipsis) next to a snapshot allows you to restore the notebook to the state at which the snapshot was created, delete the snapshot, or download the snapshot as an .ipynb file for offline use.
Let’s see how we can restore the notebook to different versions, then add some code and create a new snapshot.
Join the GeoNet Community
Whether you want to talk about notebook snapshots, or ArcGIS Notebooks in Online, Enterprise, or Pro in general join the ArcGIS Notebooks community . Ask questions, share ideas, and get help from your fellow notebook users. You can also visit the ArcGIS Notebooks product page for product level information and quick links to resources.

In ArcGIS Pro how can you save a Python Notebook as an IPYNB file?
Hi Tom- thanks for the question below. When you create a Python Notebook in ArcGIS Pro, you are actually creating an IPYNB file, so you can simply save it from the Notebook tab. You can then use this notebook as a stand-alone Jupyter Notebook outside of Pro if you wish.