Detecting objects in a map or scene just got easier! ArcGIS Pro 2.7 contains new functionality to detect objects by analyzing data in your map via the newest member of the exploratory analysis tool family — Interactive Object Detection.
Data acquisition is a common obstacle for many GIS tasks. You don’t always have the feature classes you need. The Interactive Object Detection tool helps provide data by finding and extracting objects of interest — such as windows and doors —from data, like 3D objects, imagery, and even integrated mesh scene layers that are already displayed in the view by using object detection techniques. The detected objects are saved as point features that can then be used as inputs for other analysis tools.
This Interactive Object Detection tool is different than other exploratory analysis tools in that it uses a trained deep learning model. Don’t let the phrase deep learning scare you! I was unfamiliar with it at first too, but after learning the terminology and practicing with the tool, I was totally wowed.
For the rest of this blog, I’ll walk you through the basics of the Interactive Object Detection tool, showing you how to extract windows and doors from building layers using a pre-trained model. Soon, you’ll be finding more models and detecting more objects like a pro.
Before you get started, you need to install the Deep Learning libraries and have an Advanced license level.
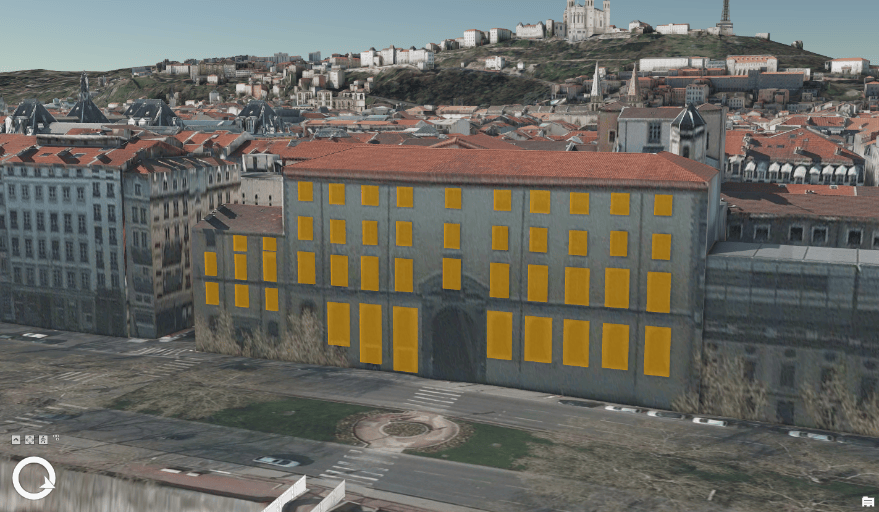
To use the tool, open a 3D scene with layers for textured buildings in ArcGIS Pro 2.7. I found the “Tourism in Lyon” web scene from ArcGIS Living Atlas of the World works well. In ArcGIS Pro, click the Analysis tab and expand the Exploratory 3D Analysis gallery and choose Object Detection to open the Exploratory Analysis pane for the tool.
Set-up overview
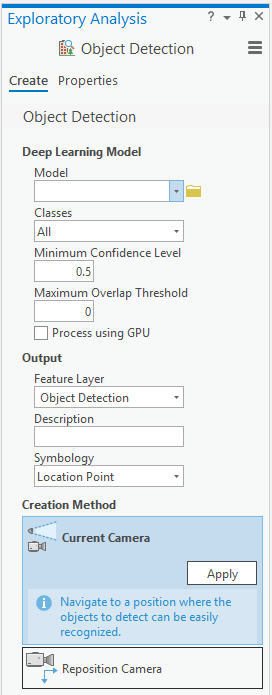
There are two categories of parameters to set: one for how the model behaves, the other for the output feature layer. To define the model, click the Model drop-down and click Download to automatically get the Esri provided pre-trained model for windows and doors. Select Windows from the Classes drop-down and define the other model parameters as you see fit. I kept the defaults.
For the output feature layer, provide a name, an optional description to be included in the attribute table, and choose the returned shape. That depends on if I want the detected object marked with an X at the center point (“Location Point”), or see the object displayed as a semi-transparent filled bounding box (“Vertical Bounding Box, Horizontal Bounding Box)? I used Vertical Bounding Box.
Before running the tool, I want to share these two tips to improve your results:
- Navigate to set up the view to directly face the buildings where windows (or doors) are most likely to be detected. Use the Explore tool or the V keyboard shortcut to help you pivot around.
- Turn off any other layers that might interfere with detections as the tool runs against the currently displayed content.
I accept the default Current Camera choice under Creation Methods and click Apply to load the model and generate the results. When the tool finishes, I see a new point layer added to the Contents pane containing the located windows.
Work with your results
Remember, the tool only runs against the data in the view. To generate additional results, move the scene to a new position and run the tool again. Subsequent runs don’t reload the model, so you will notice it processes faster.
If the results aren’t what you expect, you can change the model parameters. If all the windows aren’t being detected, try lowering the Minimum Confidence Level to include results with a lower confidence score. Alternatively, if there are too many non-window objects are being selected, you can increase the Minimum Confidence Level to filter out poorer detections.
The default model works for a variety of window and door shapes, but it can also be trained further to detect windows and doors more common in your type of data or region. If you are interested in retraining the Windows and Doors Extraction model, there are steps provided in the ArcGIS API for Python guide.
Different deep learning model packages (known as DLPKs) can also be downloaded from ArcGIS Online or other sources. Take a look around the site and see what other objects you can detect.
Note: Currently only FasterRCNN models are supported.
So, next time you’re looking to determine where windows or doors are in your map or scene, give ArcGIS Pro’s Interactive Object Detection tool a try. Let us do the “window-shopping” for you.
For more inspiration, see this YouTube video, which demonstrates the full object detection process on a building in San Diego, California, USA.

Article Discussion: