This blog will go over scene layer editing with a quick overview and then a deep technical dive for all those interested.
Quick Overview
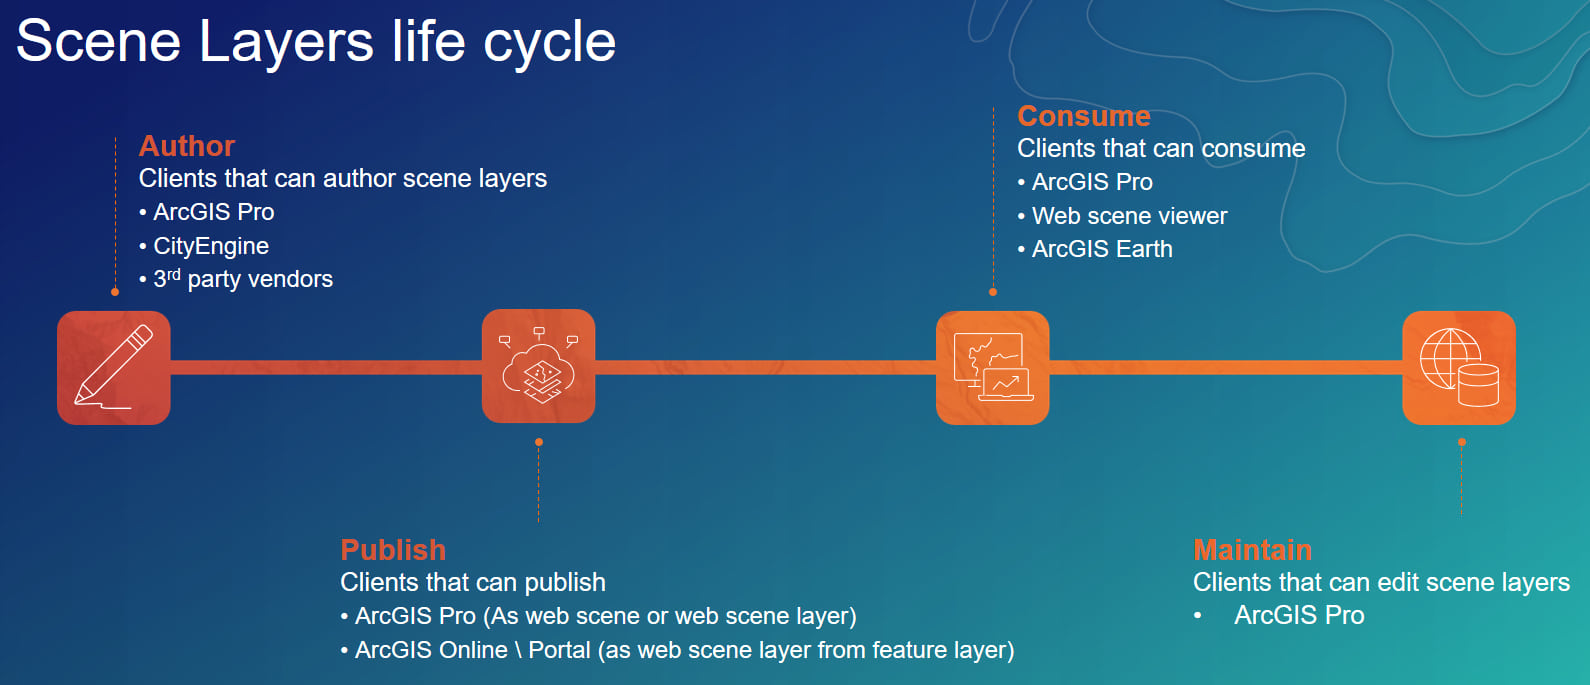
What is a Scene Layer?
Scene layers are optimized for displaying large amounts of 3D data in a scene. Scene layers are used across the ArcGIS platform in applications like Scene Viewer, ArcGIS Earth, and ArcGIS Pro. A scene layer displays one of four data types: points, point cloud, 3D objects, or an integrated mesh. The scene layer complies with the Indexed 3D Scene layer (I3S) format. The I3S format is an open 3D content delivery format used to disseminate 3D GIS data to mobile, web and desktop clients.
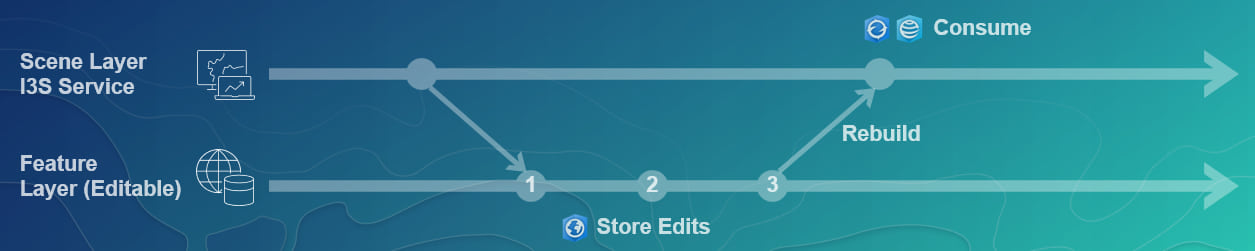
Keeping in mind that we are working with cached datasets, the scene layer needs to have a system of record with it in order to edit on demand. This is known as a scene layer with an associated feature layer.
This associated feature layer adds to the functionality of the the scene layer, including editing, and providing richer statistical information for symbolization.
How do I create a scene layer with an associated feature layer?
Only three types of scene layers support this workflow and that includes point. 3d object, and building scene layers. Currently, ArcGIS Pro is the only authoring client that is capable of sharing scene layers with an associated feature layer to your portal. See Web Scene Layer for detailed steps and the sharing section below for how to enable editing.
How do I know if I can edit the scene layer?
If you are unsure that you can edit a scene layer in ArcGIS Pro you can verify by going to the edit tab > status to view the editing permissions for the layer. See Editing Permissions for more details. You will also see a notification in the notifications pane when an editable scene layer is added.

How do I edit the scene layer?
After the data has been shared to the portal, meeting the necessary requirements, you can now edit the scene layer. In ArcGIS Pro ensure that you are logged into your portal (either as administrator or user with editing privileges) and it is set as the active portal. Drag the scene layer or feature layer from the catalog pane to the scene.
Scene layers shared by reference allow full functionality of attribute and geometry editing. Scene layers shared using the copy all option will require use of the scene layer or feature layer depending on which type of edits being performed. See the table at the end of this blog to determine which web layer to use. Begin attribute edits using the attribute table, attribute pane or geoprocessing tools. Geometry edits can be performed using Move, Rotate, Scale tools.
What do I do after editing?
After edits have been applied, the scene layer may need to be rebuilt to reflect the changes stored in the system of record, the associated feature layer. Rebuilding the cache of a web scene layer on ArcGIS Online consumes credits. For more information on credits, see Understand credits.
- Open the item details page of the web scene layer in ArcGIS Online or ArcGIS Enterprise.
- Click the Settings tab and click Manage Cache.
The Manage Cache dialog box appears.
- On the Manage Cache dialog box, check the layer to be rebuilt.
- Click Rebuild Cache.
All edits stored with the associated feature layer are now part of the scene layer and can be viewed by all users who have access to the scene layer.
Deep Dive
Authoring Stage

ArcGIS Enterprise and ArcGIS Online supports editing scene layers with associated feature layers for 3D object, building, and 3D point layers.
With that in mind, how you prepare your data and share your data will determine the editing capabilities that you have access to. If you are planning on sharing by reference you will need to meet the following requirements:
Requirements before sharing by reference:
There may also be unsupported properties set in the layer prior to sharing as a scene layer and they will need to be resolved before sharing can commence. An example, is a multipatch feature layer can only have an absolute elevation setting.
Once the data is properly authored you can move to the sharing stage.
Sharing Stage

When sharing to ArcGIS Enterprise, you can choose to reference registered data or copy all data. Sharing to Portal for ArcGIS 10.4 and later has these data options. If you do not want the web layer to have access to the registered data source, choose copy all data. When using copy all data, ArcGIS Pro copies all layers in the scene to the server. This includes registered data. The web layer will use the data copied to the server.
Requirements during sharing:
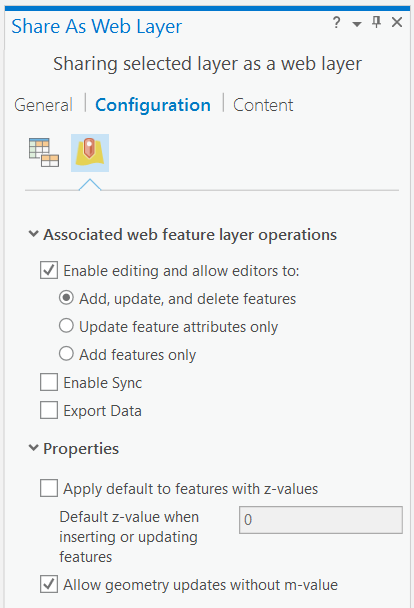
- Enable Editing
- Ensure ‘apply default to features with z-values’ is unchecked
Editing Stage

Currently 3D Object and Building scene layers support seeing geometry changes in real time. Geometry changes for point scene layers will only be seen after a partial or full update of the scene layer cache on the item details page in portal.
Note: Scene layers shared using the copy all option do not support schema changes at this release. Schema changes include adding and deleting fields.
Where can I perform attribute editing on a scene layer?
Portal for ArcGIS 10.6.1 and higher \ ArcGIS Online
- Attributes Pane
- Attribute table
- Geoprocessing Tools such as Calculate Field
Where can I perform geometry editing?
Portal for ArcGIS 10.6.1 and higher \ ArcGIS Online
- Editing tools such as Move, Rotate, Scale tools.
After edits have been saved in ArcGIS Pro, the web scene layer cache should be rebuilt so all clients can see the updates.

Where can I find detailed steps?
For steps on attribute and geometry editing see edit scene layer with associated feature layer.

Commenting is not enabled for this article.