In the history of the ArcGIS blog, a few posts have stood out as especially helpful to our readers. They’ve continued to be popular over the years, but the software ecosystem has changed (hello, ArcGIS Pro!) and we decided some of them deserve a reboot.

This is an updated version of Dale Honeycutt’s 2013 post “Scheduling a Python script or model to run at a prescribed time.” The title pretty much speaks for itself. If you have routine, lengthy processes you run with scripts or models, you can take your automation a step further and trigger the task at a specific time of day. Often this is done late at night or early in the morning, so when you arrive at your computer each day, the tedious stuff is already done for you.
I’ve modified and rearranged the original material to reflect ArcGIS Pro, Windows 10, and Python 3.
Starting with a script
In addition to this post, you should reference the Schedule a model help topic. Once you have your script ready (any script – it doesn’t matter if it started out as a geoprocessing model) you can begin at the “Create a task” section of the help topic. It will show you how to schedule a script to run using Windows Task Scheduler. The following sections of this post will also contain handy tips for getting started, so be sure to read on before you dive in!
Note that the screenshots in this blog and on the help site currently show the 2019 version of Windows 10.
Starting with a model
On the other hand, if you’d like to schedule a geoprocessing model to run at a specific time, you’ll need to bring it into a script first, so start at the beginning of the help topic linked above. You won’t need to export the model to a Python script – that’s a common misconception. Instead, you can run the model from a script as you would any other geoprocessing tool. The key is the ImportToolbox function, which allows you to import the toolbox containing the model. The help topic includes a sample of how to do this with a very simple 3-line script.
Note: Though it’s not necessary here, it’s still worth mentioning that in ArcGIS Pro 2.4 it’s quite easy to export a model to Python.
Using Task Scheduler
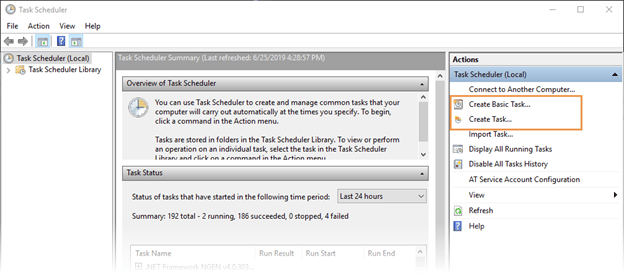
To open Task Scheduler, use the Windows search bar. The Actions pane, on the right, offers two options to create tasks. The help topic covers the Create Task option (which you’ll likely end up using, as it offers more flexibility), but here we’ll start by looking at the simpler Create Basic Task option. Both contain the same essential components, but Create Basic Task launches a wizard to walk you through the setup process.

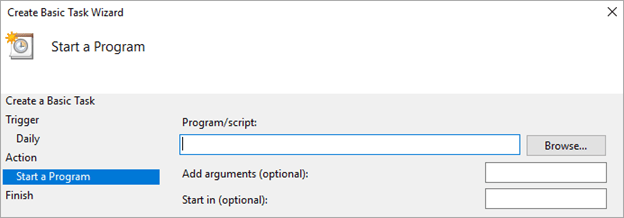
To start, launch the Create Basic Task wizard and click through, noting the essential steps (use fillers to get to the next page – you don’t need to run a real task yet). First, you’re asked to define the name of your task, then the trigger (when and how often it runs), and finally the action (which program to run – in this case, your script).
If the wizard options meet your needs, great. If you require more flexibility, you’ll find that the Create Tasks window is a better option. Alternatively, you can stick with the Create a Basic Task wizard and add any of the options offered by the Create Tasks window after creating the task: just highlight it in the task list and select Properties from the side panel.
Whichever way you choose to configure your task, keep the following tips in mind when you specify the action.
Run the Python executable with arguments
To specify the action, you’re given three fields to fill in. Intuitively, you might think to paste the path to your script in the “Program/Script” box, but this method comes with some pitfalls: namely, discrepancies with the login that Task Scheduler uses and confusion about which version of Python should be used in mixed environments (64 bit or 32 bit). To avoid this, we recommend that you run the Python executable as the program, with the name of your Python file in the optional argument field.

Suppose the script you want to run is E:\My script.py. Instead of running the script directly, instruct Task Scheduler to run python.exe with the script as an argument. In the command line, it would look like this:
"C:\Program Files\ArcGIS\Pro\bin\Python\envs\arcgispro-py3\python.exe" "E:\My script.py"
The default location of python.exe in ArcGIS Pro is indicated in the example above, but it can vary depending on your install. If you want to verify or discover its location, copy and paste the following code into a new Python script and then execute the script. The script will print the location of python.exe as well as other information about your Python environment.
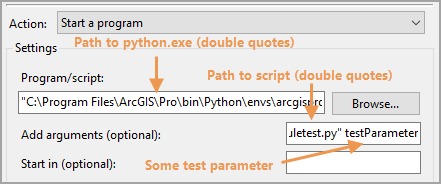
Once you’re sure of the location of python.exe and your script, enter them into Task Scheduler as shown:

Remember that if any of your paths or arguments contain spaces, you need to enclose the argument in double quotes. In the example above, both paths contain spaces, so double quotes are required.
If there are additional arguments (parameters) to your script, provide them after the path to your script. For example, the following command line executes a Python script that takes two arguments: the path to a feature class and an integer.
"C:\Program Files\ArcGIS\Pro\bin\Python\envs\arcgispro-py3\python.exe" "E:\My Script.py" C:\Temp\Work.gdb\Campsites 10
In most cases, we recommend writing scripts to take arguments as in the above example, so that you don’t have to edit the script to change the parameters. The alternative is to hard-code dataset paths or values within the script itself (in this example, that would mean the feature class and integer would be hard-coded). Scheduled scripts are a rare case where hard-coding can work to your advantage; opening and editing a script can be easier than editing the arguments of a task in Task Scheduler.
If you’d rather not hard-code your arguments, another option is to set up a task to run a Windows batch file that in turn runs your script with arguments. (If you’re not familiar with batch files, they’re essentially a list of commands in a text file with the extension .bat. Here’s a better definition). The batch file would contain the single command line shown above; this way, you could easily tweak parameters in a text editor without having to open Task Scheduler again.
Start simple
This recommendation comes from the author of the original version of this blog, who said he’d started with scheduling a simple script to refresh his memory during the writing process. Here’s my adaptation of Dale’s script, which writes some information to a log file. During my own research and rewriting process, I set it up to run every five minutes for one hour. Earlier, I recommended that you step through the wizard to get a sense of what it asks for; now, try saving this script and using either the wizard or the Create Task option to run it at the time and frequency of your choosing. This process allows you to test changes to the script quickly, and you’ll develop a better understanding of task scheduling before you try with a real script.
For clarification, the Action tab of Task Scheduler will look something like this:

And the contents of the log file will look something like this:

Take it further
Now that you’re comfortable with Windows Task Scheduler, setting up your essential, routine tasks should be straightforward. But be sure to take some time to experiment with Task Scheduler and read the Windows help. We’ve barely scratched the surface here, and there’s much more you can do for your GIS workflows and beyond.
Ghislain Prince contributed to this post

Commenting is not enabled for this article.