Not too long ago I wrote a post about how and why you may want to use Smart Mapping in custom web apps using the ArcGIS API for JavaScript. The sample featured in that post showed how to dynamically change the symbology of a FeatureLayer with the SmartMapping module and its accompanying slider widgets.
Since the release of Smart Mapping, some users have asked about how to use the SmartMapping module to change the default rendering of dynamic layers based on attributes from joined tables in dynamic workspaces. The following sample demonstrates how to accomplish this.
View the live sample
View the code on GitHub
This workflow is useful in cases where you have several tables with dozens, even hundreds of attributes useful for visualization. Creating a feature service or publishing all of the tables to a dynamic map service can be impractical because of the long amount of time it can take to load large services in web apps. Instead, you can create a map service containing only geometries and minimal attributes and enable dynamic workspaces via your ArcGIS Server Manager. This will allow you to register databases and directories to a dynamic workspace, providing your service access to resources in joined tables at runtime. This keeps the service lean, but provides it access to potentially hundreds of attributes that may be used for visualization purposes.
Sample overview
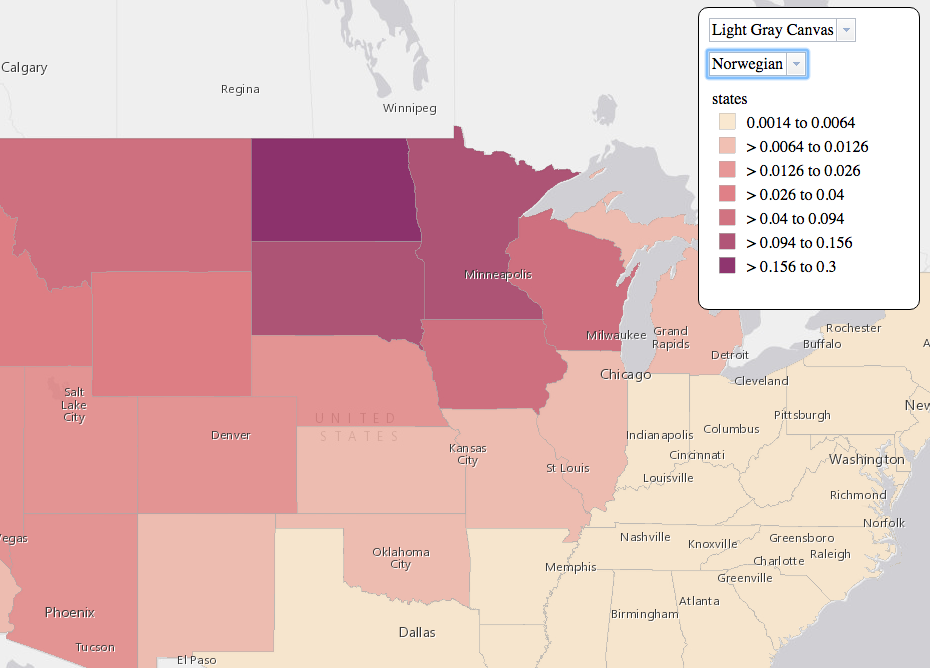
In the sample above we add an ArcGISDynamicMapServiceLayer instance to the map. The layer contains several sublayers – each containing features with geometries at different resolutions: block groups, counties, and states. The service contains a fair number of attributes, including population statistics based on age, gender, marital status, etc.
We can change the renderer of each layer based on any of these attributes, but we want to explore another set of attributes containing ancestry statistics that don’t exist in the layer itself. The ancestry attributes reside in a joined table referenced in a dynamic workspace set by the service administrator. We want the user to select a country in a dropdown menu which then makes a call to the SmartMapping module to change the symbology for each state based on the percentage of people that can trace their ancestry to the selected country.
Before getting into some of the details of this sample, keep in mind that generating renderers with the SmartMapping module is only supported for FeatureLayer. You may apply renderers generated with SmartMapping to dynamic layers, but this requires additional network requests to calculate statistics necessary to create a renderer that fits your data. So this workflow can get a little complicated and still carry a performance cost.
Create a dynamic layer with a joined table
First we need to create a dynamic layer with a joined data source. To accomplish this, we must create a JoinDataSource object, which contains information for the left and right tables and their respective keys to perform the join.
var joinDataSource = new JoinDataSource({
  joinType: "left-outer-join",
  //
  // Sets the left table source (layer with geometries) to the joinDataSource
  // object. All we need to specify is the sublayer id of the map layer.
  //
  leftTableSource: new LayerMapSource({
    type: "mapLayer",
    mapLayerId: 3 // The index of the states sublayer
  }),
  // the field in the map service indicating the state name
  leftTableKey: "STATE_NAME",
  // the field in the joining table indicating the state name
  rightTableKey: "State",
  //
  // Sets the right table source (the attribute table to join) to
  // the states layer in the map service. This object will be used to complete
  // the join to the dynamic service (the layer with the geometries).
  //
  rightTableSource: new LayerDataSource({
    dataSource: new TableDataSource({
      type: "table",  // indicates the data source is a table
      // workspace where the table resides (defined in ArcGIS Server Manager)
      workspaceId: "CensusFileGDBWorkspaceID",
      dataSourceName: "ancestry"  // the table name
    })
  })
});
Then we add the JoinDataSource as a source to a DynamicLayerInfo object, which is then set on the ArcGISDynamicMapServiceLayer. This completes the process of the join. Now all attributes in the ancestry table are available to the census layer.
//
// Create the dynamic layer data source for a DynamicLayerInfo instance.
// This is a join data source and completes the join between the table
// full of attributes and the layer containing geometries.
//

var dynamicLayerDataSource = new LayerDataSource({
  dataSource: joinDataSource  // this data source was created in the previous step
});

// Creates an array of dynamicLayerInfo objects for all sublayers in the service
var dynamicLayerInfosArray = censusMapServiceLayer.createDynamicLayerInfosFromLayerInfos();

// Find the dynamicLayerInfo object for the states sublayer
var dynamicLayerInfo = dynamicLayerInfosArray.find(function(dynamicLayerInfoItem){
  return dynamicLayerInfoItem.name === "states";
});

// set the dynamic layer info object on the census map service layer
dynamicLayerInfo.source = dynamicLayerDataSource;
censusMapServiceLayer.setDynamicLayerInfos([dynamicLayerInfo], true);
Create a FeatureLayer
SmartMapping only supports FeatureLayer. Therefore, to leverage SmartMapping capabilities in this use case, we must create a FeatureLayer instance used solely for generating a good default renderer. Note that the layer url must point to the dynamicLayer endpoint on the map service and the source of the layer must point to the dynamicLayerDataSource object we created in the previous step. This ensures the FeatureLayer has access to the joined table in the dynamic workspace.
//
// Create a FeatureLayer with the joined data source so the SmartMapping
// module can access the data in the joined table for generating a
// renderer to apply to the DynamicLayer. SmartMapping can only
// generate renderers based on FeatureLayer instances.
//

// Set options for the feature layer instance
var layerOptions = {
  mode: FeatureLayer.MODE_SELECTION,
  outFields: ["*"],
  // set the source to the JoinDataSource so the SmartMapping module
  // can have access to the data in the fields from the joined table
  source: dynamicLayerDataSource
};

// Create the layer with the url to the dynamic layer
var featureLayer = new FeatureLayer(layerUrl + "/dynamicLayer", layerOptions);
Generate a renderer
Now all we need to do is use the FeatureLayer instance to generate a renderer with smart defaults based on the ancestry field selected by the user. In the snippet below, we call the createClassedColorRenderer() method to generate a ClassBreaksRenderer based on color. Notice how the FeatureLayer is used as an input parameter for generating the renderer, but the renderer itself is set to the drawingInfo of the dynamic layer with an instance of the LayerDrawingOptions module.
smartMapping.createClassedColorRenderer({
  // selected by the user
  basemap: basemapStyle,
  classificationMethod: "natural-breaks",
  // ancestry table field selected by the user
  field: ancestryClassificationField,
  // featureLayer created in the previous step
  layer: featureLayer,
  // normalize by the total population
  // note the field name is prefixed by 'states'.
  // this indicates the workspace where the field
  // is located - the states sublayer of the service
  normalizationField: "states.POP2007",
  normalizationType: "field",
  numClasses: 7
}).then(function (response){

  var optionsArray = [];
  // Create a LayerDrawingOptions object used to set
  // a renderer on a sublayer of a DynamicLayer
  var drawingOptions = new LayerDrawingOptions();
  // Set the response renderer on the drawing options
  drawingOptions.renderer = response.renderer;

  // And place the drawing options in index 3 so it applies to the states sublayer
  optionsArray[3] = drawingOptions;
  // set the renderer on the layer
  censusMapServiceLayer.setLayerDrawingOptions(optionsArray);
});
Conclusion
This sample adds an ArcGISDynamicMapServiceLayer instance to the map and updates its visible layer(s) and symbology on the fly using a renderer generated from the SmartMapping module. This allows you to explore data from joined tables in dynamic workspaces and change the visualization of a dynamic layer. Keep in mind that not all renderers generated by the SmartMapping module, including continuous color and continuous size, cannot be used in the current version of MapServer. Support for applying these renderers to dynamic layers is planned for future releases.
The snippets provided above represent the most essential pieces of code needed for this workflow to function. Review the code of the app to see each of these pieces in context.

Commenting is not enabled for this article.