The ArcGIS API for JavaScript provides you with many different layer types that support various data types and visualizations. We also provide you with the building blocks for creating your own custom layer types. These are BaseTileLayer, BaseDynamicLayer, and BaseElevationLayer which were introduced in the 4.4 version of the API.
- Display an unsupported data source in your JavaScript application without having to convert it to a data format supported by ArcGIS.
- Process the data returned from the service before it is displayed. This could be because the service returns binary data, and the data needs to be processed to generate an image so it can be displayed on the view.
- Display synthesized data such as an exaggerated elevation layer.
- TypeScript: You will need to set up your TypeScript development environment. TypeScript is a strict syntactical superset of JavaScript. Once written, it can be compiled to plain JavaScript. There is a multitude of great online resources that go into detail on what TypeScript is, why it is used, and how you use it.
- Familiarity with esri/core/Accessor: Accessor aims to make developing classes easy by providing a mechanism to get, set, and watch properties. Please refer to the Implementing Accessor topic for additional details on how this works and its usage patterns.
- Understanding the loadable pattern: If your custom layer requires loadable resources, then you must load all loadable dependencies on the layer. Please see the Understanding the loadable pattern topic for additional details on how this works.
Implement BlendLayer class
We will create the BlendLayer class (app/BlendLayer.ts) which will extend BaseTileLayer. You can view or download the source code for the entire application from here. The application has the following folder structure.
root-folder/
  index.html
  package.json
  tsconfig.json
  app/
    main.ts
    BlendLayer.ts
  node_modules/
Add dependency paths and import statements
When creating custom classes for ArcGIS API for JavaScript with TypeScript, the following triple-slash references are always added at the top of the class. They instruct the compiler to import AMD modules: __extends and __decorate, which are helpers when extending a class or decorating members of a class.
/// <amd-dependency path="esri/core/tsSupport/declareExtendsHelper" name="__extends" />
/// <amd-dependency path="esri/core/tsSupport/decorateHelper" name="__decorate" />
Next, we will import the modules that will be used in this class as shown below. In the first line, we are importing subclass, declared and property decorators from esri/core/accessorSupport/decorators module. These decorators can be thought of as the underlying glue that is used to create 4.x classes.
import { subclass, property, declared } from "esri/core/accessorSupport/decorators";

import TileLayer = require("esri/layers/TileLayer");
import BaseTileLayer = require("esri/layers/BaseTileLayer");
Extend BaseTileLayer class
Here, we are extending the BaseTileLayer class. The @subclass decorator is used in conjunction with declared and is necessary as they are both key components needed for instructing subclasses off of a given base class.
@subclass("esri.layers.BlendLayer")
class BlendLayer extends declared(BaseTileLayer) {

}
Add properties to BlendLayer class
Within this class implementation, we can define properties of the class using @property decorator. We define a property called multiplyLayers, which is an array of tile layers that will be blended together as shown below:
@property()
multiplyLayers: TileLayer[] = [];
Add methods to BlendLayer class
We can now add public and private methods to the class. The tile layers added to the multiplyLayers property are loadable resources. If a custom tile layer requires loadable resources, then you must load them in the layer using the load() method. This ensures that all loadable resources required for the layer to function are loaded prior to the custom layer resolving and becoming loaded.
load(): any {
  // call load method on each tile layer stored in multiple property
  this.multiplyLayers.forEach(function (layer) {
    // The tile layers must load() prior to the BlendLayer
    // resolving and moving to the "loaded" status.
    this.addResolvingPromise(layer.load());
  }, this);
}
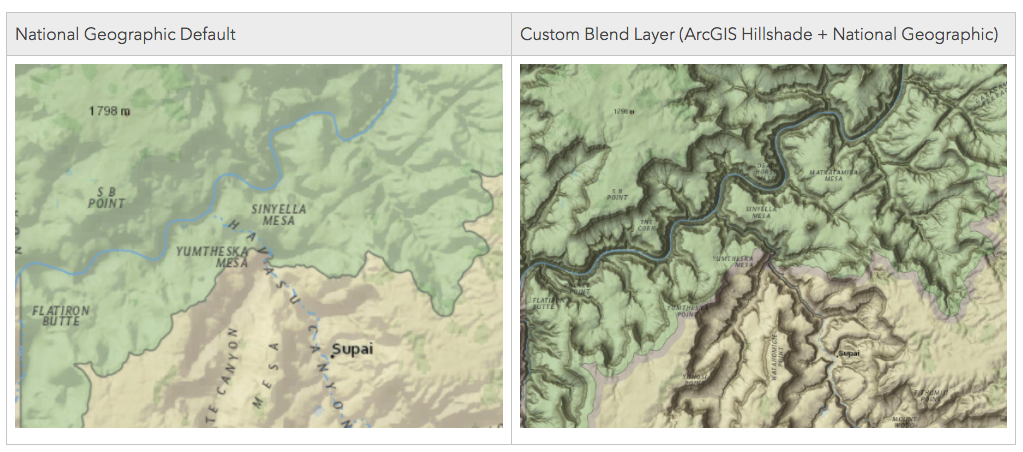
Once the layer is loaded with its required resources, we must override the fetchTile() method of the BlendLayer. Within this method, call fetchTile() on each tile layer returned in the multiplyLayers property. Once each tile layer returns the tile(s) visible in the view, we apply multiply operation to the tiles so that the BlendLayer will show the blended image.
// Fetches the tile(s) visible in the view
fetchTile(level: number, row: number, col: number): IPromise<HTMLCanvasElement> {

      const tilePromises = this.multiplyLayers.map(layer => {
        // calls fetchTile() on the tile layers returned in multiplyLayers property
        // for the tiles visible in the view
        return layer.fetchTile(level, row, col, { allowImageDataAccess: true });
      });

      return all(tilePromises)
        .then(images => {
          // create a canvas
          let width = this.tileInfo.size[0];
          let height = this.tileInfo.size[0];
          let canvas = document.createElement("canvas");
          let context = canvas.getContext("2d");

          canvas.width = width;
          canvas.height = height;

          // multiply - multiplies the numbers for each pixel of the top layer (nat geo)
          // with the corresponding pixel for the bottom layer (hillshade).
          context.globalCompositeOperation = "multiply";
          images.forEach(function (image) {
            context.drawImage(image, 0, 0, width, height);
          });

          return canvas;
        });
    }
Finally, we export the BlendLayer class. The export = syntax specifies a single object that is exported from the class so that the class can imported using import module = require(“Class”) elsewhere.
export = BlendLayer;
We are done implementing the BlendLayer class. Now let’s use this custom layer in an application. We will import the class in in the app/main.ts file as shown below:
import BlendLayer = require("app/BlendLayer")
Now the BlendLayer can be used in the application.
const natGeoLayer = new TileLayer({
  url: "https://services.arcgisonline.com/arcgis/rest/services/NatGeo_World_Map/MapServer"
});

const hillShadeLayer = new TileLayer({
  url: "https://services.arcgisonline.com/arcgis/rest/services/Elevation/World_Hillshade/MapServer"
});

// Create a new instance of BlendLayer
const blendLayer = new BlendLayer({
  multiplyLayers: [
    hillShadeLayer,
    natGeoLayer
  ],
  title: "Blended NatGeo World Map",
  copyright: "Blended National Geographic Layer"
});

Commenting is not enabled for this article.