March 2023 update: this blog promotes the functionality of the Smart Editor widget in Web AppBuilder, which is to be retired. For comparable functionality in the new Editor widget, see From the Smart Editor to Smart Forms.
Curating large sets of data can be time-consuming and labor-intensive. As an editor, I’m always looking for ways to:
- Streamline repetitive editing tasks
- Collect more data in fewer clicks
- Prevent data entry errors and discrepancies
Are you seeking the same? If yes, the Smart Editor widget may be the unicorn you’re looking for!
The Smart Editor widget is a configurable tool for editing features and their related records in the web. It can be added to any application created with Web AppBuilder for ArcGIS. Not convinced of the magic yet? There is more to it than meets the eye.
Attribute Actions
In the Smart Editor widget, Attribute Actions can be set to populate default values or to calculate values across different layers. You can use location information, such as addresses and coordinates, or information from intersecting features on the map. There’s no need to post-process your data with field calculators, intersects, and joins, it’s all done on the fly.
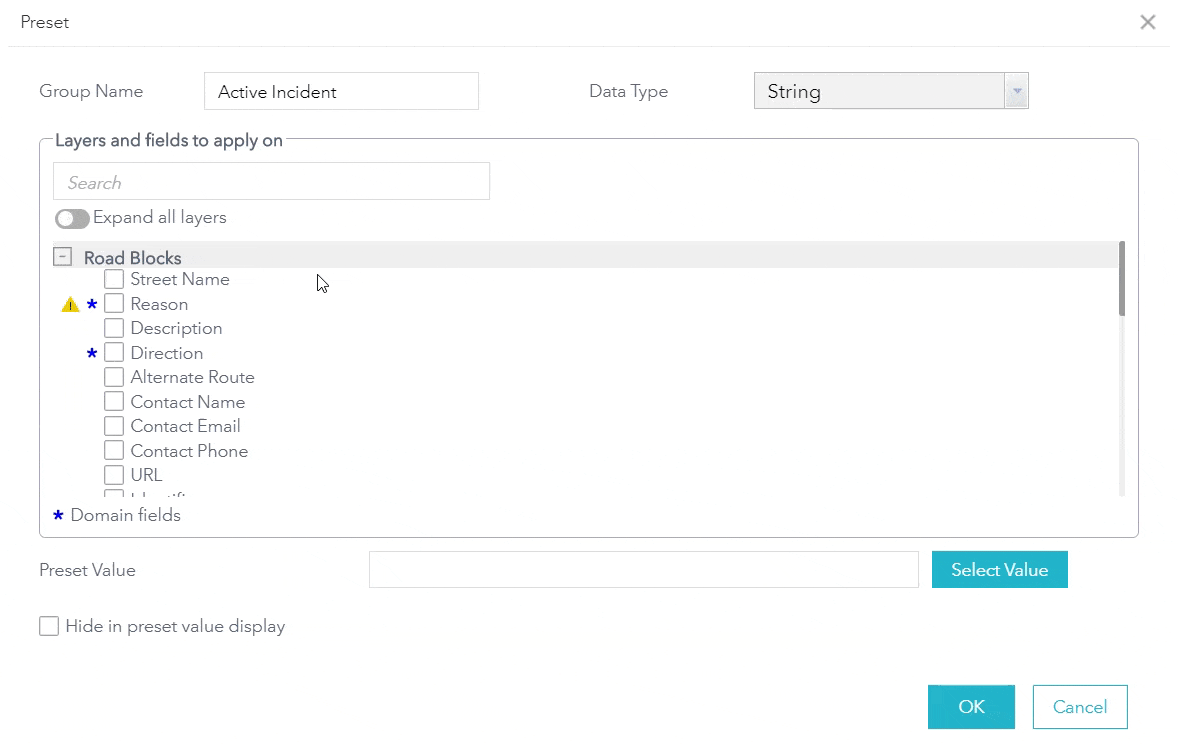
With the October 2019 update to ArcGIS Online, the Smart Editor widget has new exciting capabilities. Notably, the new Preset values design will save time for both users configuring and using the Smart Editor widget. The key changes are listed below.
New Preset builder
Preset values now have their own builder within Attribute Actions.

Filter fields by Data Type
When selecting and applying Preset values, fields can be shown based on their data type.

Group layers into a single Preset
Create a new group to configure Preset values to act against multiple fields across different layers.

Assemble domains
Filter fields with domains and compile coded values from different domains using a Preset. Only values from different domains using the same coded values can be reconciled.
Fixed and relative dates
Specify fixed and relative dates when creating records. A fixed date is a value that does not change over time. A relative date changes based on the current date and time. When setting Past or Future dates, the specified values are subtracted or added to the current date and time.

Hide Preset values in the application
Default values are added behind the scenes when the editor creates new records. This prevents crowding the widget panel if an editor will never need to modify the value.

Populate Presets using URL parameters
Define the value for a Preset in the URL. This allows you to share the same application with different preset values for different projects, without having to enter a specific value every time the application loads.

How does this affect your existing Presets?
Preset values you’ve set before the October 2019 update will continue to work as expected. Group names using a field name and a field alias are generated for presets previously defined in the Layer Settings. The option to define presets in the layer settings is no longer supported moving forward.

Attribute Actions and the new Preset builder make it easier to populate default values and to calculate values across different layers. Smart Actions can provide additional capabilities to define field behavior.
Smart Actions
If Attribute Actions provide some of the magic, Smart Actions are the unicorn’s horn. Smart Actions use custom expressions to define behavior applied to an attribute field such as whether a field is required, hidden, or disabled. Set up actions to determine how a field value is defined or manipulated when a requirement is met.
When a field participates in a Smart Action, priority (1, 2, or 3) can be set for a behavior (Hide, Required, or Disabled). For example, if you set as priority 1 to a behavior, it will be verified before a behavior of 2nd priority, and so on. If the expression for the behavior in priority 1 is not true, then the behavior in priority 2 will be applied.

While the Smart Editor widget can be used as a simple editing tool, Attribute Actions and Smart Actions can enhance your editing process to streamline repetitive editing tasks, collect more data in fewer clicks, and prevent data entry errors and discrepancies.
To learn more about how to configure the Smart Editor widget, review the Smart Editor widget documentation.
Check out the first video of the Get smart about editing series! (now available starting in September 2020)


Article Discussion: