ArcGIS 10 makes it easy to edit the vertices and segments in features. To modify the shape of a feature, select it and click the Edit Vertices button on the Editor toolbar or simply double-click the feature with the Edit tool. The Edit tool pointer then changes from the black arrow that is shown when working with whole features to a white arrow indicating that vertices can be directly edited. The Edit Vertices toolbar also appears, containing tools to select, add, and remove vertices quickly.
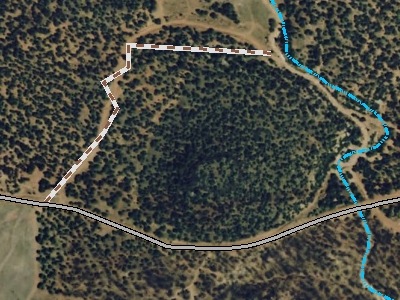
Recently, I was working with some natural resource management data and noticed a hiking trail layer that needed to be edited to match a high-resolution image. The poorly digitized trail feature (the dashed brown line) started at a road (the gray line) and ended near a stream (the blue line). When compared to the aerial photograph, the trail was straight where it should be curved and had some unnecessary zigzags. I was able to reshape the feature easily by using the Edit tool to select and edit its vertices. This post describes how I updated the feature. The methods presented are available for ArcView, ArcEditor, or ArcInfo users.
Selecting and editing vertices interactively
ArcGIS 10 provides more interaction between the Edit tool and vertices on the map than previous releases. For example, multiple vertices can be selected by dragging a box to move or delete them all at once. To remove a part from a multipart feature, right-click the part on the map, point to Part, and click Delete. Before, these and other vertex-related tasks could only be performed on the Edit Sketch Properties window, often requiring sorting through a potentially lengthy tabular list of vertices.
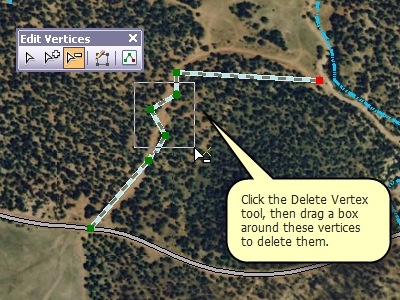
To fix the issues with the trail line feature, I first double-clicked it with the Edit tool to view its vertices and segments. This made the Edit Vertices toolbar appear; it floats by default but can be moved around or docked. On the toolbar, the Modify Sketch Vertices tool (the white arrow) can be used to select vertices, move them, and edit line segments. To add a vertex, use the Add Vertex tool or the A key and click where to insert it. Clicking a vertex with the Delete Vertex tool or pressing the D key deletes vertices. I simply used the Delete Vertex tool to drag a box around all the vertices in the zigzag and removed them at once. There is a complete list of the available keyboard shortcuts in Editing vertices and segments in the ArcGIS Desktop Help.
By default, a vertex moves independently from other vertices when it is dragged. To keep the general shape of a feature, click the Editor menu, click Options, and check Stretch geometry proportionately when moving a vertex. When dragging a vertex with this option on, other vertices move to preserve the proportions of the feature’s segments and the sketch rubber sheets to maintain its general shape.
Editing curved segments
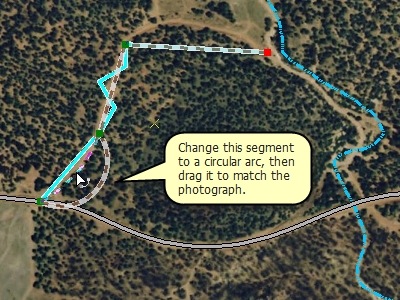
ArcGIS 10 provides more curve editing capabilities than before, so there is no longer a need to redigitize curves just to modify their shapes. The trail line had two straight segments that would better match the aerial photograph if they were curved. To update the straight segment leading from the trailhead at the road, I right-clicked it, pointed to Change Segment, and clicked Curved. This allowed me to drag the arc to make it align with the curve on the aerial photograph. I held down the spacebar to turn off snapping temporarily as I moved the arc, so I could position the curve exactly where I wanted it and avoid snapping to the original shape. If I wanted to specify a particular radius value, I could press the R key. Keep in mind that curves in shapefiles are stored as a series of densified straight lines because shapefiles, unlike geodatabase feature classes, do not support true curves.
The last segment nearest the stream also needed to be a curve instead of a straight segment. Rather than making it into an arc like the first segment, I thought it would look better as a smooth Bézier curve. Again, I converted the existing straight segment to a curve, but this time to a Bézier. In ArcGIS 9, editing Bézier curves was only available with geodatabase cartographic representations. With ArcGIS 10, Bézier curves can be created in any feature class by digitizing them using the Bézier Curve sketch construction method on the Editor toolbar palette or by using certain editing commands, such as Smooth on the Advanced Editing toolbar. To edit the shape of the Bézier segment, I moved the control points and handles to change the direction and the steepness of the curve until it matched the photograph.

After I removed the extra vertices and edited the curves, the trail feature better aligned with the underlying imagery. Once I was finished making changes to the shape, I applied the edits by clicking the Finish Sketch button on the Edit Vertices toolbar. If I needed to refine the line’s shape after that, I could double-click it again and modify the segments with the Edit Vertices toolbar. I also noticed that I needed to extend the trail slightly to make it connect to the road, so I dragged the trail’s first vertex until it snapped to the road edge.

Editing topology edges
The Topology Edit tool can be used similarly to manipulate multiple vertices and change segment types for topology edges. This means that I can update coincident features through a map topology or geodatabase topology using the same methods that the Edit tool provides for editing the shapes of individual features. For example, I have a forest boundary that is adjacent to a lake, so I can select the shared topology edge and use the Topology Edit tool to modify the border of both features at the same time. The Edit Vertices toolbar and keyboard shortcuts are also available with the Topology Edit tool.
Content Provided by Rhonda – Editing Team
Commenting is not enabled for this article.