
Exporting to an external graphics package like Adobe Illustrator or Macromedia Freehand from the ArcMap environment can have its challenges. One positive aspect of exporting is the ability to make certain that CMYK values are retained for proper print color reproduction. Some of the challenges you may face after export are inconsistent vector line widths, irregular polygon shapes, and something our programmers call polygon dicing.
The issues of inconsistent line widths and irregular shapes have to do with the output resolution setting for the Adobe Illustrator (AI) format. To preserve line weights and prevent irregular shapes in the AI output file, follow these steps:
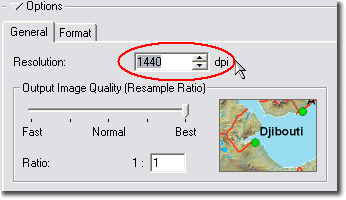
- From the File menu, choose Export Map and set the Save as type to AI (*.ai).
- In the Options area, click on the General tab.
- Set the Resolution to a number that is divisible by 72 (the default is 300, but the Export dialog will remember your settings). For example, output resolutions of 360, 720, 1440 and so on.
- The Output Image Quality (Resample Ratio) should be set to Best. Leave the Ratio as 1:1.
- Press Save.
If you are exporting only vector layers, the resolution you choose should be based on the precision or quality of your data relative to your map’s scale and the graphical quality required. Since increasing the resolution will also increase the file size, the idea is to find and use the resolution that produces the smallest file size without degrading the quality of the output graphics. (Note: the maximum resolution is 32,000 dpi). Below are examples of how different resolutions can change the quality of lines and shapes.
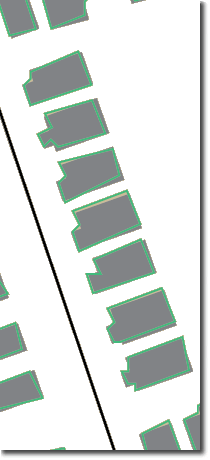
This image shows identical building footprints in different resolutions. 3600 dpi resolution is shown in gray. On top is the 72 dpi resolution in green. See how a low resolution degrades the quality of the green polygons.
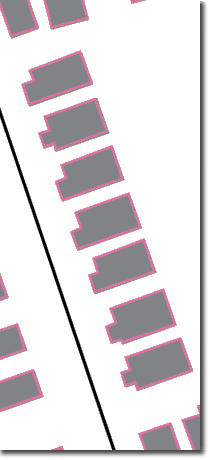
This image shows identical building footprints in different resolutions. 3600 dpi resolution is shown in gray. On top is the 360 dpi resolution in pink. Since the resolution is greater, the shapes maintain more detail and the shape much closer to what it is supposed to be (note especially the buildings outlines at the top do not quite conform). To some cartographers, this resolution may be sufficient, depending on map scale and other factors.
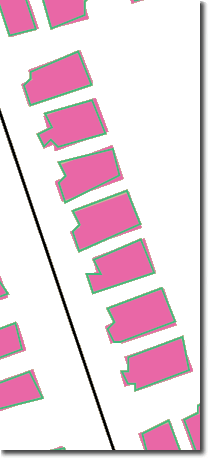
As a final comparison between resolutions, even 72 dpi differs greatly from 360 dpi in this example. Building footprints of 72 dpi resolution are shown in green and 360 dpi resolution in pink.
If you feel that you have achieved a greater amount of detail than necessary, i.e., your graphics file loads or draws very slowly, you can lower the output resolution, or some graphics programs have functions to simplify of vector paths. Using a path simplifying tool can help reduce the amount of nodes while maintaining the detail. This will help trim down file sizes and improve redraw/loading times.
When a raster is included in your export, even a resolution like 720 dpi or higher will cause potentially very large AI file sizes. In this case consider the option of exporting your map’s vector and raster layers separately, with different resolutions, and then combine them in your graphics software. This method will ensure that the vector layers are the highest resolution possible and that the raster layer will maintain a reasonably high resolution as well.
Increasing output resolution, however, may cause polygon dicing and banding to occur. The AI export function dices polygons to make them compatible with older versions of graphics software. Polygons that have more than 8000 vertexes will get “diced”. This 8000 vertex limit is a hidden setting that can be changed; there is a Knowledge Base article that explains how just after the block of red text.
This image shows dicing at a resolution of 720 dpi. The original polygon had 28,679 vertices. Increasing output resolution would only add more dicing.
You find out how many vertexes are in your polygons using the Editor. Start Editing, select a polygon, change the edit task to Modify feature, and open the edit sketch properties (last button on the right of the Editor toolbar), and scroll to the bottom; the vertex count is in the left column.
After increasing the ai_MaxVertices value to 30,000, there is no more dicing at the same resolution.
A larger threshold will cause longer redraw and load times. Depending on your data, you will have to experiment with this setting to obtain optimal results.
Thus, by following these guidelines you will be able to minimize or even eliminate these challenges from your workflows that involve exporting your map to be finished in a graphics package. Also note that these guidelines apply to EPS, SVG, and PDF output as well.
Commenting is not enabled for this article.