Depending on the type of highway you are labeling (interstate highway, U.S. route highway, or state route highway), the standard highway shield symbol may or may not be wide enough for all the characters in your labels. Often, you do not get the desired outcome by simply using one shield for all highway number labels because one size rarely fits all! The numbers look “squished” or they overrun the shield symbol when there are more than two characters (depending on how large you make the shield and the characters). Here are some tricks you can use to create highway shields for labels of varying widths, especially when there are more than two characters in some of the highway names.
A. Preparing your data
Often the field that contains the name you want to appear in the shield also has other characters in it. You need a label field that ONLY contains the numbers that will appear inside of the highway shield.
In Figure 1, ROUTE_NUM is the original attribute and HWY_LABEL is the field that is used to label the highway shields.
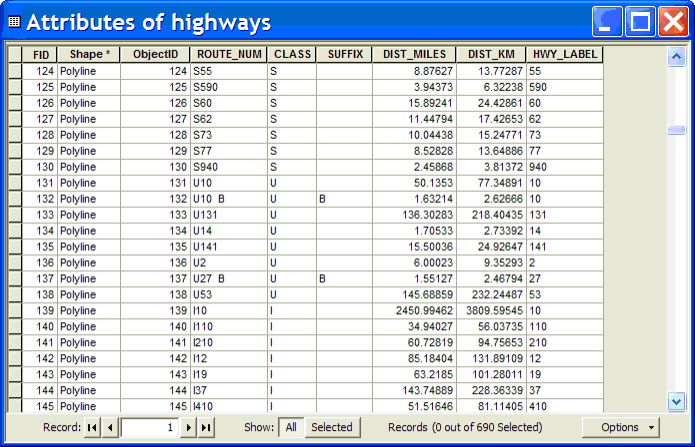
Figure 1: the HWY_LABEL field is used to label highways.
There are two steps to setting up this label field: 1) adding the label field, and 2) using a special tool to populate it.
-
- Add a label field
First, add a text field to your attribute table that is at least as long as the longest number that will show in your highway shields. - Populate the label field
Second, download the Label String Management Tools from the ArcScripts download Web site. In the download, there are some things you may want to take a look at including the contents of the Doc folder and the readme.txt file.
- Add a label field
To load the toolbox into ArcToolbox, right click on the ArcToolbox icon. Select Add Toolbox and navigate to the folder into which you downloaded the Label String Management Tools. Click Label Text Tools and click Open. The Toolbox will now appear in ArcToolbox.
In the newly added Label Text Tools toolbox, in the Custom Field Calculators toolset, open the Extract Hwy Numbers for Hwy Shield Labels tool. This tool populates the label string field that you added with the text that will be shown in the highway shields. For example, if the highway name is “10″, the tool will populate the new label field with “10″.
- Add the highway type field
If you are going to be using different highway shield symbols for different types of highways, you need a field in your attribute table that identifies what type of highway each feature is. Ours is “Class”, and it identifies interstate highways as “I”, state route highways as “S”, and U.S. route highways as “U” (see figure 1).
Now that your data are ready, you can create the labels.
B. Create the labels
-
- Create multiple label classes
The next step is to create different label classes for each type of highway of each label length. This is most easily done in Label Manager (figure 2). The following examples use the Maplex Label Engine. Depending on your data, you could have up to six classes if you have interstate highways, state route highways, and U.S. route highways with names that are 1-2 characters long and 3 or more characters long.- Interstate_Shield – this is used for interstates with names that are less than 3 characters long.
- Interstate_WideShield – this is used for interstates with names that are 3 characters long.
- Create multiple label classes
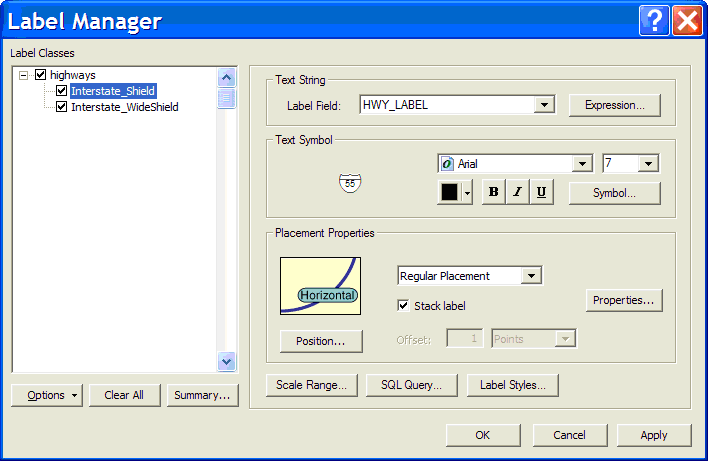
Figure 2: Label Manager can be used to create the label classes.
In our example, interstate highways can be 1, 2, or 3 characters long. Cartographically, the desired result is to have one highway shield that can be used for interstates that are 1 or 2 characters long and a second shield for labels with 3 characters. (There are no interstates with names that are more than 3 characters).
The same would hold for highways other than interstates. In those cases, the number of characters might even be more than three. You would need to create a label class for each unique combination of highway type and number of characters.
In our example, we created two label classes in Label Manager:
-
- Create the highway shield symbol for interstates with names that are less than 3 characters long
The EASIEST way to create these symbols is to select them from the Symbol Selector and then make any edits you need to make. We want a symbol like the U.S. Interstate HWY symbol (figure 3), but we want it to have a white fill with a dark gray outline. So in Label Manager click the Symbol button to select this symbol, and then click Properties in the Symbol Selector to make some changes.- With your label class highlighted in the Label Manager window, select Symbol.
- In the Symbol Selector window, click Properties.
- In the Editor window, click the Advanced Text tab and make sure Text Background option is checked.
- Click the Properties button located under Text Background.
- In the next Editor window, click Symbol.
- In the Symbol Selector window, click Properties.
- Create the highway shield symbol for interstates with names that are less than 3 characters long
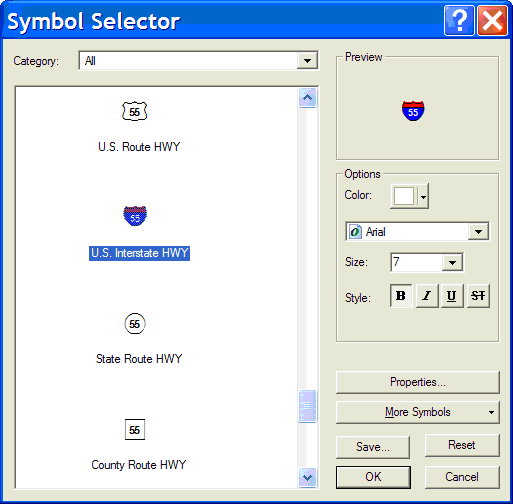
Figure 3: There are a number of highway shields in the default Esri Style that you can simply modify.
There are a number of dialog boxes you need to navigate through to get to the point where you edit the highway shield symbol. Follow these steps to get there:
Now you will be able to edit your highway shield symbol.
-
- Edit the highway shield symbol
You can click on the symbol layer and change any properties you want to – we changed the two fill symbols to white and the outline to dark gray (figure 4).
- Edit the highway shield symbol

Figure 4: The multi-layered symbol can be edited to appear as you like.
Click OK twice to accept the changes you made.
Note: At this point, note that the Editor dialogue box you have the option to “Scale Marker to fit text”. If you use this option, you will scale the symbols in both the x and y dimensions so that they fit your text (figure 5). This is NOT usually the effect that you want, but if you are in a hurry it is a better option than having your text overrun the shield symbol. The better option is to use a different symbol for the highways with longer names. This is pretty easy once you have the first label class set up.
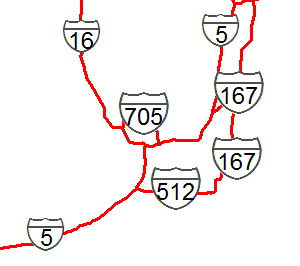
Figure 5: The “Scale Marker to fit text” option increases the height of the shield symbol as well as the width.
Click OK again to accept the changes and return to the first dialog box in Label Manager.
-
- Set up the label class SQL queries
The last step in setting up this label class is to specify that you will use these rules to ONLY label the interstate highways that have names that are less than three characters long.
On the first dialog box of Label Manager, click the SQL Query tab and type in the following SQL query (the operator CHAR_LENGTH searches the character length of a given field):

Click Apply to see the results. - Create the highway shield symbol for interstates with names that are 3 characters long
Since you now have one of the label classes set up, you can right click it and select Copy Parameters. Then right click on the second label class and select Paste Parameters.
All you have to do now is to change the SQL query and edit the shield symbol. The SQL query for this class is:

Now edit the symbol to make these changes (Figure 6):- Change the font to Esri Shields.
- Change the symbol for the dark gray outline to the symbol with Unicode value 94.
- Change the symbol for the white fill to the symbol with Unicode value 91.
- Set up the label class SQL queries
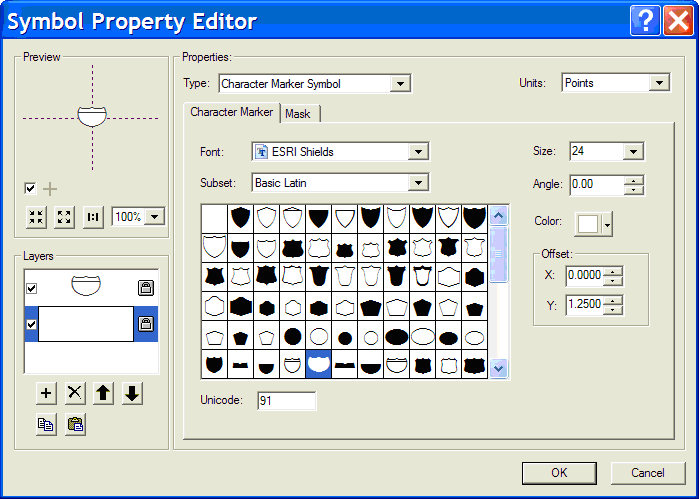
Figure 6: A few minor edits will result in a highway shield that can be used for labels that are 3 characters long.
You should now have two types of highway shields for labeling your interstate highways. For labeling other types of highways, follow the same methodology using different shield types and adjust the second query to be >= 3 as some U.S. Route and State Route highways are more than 3 characters long.
This might seem like a lot of hoops to jump through but the result should be really good looking highway shields on your map. And of course you can always save the feature class as a layer file and reuse the symbology and labeling on your other maps!
Commenting is not enabled for this article.