With ArcGIS Hub Premium, you can extend accounts to partners in your community so that together you can shine a light on upcoming in-person and online events related to your initiatives.

In this article, you’ll learn how to onboard partners to your Hub community and task them with the tools they need to create events for an initiative.
Requirements
To complete this workflow, you must have ArcGIS Hub Premium and an existing initiative. You may also have to collaborate with the following administrators:
- A Hub administrator – someone with a default ArcGIS Online administrator role who belongs to your Hub’s employee organization. This person can enable collaborative events for your initiative.
- A Community administrator – someone with a default ArcGIS Online administrator role who belongs to the Hub’s community organization. This person can set up new community accounts for your partners if they need them.
Step 1: Onboard partners to the Hub community
Before partners can create events, they must have an account with your Hub community. Anyone can create a community account if your Hub community is open to the public. You can also contact your Hub community administrator and request that they set up new accounts using each partner’s email address. This method requires the administrator to set a temporary password for each account. Once these accounts have been configured, you can add your partners to an initiative’s core team and send them an email with their temporary sign-in credentials.
Step 2: Add new members to a core team group
You have two options when adding your partners to a core team. You can add them to your official initiative’s core team or you can create an additional core team by setting up a second initiative.
Method 1: Use your official initiative’s core team
When you add your partners to your official initiative’s core team group, they can edit the initiative’s site and any other content shared with the group. Use this method if you want your partners to contribute additional resources to the initiative, such as uploading data or creating a new page.
To access your official initiative’s core team, open the initiative in edit mode and click the second drop-down menu in the navigation bar. Choose Teams.

Open the initiative’s core team. Click the Add Members button and ensure that you’re viewing a list of community members. Select your partners from the list.

Note: If you don’t see the person you want to add, they may not be a member of your Hub’s community yet. Refer to step one.
Method 2: Use a separate core team
If you don’t want add your partners to your official initiative’s core team group, you can create a new initiative to generate a second core team group. Choose this option if you want to prevent partners from editing the initiative’s content.
Get started by creating a custom initiative. Give it a distinct title so that you can easily distinguish it from your official initiative.

All new initiatives are shared privately with members of the initiative’s core team group, so you can always manage the initiative internally. To add your partners to the group, open the initiative in edit mode and click the second drop-down menu in the navigation bar. Choose Teams.

Open the initiative’s core team. Click the Add Members button to select your partners from the list.

Note: If you don’t see the person you want to add, they may not be a member of your Hub’s community yet. Refer to step one.
Step 3: Enable collaborative events
This step is imperative. If collaborative events aren’t enabled for the initiative, your partners will not be able to create events. Request that someone with a default ArcGIS Online administrator role visit the official initiative or community events initiative (depending on which method you chose) and follow steps provided in Enable collaborative events. The Hub administrator for your organization should have this default administrative role.
When the administrator enables this feature, they are added to the initiative’s core team. They must remain on the core team for collaborative events to continue working.

Once you’ve completed this step, you can send your new team members an onboarding email and instructions for next steps.
Step 4: Add instructions
To help guide your partners in creating events, you can customize a set of instructions by adding a row to the official initiative’s site or the community-events initiative’s site.
Add a row and text
Open the initiative site in edit mode. Add a row card anywhere on the site’s layout. Then, place a text card on the row. In the text box, provide instructions. For example, you could include the following copy:
Step 1: Follow these steps to create an event. You do not have to include an image for your event, we will add one for you when reviewing your event for submission.
Step 2: To complete your event, publish the event to the core team.
Step 3: After you’ve added your events, follow these steps to send an email to <insert Initiative Manager name>. In the body of the email, inform them that your events are ready for review so that they can be added to the initiative’s public website.
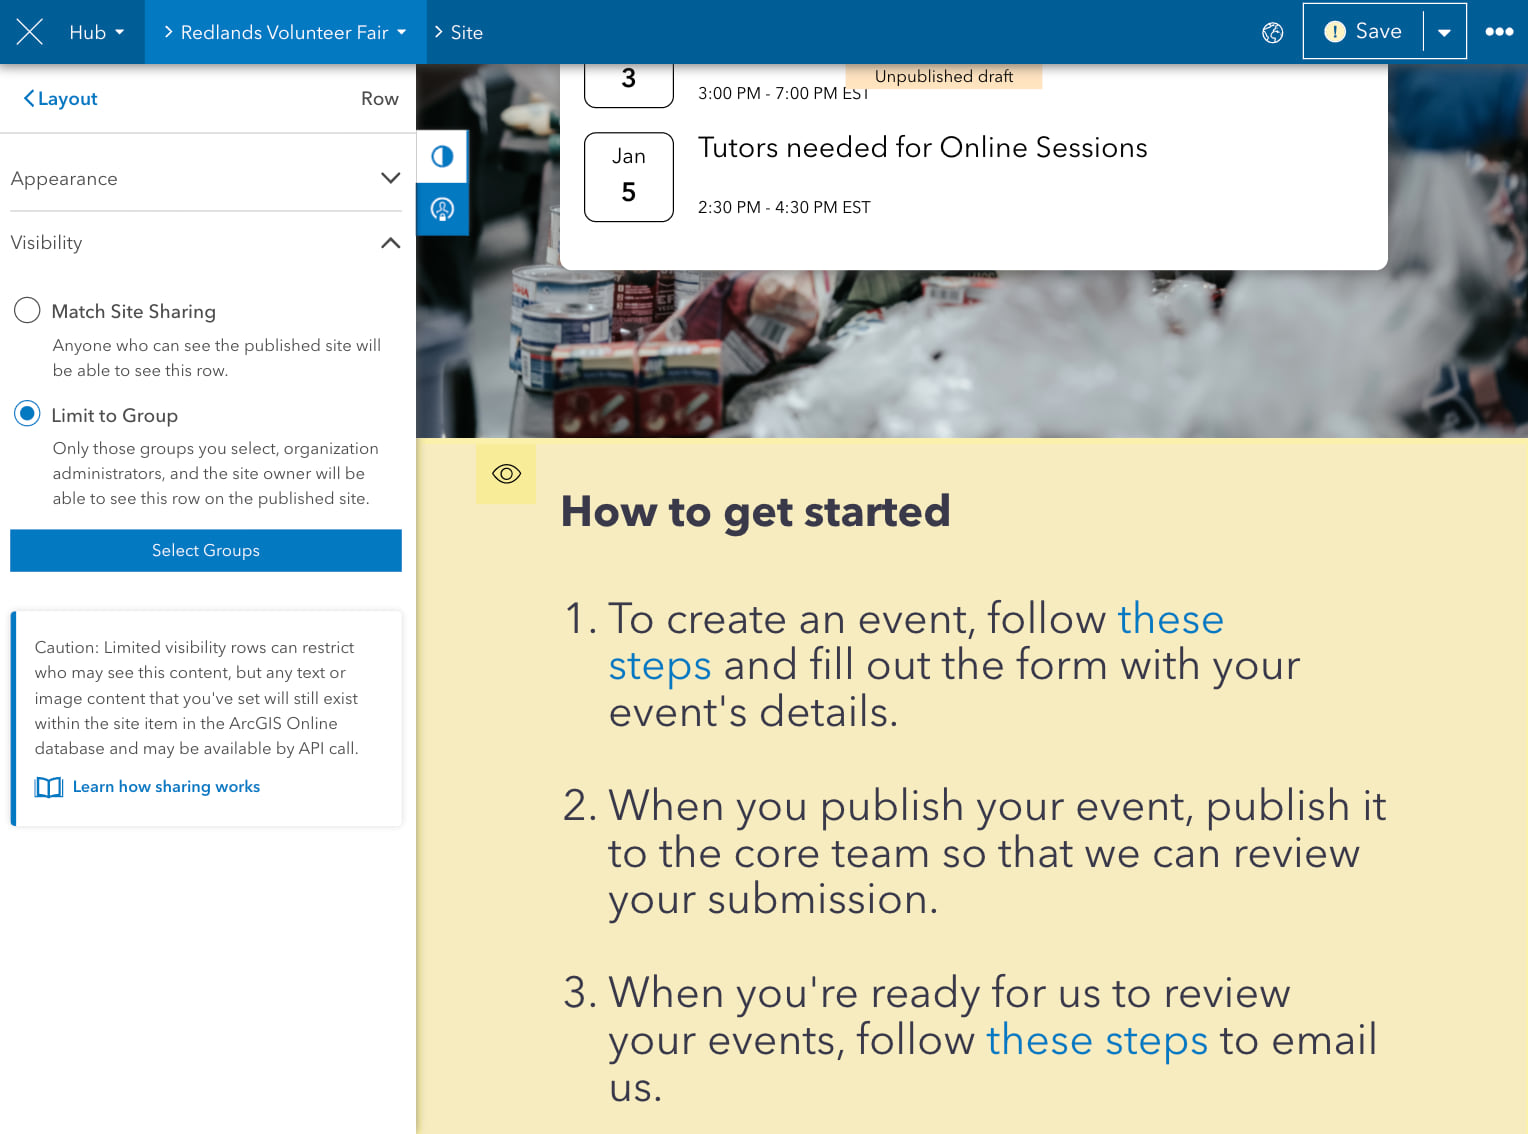
Set row visibility
Row visibility allows you to share the rest of your site with your organization or the public. If your partners are members of your official core team, set the visibility of the row to only your core team by clicking Visibility in the row’s settings. Doing so, prevents anyone who is not a core team member from seeing the row and its set of instructions, even if the site is elevated to public visibility. You do not have to complete this step if you’ve created a separate core team, as its initiative will always be shared with the core team.
Once you’ve clicked Visibility in row settings, click Limit to Group, then click Select Groups. From the list, select your initiative’s core team and click Select.
 to give them visibility of the row.")
To confirm the row’s visibility setting, ensure that your site is shared with the public, then click Save and Publish Draft. In the top-right corner of the site, click your profile dropdown menu and choose Sign Out. The row disappears because you are viewing the site anonymously. If needed, revert the site’s visibility back to the core team or organization.
Step 5: Send a welcome email
Welcome your partners to their new team by emailing each individual the information they need to get started. This step is especially important if you have your partners’ community account credentials (username and temporary password). A good onboarding email will include the following:
- A link to the initiative’s site and instructions on how to sign in. Global navigation must be enabled for the Sign In option to appear in the top-right corner of the initiative’s site.
- A reminder to follow the instructions provided on the site.
- Your contact information.
- A request that your partner contact you when they’ve finished adding their events by sending you an email from the core team or to another email.

Step 6: Review events
If you’ve instructed your team members to publish their events only to the core team, you can review, update, and publish them prior to them becoming discoverable on your initiative’s site.
Open the initiative’s site in edit mode and click the first drop-down menu and choose Events. You will see a list of all events to which you have access. Since you are the Initiative Manager for the official initiative or Community-only initiative, you will see all events shared with the initiative’s core team.
Events that have been shared with the core team or organization are noted as Private.

Click on the event to open it in edit mode and make any necessary adjustments to the event’s details. When you’re ready to share the event with the public, click the visibility dropdown menu and update it to Public.

Step 7: Add events to the official initiative’s site
To share events on the initiative’s site, you must use a Featured Event or Upcoming Events card. A featured event allows you to display details for one event only, whereas Upcoming Events can display a list of all events associated with the initiative.
In this example, we’ll configure an Upcoming Events cards with events from a community-only initiative.
Open the official initiative in edit mode and add an Upcoming Events card to the layout. On the side panel, click Select Initiatives.

You do not need to complete this step if your partners created events as official core team members – their events will automatically populate the new card. Just ensure that the visibility of the events have been updated.
From the list of initiatives, select the community-only initiative and click Select.

Once you’ve added the events to your initiative’s site, visitors can sign up to attend an event by clicking its Attend button. If someone tries to click Attend on an event but isn’t signed in with their ArcGIS account (a staff account or community account), they will be prompted to sign in so that they can be added to the event’s attendees group. You and your partners, as well as other core team members, will be able to send emails with content, surveys, reminders, and other relevant information to attendees by following these steps.
Generate awareness
There are a few ways that you can encourage the public to sign up for your initiative’s event. One simple way is to ensure that the one-click sharing button is enabled for the initiative’s site. This button appears on all pages and views related to the initiative and allows visitors to quickly share content through social media. If your initiative has followers, send them an email with a link to the new event or a reminder for them to check out your site’s updated calendar. You can also invite them and anyone else who has a staff or community account to attend the event.
Feedback and questions
If you have any questions or comments about this workflow, please leave a comment below. ArcGIS Hub also has a User Lab, a way for you to meet the team, get sneak peeks into upcoming features, and provide feedback on core functionality.

Article Discussion: