Imagery visualization and interpretation are now available through the new Image Interpretation (beta) configurable app. Check out the Imagery App Intro blog for an overview of the configurable app. Here, we will provide a brief tutorial to help create and use some of the features available in the Image Interpretation configurable app.
In this example, you will create an app that can identify a burned area using the Compare and Change Detection tools available in the Image Interpretation (beta) template. You will locate the app template, configure your app, and use the application to identify burn scars
Creating and Configuring the Image Interpretation App
1. Create a new web map
Esri’s Living Atlas provides many different image services; in this example, we will use Esri’s world-wide dynamic Multispectral Landsat 8 image service.
- Sign in to your ArcGIS Organization
- Save this Imagery Blog web map to your content by opening the map and selecting Save As. Save in a location you can reference later when creating your app.
2. Locate the Image Interpretation (beta) configurable app
Since the Image Interpretation template is still in beta, you’ll need to seek out the template—it won’t be available with the rest of the app templates.
- To find it, make sure you’re logged in to ArcGIS Online; search for “tags:Imagery Interpretation Template”; and make sure you uncheck “Only search in <My Org Name>”
- Open the item details by clicking “Image Interpretation (beta)
3. Create a web app
Once you are on the item details of the Image Interpretation (beta) app you can begin creating your own app.
- Select Create a Web App. Tip: If you don’t see the Create a Web App button, verify you are signed in. You may need to return to step 2.
- Provide a descriptive title and tags and click OK
- Select your web map you created earlier
4. Configure your app
The purpose of this app is to easily identify a burned area in Lake County, CA using the Change Detection tool, and then visualize before and after images using the Compare tool.
- On the General tab, check Enable search tool to add a location search tool in the web app
- Navigate to the Imagery Layers tab in the configuration panel
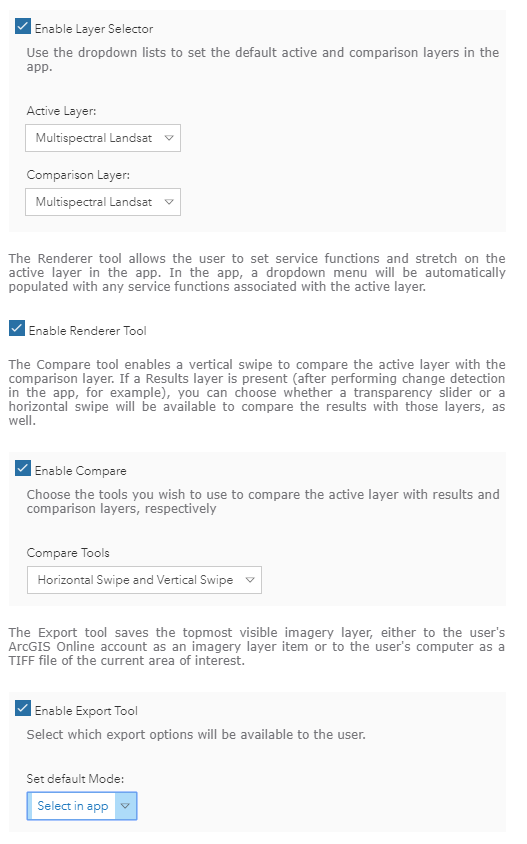
- Check on all four tools: Enable Layer Selector Tool, Enable Rendered Tool, Enable Compare, and Enable Export Tool. Take a moment to read the descriptions of the tools. Configure the tools to match the screenshot.

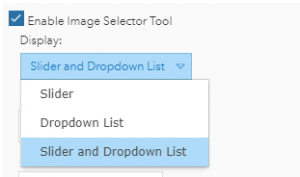
- Navigate to the Image Selector Tab.Check Enable Image Selector Tool. Change the Display drop-down to ‘Slider and Drop-down List’

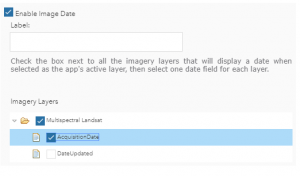
- Under the Imagery Layers section, check Multispectral Landsat, then check the AcquisitionDate field. Enabling AcquisitionDate will let you choose which images you want to compare based on their acquisition date.
- Navigate to the Image Date Tab
- Check Enable Image Date
- Enter “AcquisitionDate” as the label
- Check Multispectral Landsat and select AcquisitionDate
- Navigate to the Image Date Tab
- Check Enable Image Date
- Enter “Acquisition Date” for the label
- Check Multispectral Landsat and select AcquisitionDate

Interacting with the Image Interpretation App
You will now interact with the app and use the Renderer, Change Detection, and Compare tools to explore a burn scar.
1.Use the Renderer tool ![]() to view the image using Short-Wave Infrared with DRA. Hit Apply. Tip: Mouse over each tool for a descriptive tool-tip.
to view the image using Short-Wave Infrared with DRA. Hit Apply. Tip: Mouse over each tool for a descriptive tool-tip.
2. Use the Image Selector tool to find the Landsat scenes you’ll compare.
- Open the Image Selector Tool
- Check Enable Image Selector

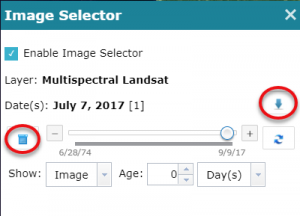
- Change the slider to a drop-down using the scroll icon circled on the right in the screenshot.
- Select Aug 3, 2015, from the drop-down, the date the burn scar appeared
- Click the arrow button to set the Aug 3 image as the comparison layer, circled in the screenshot.
- Now, another date will need to be selected to compare with the burn scar image. From the drop-down list, select August 5, 2016, a year after the burn. The image in the display will update to the newly selected date. Tip: Two images always need to be selected to use the Compare tool. This can be two separate imagery layers or two different dates within an image service.
3.Use the Compare tool to explore the differences between the before and after images.
- Activate the Compare tool.
 Immediately you will notice your Compare tool is set to the previously selected date and the currently displayed date—August 3, 2015, and August 5,2016.
 - Use the vertical slider to view the differences between the two images
- Click the Compare tool icon to turn off the tool when you are done
4. Use the Change Detection tool to create an image of where the burn scar occurred.
- Activate the Change Detection tool

- Click Apply to create a difference image, which subtracts one image from the other to show you where the differences are
This is a quick introduction to a few of the tools available within the Image Interpretation Application.


Article Discussion: