Search in Map Viewer is used to find places on a map. Search is located in the lower right, alongside the Settings (light) toolbar. By default, Map Viewer and ArcGIS Instant Apps use the ArcGIS World Geocoding Service locator to find addresses, places, landmarks, points of interest, and XY coordinates worldwide.
Search in Map Viewer and apps can be refined or extended in a several ways. For example, map authors can configure one or more layers and attribute fields in the map to be used in search. In a similar way, apps can also be configured with one or more layers and attribute search sources.
Follow this tutorial to learn more about configuring layer and attribute search source in maps and apps.
Quick links
Use these links to jump to a section of interest.
Configure layer and attribute search in maps
Configure layer and attribute search in apps
More information

Configure layer and attribute search in maps
You can follow along using the Florida Springs example map, or use the Florida Springs layer to create and configure search in your own map. Whether starting with the example map or example layer, Sign in to save the map to your Content.
Step 1 — Sign in to your ArcGIS account and save the map.
Step 2 — Open the map item details and click Settings.

Step 3 — Scroll down in settings to locate the Application Settings section. Check the By Layer box to enable search using a map layer.

Step 4 — Complete the Application Settings.
(a) – Enter the hint text. This is the string that will be displayed when search is used.
(b) – Choose the layer and and search field from the drop-down. You can also choose from Contains or Equals for applying the search string.
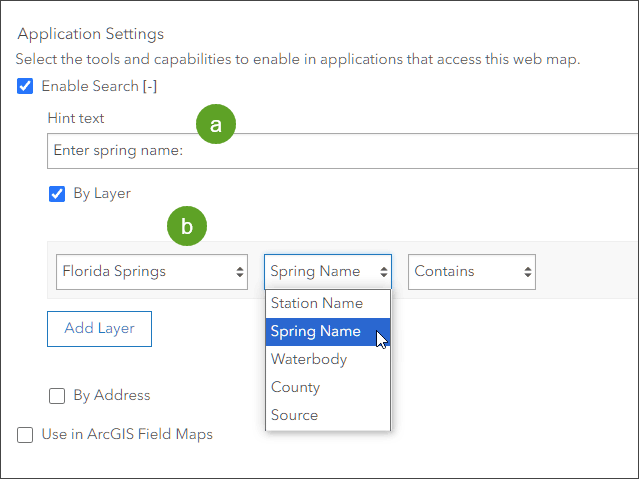
When finished, click Save.
Step 5 — Open the web map and use search. The search tool displays the newly added layer attribute search along with the default ArcGIS World Geocoding Service (unless your organization has configured a custom locator). The default is to use All locators when searching.

Step 6 — Select Florida Springs: Spring Name from the search drop-down, as shown above.
Step 7 — At the Enter spring name prompt, begin typing to find matches.

Choose a match to open its pop-up and zoom to the location.

Configure layer and attribute search apps
ArcGIS Instant Apps can be configured to use a layer attribute search similar to the one configured for the map described in the section above. The app can be configured to use the layer search in addition to the World Geocoding Service (or other locators configured in your organization), or you can restrict search to use only a single layer and attribute.
You can view the example Basic Instant App and configure your own by following the steps below.
Step 1 — Open the Florida Springs example map and sign in to your ArcGIS account. Save the map.
Step 2 — You can create a web app in two ways.
(a) – From the Overview tab in the map item details, click Create Web App and choose Instant Apps.

(b) – Open the map and click Create app from the Content (dark) toolbar, then choose Instant Apps.

Step 3 — Choose an Instant App. This tutorial uses Basic.

Step 4 — In the Create app pane, enter a title and (optionally) tags.

There are many options for configuring Instant Apps. For this example, the focus will be on Search configuration. The World Geocoding Service will be removed and layer search will be added.
Step 4 — In Step 3 in Express mode (or Interactivity > Search in full setup mode), locate the Search configuration section. Ensure that Search is toggled on (the default). Click Add a source.

Step 5 — In the Add search source pane, configure as follows:
(a) – Choose Layer as the source.
(b) – From the Set up source drop-down, choose Map.
(c) – Choose the Florida Springs layer.
(d) – Choose Spring Name from the search field drop-down.
(e) – Click Add source when finished.

Step 6 — Choose the field Spring Name in the Display field drop-down. Then open Additional search options.

Step 7 — Configure additional search options as desired. Click Done when finished.

Step 8 — Since we only want the app to search for springs by name, delete the ArcGIS World Geocoding Service source. If you want to use all sources, toggle All sources on.

Step 9 — Complete the rest of the app configuration as desired and click Publish, then Launch when done.
The configured example app includes an information window and open search tool. Begin entering text, when a match is selected the map will zoom to its location.

More information
For more information, see:
- Search locations and features (Help)
- Configure feature and table search for maps (Help)
- Configure search in apps (Help)
- Geocoding and geosearch (Help)

Commenting is not enabled for this article.