Have you ever published data with date/time fields as map services or feature services? After they were published and added to a web map and app, did the date and/or time display incorrectly? Did you spend a few hours trying to remember Time Zone math from grade 3 to try to figure out what was happening? Did you wish you could hop in a time-travelling DeLorean and travel back to the Wild West before Sir Sanford Fleming invented Standard Time? As equations of relativity show that both space and time coordinates of any physical event, GIS data with date field is a great way to show where an event occurs along the space time continuum.
Date is a common data type that is often used in GIS to display the location, date and time of an event, like when and where a tree inspection is performed, rain is predicted or garbage collection is scheduled. Traditionally with static print maps, data was collected and displayed in a local time zone. As many maps are now displayed as interactive apps on the web, they can be accessed from all over the world, requiring a new approach to collecting and displaying date data. Displaying and publishing date data can often be confusing and appear to be incorrect. This blog will discuss four rules of working with date fields that need to be considered and accounted for to master space and time in data on the web. Note. If you want learn more about the complexities of developing with time zones, check out this YouTube video.
Golden Rules to Mastering Space and Time on the Web!
Understanding the interaction between web services and apps with date fields is critical for mastering space and time data. The concepts discussed in this blog will apply in web apps and some runtime apps from Esri, including Map Viewer, Web AppBuilder, configurable apps, Operations Dashboard, Collector, etc. For the examples a text field (Text Date) and a date field (Start Date) were added to each dataset to show the original date values in the dataset and how the server/app transformations the date fields.
Note. Using a text field instead of a date field is a potential work around for showing static dates. Using text fields instead of date fields will remove the capability to enable time on a layer for animation, use time-based smart mapping styles and use date based scripting (calculate field, Arcade, Python API).
Rule #1: When viewing apps, the date/time field in your web service transforms from UTC to the time zone selected on your device clock
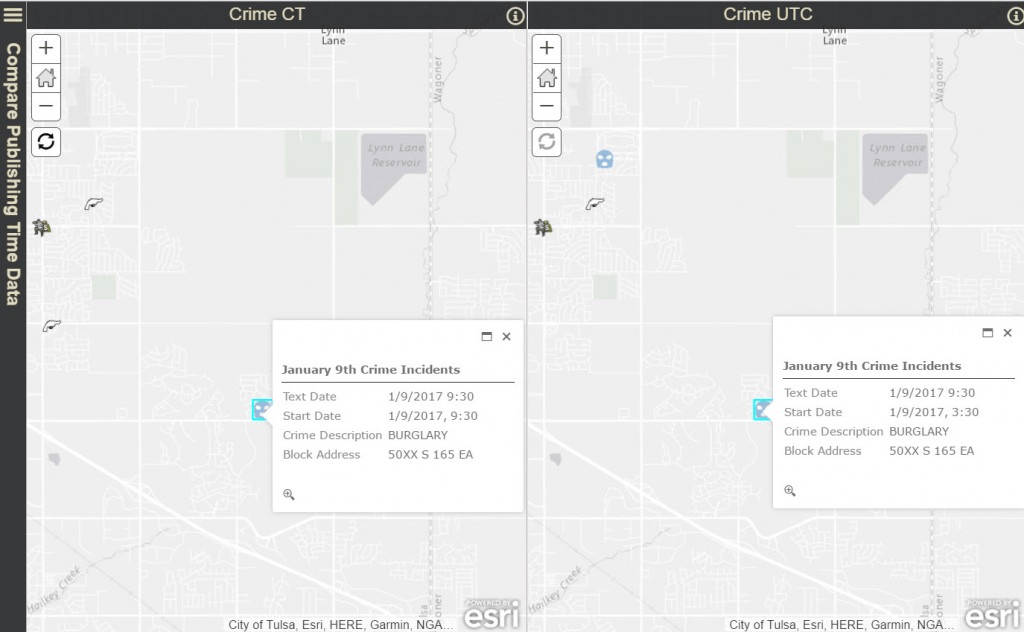
Consider where the viewers of your app are located when they are viewing your app. They could be located in your local time zone or they could potentially be anywhere in the world. Web apps will show date fields in the viewer’s local time zone to ensure that a consistent time is displayed at all locations.
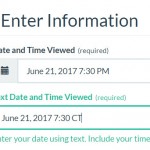
This may seem confusing but consider an editing workflow. The Heron Watch Citizen Science app was created so people from all over the world can submit data points when and where they view a heron. The Geoform app takes the input date field in a local time and transforms all edits into UTC for storage in the feature service, regardless of where the editor is located.
As you look at the results of entries in this app, you’ll notice that text entries were added at different times and time zones, but when you compare the date field, they were all entered at approximately the same time on June 21st, 2017.
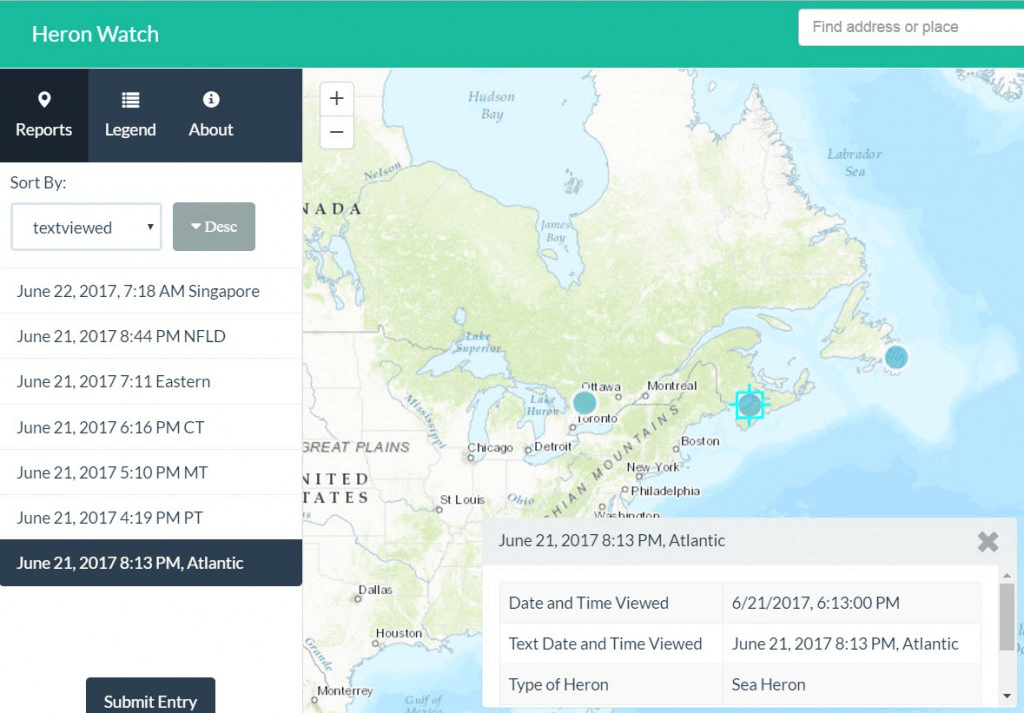
This transformation that occurs keeps the time format standard and usable across the World Wide Web without users needing to think about time zones.
Note. Depending on where you are located, the text field of the examples may or may not match with the date field. This is because the app will automatically transform the data from UTC to the time zone of the computer’s operating system. If you want the date to appear like the screenshots, change your computer clock to the specified time zone in the example to see the date’s line up.
Rule #2: When publishing data to a map service or feature service, it is assumed that the date fields are in UTC unless specified otherwise!
When working with date fields it is essential to understand how time is represented in your data set. Is the date data that you have in UTC or a local time zone? Often data is collected and represented in a local time zone in shapefiles, text files and file geodatabases. The date field is accepted as is without requiring a time zone or standard time to be specified. Web services assume the data is UTC when it’s published as the app will transform the data (Rule #1).
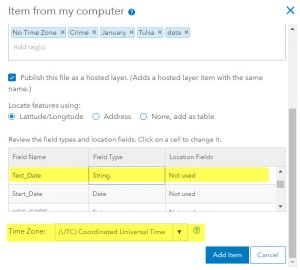
As an example, let’s look at a crime dataset that was downloaded from the City of Tulsa Open Data Site. This data was slightly modified to contain block address, crime description and start date fields that includes the date and time when the crime started. A duplicate date field was added to view the original date text from the spreadsheet before publishing. The data was published as a hosted feature layer from a CSV file, using the default time zone and setting a date field to be a string.
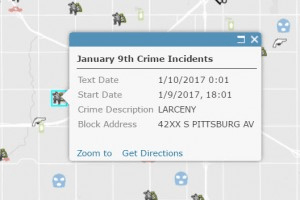
The layer was then used to create a web map that was filtered to display the crimes that occurred on January 9th, 2017. When a pop-up is selected, you’ll notice that the text date and start date fields are different in the pop-ups even though they were identical values when they were originally published.
Time Math:
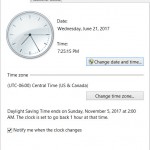
The input date (Text Date) of this example was 1/10/2017, 00:01 am in Tulsa (Central). When it was published, no time zone was specified so the feature service assumed the input was 1/10/2017 00:01, UTC. The app performed the following time transformation to get the value of the Start Date field: 1/10/2017, 00:01 UTC – 6 hours = 1/9/2017, 18:01.

When working with date fields it is essential to understand how time is represented in your data set. Is the date data that you have in UTC or a local time zone? Often data is collected and represented in a local time zone in shapefiles, text files and file geodatabases. The date field is accepted as is without requiring a time zone or standard time to be specified. Web services assume the data is UTC when it’s published as the app will transform the data (Rule #1).
As an example, let’s look at a crime dataset that was downloaded from the City of Tulsa Open Data Site. This data was slightly modified to contain block address, crime description and start date fields that includes the date and time when the crime started. A duplicate date field was added to view the original date text from the spreadsheet before publishing. The data was published as a hosted feature layer from a CSV file, using the default time zone and setting a date field to be a string.
Rule #3: When entering a date field, a default time of 12:00 am is entered when a time is not specified.
Sometimes a time isn’t required information when displaying a date. If you are displaying road work schedules, it’s only required to show the start and end date but not the time. For this example, road work data was downloaded from the City of Salem Open Data Site. The data contains a start and end date for the period of time when road work will be performed. There is also a text field of start and end time to show the daily schedule of work hours. Date fields always include a time, even if it isn’t displayed in the pop-up or table. The start and end date fields in this example were modified to include the date and no time values. When a time isn’t specified, it is assumed that the time is 12:00 am. This can lead to some confusion as the app time transformation still occurs (Rule 1) when a time isn’t specified. If a time zone isn’t specified during publishing a time of 12:00 am UTC is entered as the time of the date in the database. This can result in the date appearing incorrectly.
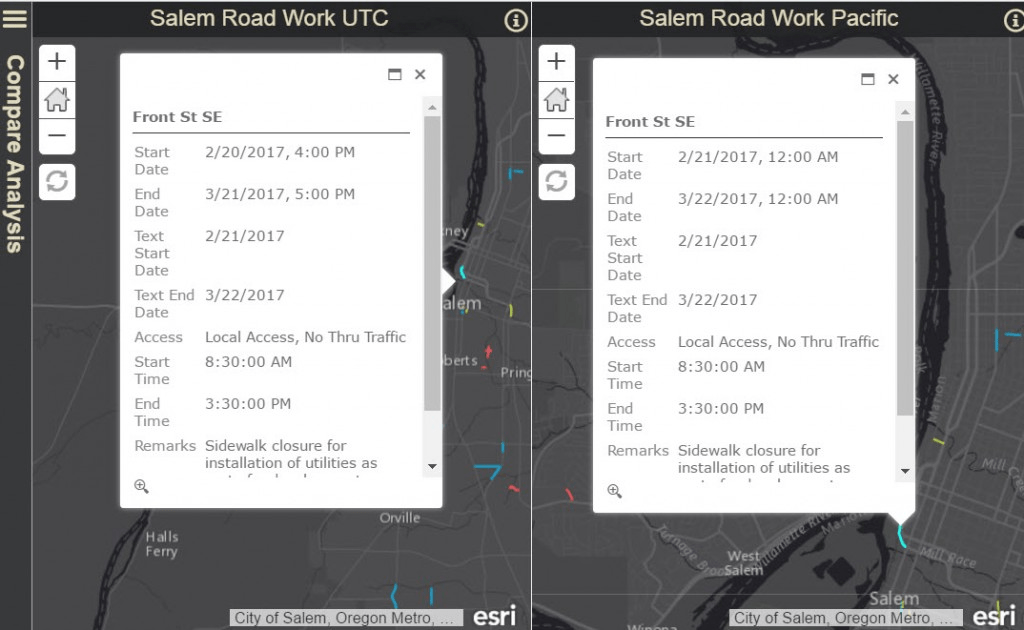
The image below displays a service where the date field appears on the day prior to the roadwork day. In the example below, no time was specified when publishing a shapefile using ArcGIS Pro. The date fields (Start Date, End Date) appear at 5:00 pm the day prior to the original input text fields (Text Start Date, End Start Date).
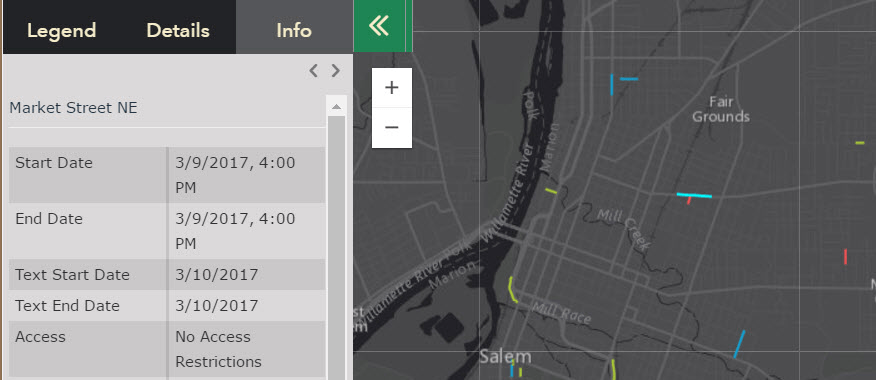
Time Math: 3/10/2017 12:00 UTC transforms to Pacific Time: 3/10/2017 12:00 UTC – 8 hours = 3/9/2017, 16:00 (4:00 PM). Publishing the data and specifying a time zone while publishing will resolve this error.
Rule #4: Consider Daylight Savings Time when publishing data.
Many places observe Daylight Savings Time (DST) where the hours adjust in the Spring and Fall to better use daylight hours. Some nations and regions don’t observe daylight savings time such as places where daylight doesn’t fluctuate significantly and in some regions, like Arizona and Saskatchewan. For this reason check the status of DST in the region of your data and adjust for daylight savings when needed.
ArcGIS Pro, provides a configuration option during publishing to adjust for DST. When you publish your data to adjust for DST, the publishing process automatically modifies your date fields to align with the daylight savings adjustments of the region.
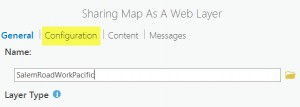
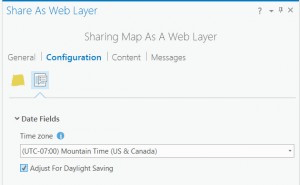
Using the example from the previous rule, you can see how the start date and end date time in the UTC web map are different by 1 hour, even though they were both published with the values of 12:00 am UTC. As DST occurred on March 12, 2017, dates after March 12, are adjusted by one hour less in the application in accordance to computer clock settings. When the data is published to adjust for DST, both the service and the application adjust for daylight savings correctly. In the Salem Road Work Pacific map, Pacific Time and DST publishing settings were enabled, resulting in the correct display of time.
Now that you understand the 4 rules for how time data is handled on the web, consider the time data that you currently use. Identify the time zone in which your data originates and any time zone or daylight savings adjustments that may need to be made for the dates and times to display correctly. Once your date data is published correctly, take advantage and confidently use the great date and time functionality in your apps. Check out these great resources to display your time data in web maps and apps:


Showing Time in Story Maps (applies to all apps)
Show Time in your Maps (focus on web cartography techniques with Smart Mapping and Filtering)

Commenting is not enabled for this article.