Estimated Read Time: 5.5 minutes
Picture this: you’ve received updated data for a project. It could be new survey results, updated customer records, or the latest population data for your county.
Now, you need to decide what to do with the dataset you already have and consider how any changes may impact the layers, maps, and apps you’ve created using the original dataset. Figuring out a workflow with the least impact and downtime is critical.
You could delete your old, existing dataset and start fresh. But what if the overwrite resets some of your previous configurations or breaks the shared data? In cases like that, updating your existing datasets or refreshing them with new data may be more efficient.
In this blog, we’ll explore three new Overwrite Options in ArcGIS Pro 3.5 and work through an example of how to use them.
Overwrite tool outputs
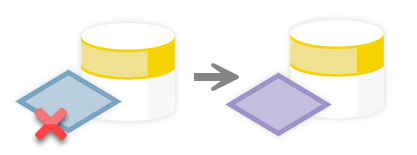
If you’ve ever ran a geoprocessing tool, you’ve likely encountered the warning below.

The message appears next to an output parameter when the given output already exists and the option to allow overwrites is checked. So, when you run a tool with this warning, the existing dataset is deleted and replaced by the tool’s output.
Pro 3.5 tool overwrite enhancements
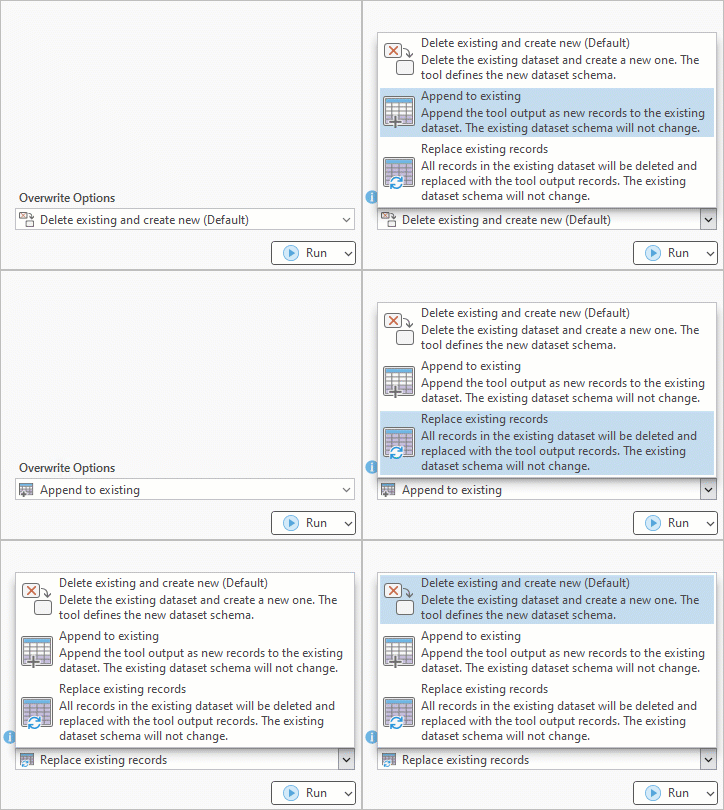
To provide more control for tool outputs, ArcGIS Pro 3.5 includes an Overwrite Options drop-down list with three overwrite methods to choose from.

Use the following overwrite option to ensure a clean slate each time you run a tool:
1. Delete existing and create new (Default)–Performs the same overwrite behavior that was available in previous ArcGIS Pro releases, where the original dataset is deleted from the database and replaced with a new one.

Use the following options to update an existing dataset without altering its structure, including its table schema and fields:
2. Append to existing–Adds the tool’s output features or records to the original dataset.

3. Replace existing records – The original dataset’s features and attributes are deleted and replaced by the tool’s output.

Where are the Overwrite Options?
You can find Overwrite Options in many tools that create output datasets when you set the tool output to a dataset that already exists. These options are included in some of the most commonly-used tools in the Analysis toolbox (Pairwise Buffer, Summary Statistics, etc.), and Data Management features toolset (XY Table to Point, Copy Features, etc.).
You can also specify the Overwrite Options for these tools in Python using the overwriteOutputOptions environment property.
What to know before getting started
Before diving into Overwrite Options, here are a few things to keep in mind to avoid any surprises:
- Overwrites are permanent, so, you cannot undo any changes.
- When using the Append to existing or Replace existing records options to update outputs:
- The geometry type must match the original dataset. For example, you cannot create polygons in a point feature class.
- All non-matching fields are excluded from the tool output.
- Outputs will be projected in the same spatial reference as the existing dataset.
Example: Update a feature layer with Overwrite Options in ArcGIS Pro 3.5
Objective: Update an existing point feature layer in your portal without disrupting its connected data services, such as its dashboards, maps, or web apps.
Your team maintains a shared point feature layer of NYPD Stop, Question and Frisk incidents in your organization’s portal. This layer is used in several shared maps, dashboards, and web apps to support research on racial disparities for police stops in New York City.

The point dataset includes the stop date and details, demographic information about the suspect, and the XY coordinates.
| OID | SHAPE | STOP_FRISK_DATE | SUSPECTED_CRIME_DESCRIPTION | ARRESTED | SUSPECT_SEX | SUSPECT_RACE | STOP_LOC_X | STOP_LOC_Y |
| 1 | Point | 1/1/2023 | MENACING | N | MALE | BLACK | 984781 | 198509 |
| 2 | Point | 1/1/2023 | CPW | Y | MALE | WHITE HISP | 1015557 | 170379 |
| 3 | Point | 1/1/2023 | CPW | N | MALE | WHITE HISP | 1005940 | 197103 |
| 4 | Point | 1/1/2023 | CPW | N | MALE | BLACK | 1049830 | 185439 |
| 5 | Point | 1/1/2023 | CPW | Y | MALE | BLACK HISP | 1013821 | 252710 |
Your organization is still using data from 2023 for the point feature layer. But the NYPD releases updated stop, question and frisk data annually in Excel (.xlsx) files. To keep your internal systems current, you need to overwrite the existing feature layer, so that it includes the most recent year’s data (2024).
Append new data to a Feature Service Layer
Use the XY Table To Point tool to convert the table to points and append new records to the existing feature layer.
You may be thinking, aren’t you skipping a step?
In previous versions of Pro, yes. You would need to first run the XY Table To Point tool to create points, then run the Append tool to add the new points to the feature layer.
New in ArcGIS Pro 3.5, you can use the Append to Existing option to run an append operation behind the scenes while you run a tool, instead of creating a new output dataset that has to be post-processed!
Note: Although you won’t be using the Append tool today, in ArcGIS Pro 3.5, the tool has some exciting new features that improve performance for feature service layers!
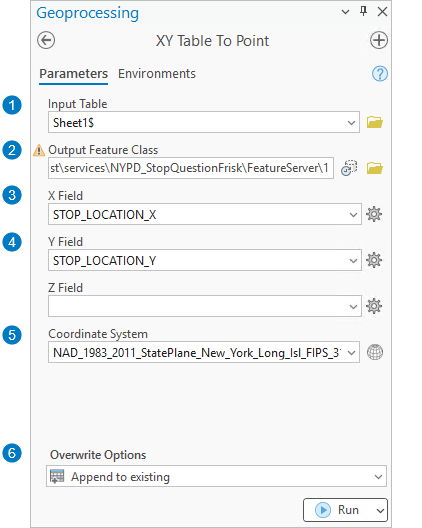
Open the XY Table To Point tool and set the following parameters:

1. Input Table: The excel sheet with the updated data. sqf2024:Sheet1$
2. Output Feature Class: The REST endpoint/URL of the feature service data.
A warning will appear next to the parameter, indicating the feature class already exists, and Overwrite Options will appear above the Run button.
Note: If you see an error message instead of a warning, check the Allow geoprocessing tools to overwrite existing datasets option.
3. X Field: STOP_LOCATION_X
4. Y Field: STOP_LOCATION_Y
Note: You may need to clean the data in Excel to convert the coordinate fields to a numeric field type. Learn more about working with Excel in ArcGIS Pro
5. Coordinate System: 6539
6. Overwrite Options: Append to existing
Note: You cannot delete or create new web feature layers from geoprocessing tools, you can only process the layer’s existing records, including deleting or appending rows. So, if you attempt to run the tool using Delete Existing and create new it will fail.
Run the tool.
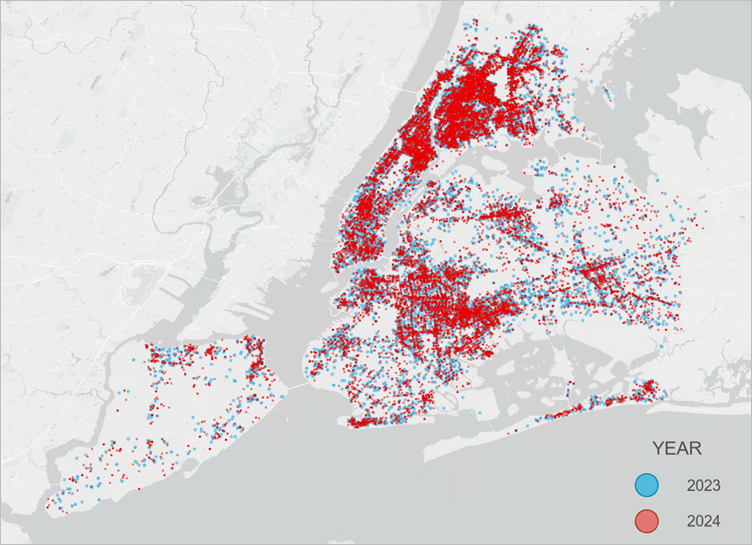
The resulting map includes the 2024 points appended to the existing feature layer.

You may have noticed that the input table has over 80 fields, whereas the feature layer in the example contains 9 fields. By using the Append to existing (or Replace existing records) option to update the feature layer, all non-matching fields from the input table were excluded from the output.
Note: If your output requires field matching rules because the fields have different names or types, you will need to continue using a two steps approach with the Append tool’s Field Map to set the field matching rules.
Summary
In Pro 3.5, Overwrite Options are available in select tools when you set the output to an existing dataset. Overwrite Options include three methods for overwriting your data: Delete existing and create New (default), Append to existing, and Replace existing records.
Use the Delete existing and create new (default) option to delete and replace an existing dataset with the tool output. Use the new Append to existing and Replace existing records options to incrementally update or seamlessly replace your existing datasets attributes without altering its schema.


Will this properly handle relationship classes? I have had this issue for years when we need to swap out the records of a parent table. Even though our relationship classes are set to “Unmanaged” Arc will still set all the child keys to null on me if a delete the parent! This is not what I would expect from an “Unmanaged” relate. Will this new tool have a way around this? If not when the delete fires all the child record keys get set to null and then there is no way to tell them apart anymore.
Preferably “Unmanaged” relates get changed to be truly unmanaged, but if not, this tool should have a way around this. Esp when we have replication going it gets hard. It is also hard since we have 15-20 relates off the parent. It can take hours to delete since it goes and touches every single child.
BTW the way I have been getting around this the last few years is to first calculate all the parent keys to the word Delete. Then replicate if you have a replica. Then finally delete the records. This way when it goes hunting for children it finds none.
thanks for any advice here