In almost every organization, decisions are made based on collected data. Form-based data collection solutions such as ArcGIS Survey123 provide organizations with intuitive new ways to capture rule-based responses from desktop and mobile users. They can be used to collect data from outside of an organization, such as a permit request as part of land development activities, or inside of an organization, such as an annual condition assessment for a physical asset. However, collecting data is only one aspect of the process. Incorporating the data into your organization’s business processes can greatly improve efficiency and accelerate decision making. For example, an organization that routinely performs parcel inspections before issuing a building permit can assign a survey crew to inspect a parcel. The results can be submitted as part of a job in Workflow Manager using a Survey123 survey and the job can instantly be assigned to a GIS specialist to review and update the GIS data based on the collected data.

ArcGIS Survey123 is a simple and intuitive form-centric data gathering solution that allows you to create, share, and analyze survey responses. ArcGIS Workflow Manager is an easy-to-use, scalable enterprise GIS workflow management system that streamlines your production processes by automating and simplifying the production of location-enabled work. When you integrate Survey123 surveys in your Workflow Manager workflows, you’ll be able to collect, view, and edit surveys directly in Workflow Manager. Survey data will also be accessible throughout the workflow for input into geoprocessing tools, email notifications, and more.
Once your integration in setup, you may want to learn more about automatically creating jobs with Survey123 webhooks using the ArcGIS Workflow Manager Server Advanced role. For now, let’s dive in.
Create and publish a survey
Before you get started in Workflow Manager, you’ll need to create and publish a survey in Survey123. The survey can be created on the same ArcGIS Enterprise portal on which you federated Workflow Manager Server, a different ArcGIS Enterprise portal, or ArcGIS Online. In this example, we’ll be creating the survey on the same Enterprise portal as Workflow Manager Server.
1. Sign into your Enterprise portal using the following syntax:
https://survey123.arcgis.com/?portalUrl=https://exampleportal.esri.com/arcgis
2. On the My Surveys tab, click New survey to create and publish a survey.
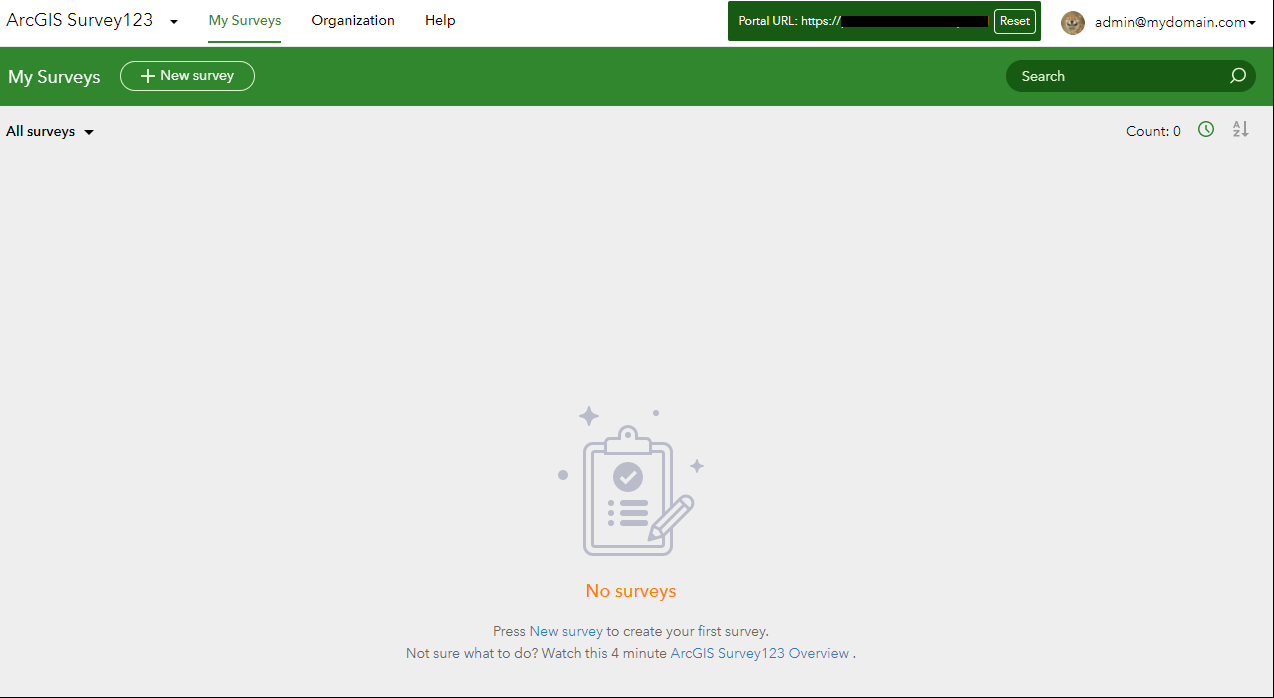
3. Make sure the settings on the Collaborate tab are configured correctly so that the survey can be accessed by survey submitters and viewers.
The following are settings that you might need to change on the Share survey tab:
- Who can submit to this survey? — Do you want to allow the public to submit surveys or only allow members of your organization?
If you only want to allow specific groups, make sure that you also include the Workflow Manager groups that contain the users that will be submitting and viewing the survey.
- What can submitters do? — Do you want submitters to only be able to add new records, add and update records, or have full control?
- Multiple submissions—Do you want to allow submitters to submit more than one survey?
- Survey status—Do you want the survey to be open, closed, or do you want to schedule the open and close dates?
The following are settings that you might need to change on the Share results tab:
- Who can view the results of this survey? — Who do you want to allow to view survey results?
- What data can viewers see? — Do you want to allow viewers to see all records or just their own responses?
If you have users with view only privileges that need to review other users’ responses, you’ll need to allow them to see all records in the survey.
Now that your survey is published and configured, you can add and configure the Survey123 step in your workflow diagram.
Add and configure the Survey123 step
Now let’s head over to Workflow Manager and create a workflow diagram for the Survey123 step.
1. Sign into Workflow Manager and create a workflow diagram.
2. Drag the Survey123 step from the Step Library panel onto the workflow canvas.

The Step Details panel appears on the right side of the workflow canvas.
3. Click Add Survey123 Form to add the survey you created earlier to the Survey123 step.
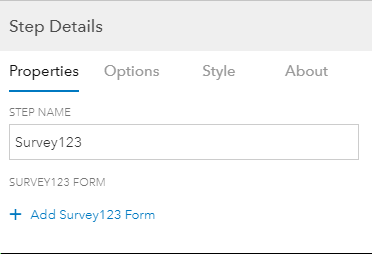
The Add Survey123 Form dialog box appears.
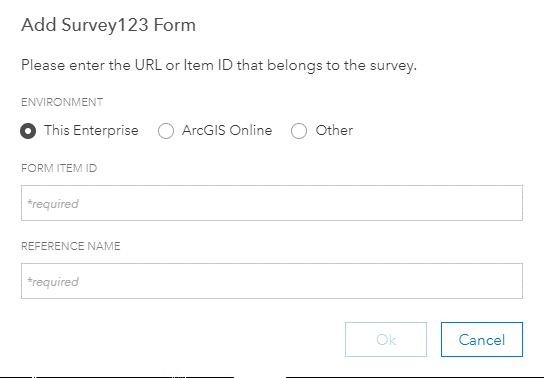
4. In the previous section, we created a survey on the same Enterprise portal as Workflow Manager Server, so you’ll need to choose the This Enterprise
5. In the Form Item ID text box, you’ll need to provide the Item Id for your published survey.
The Item Id can be found in the URL in your web browser’s address bar on the Survey123 website where your survey was published.

6. Lastly, you’ll need to provide a name for the survey in the Reference Name text box.
7. When you’re finished providing the required information, click OK to add your survey to the Survey123 step.
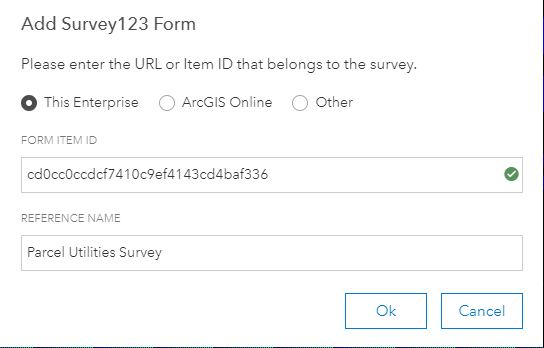
The survey appears in the Step Details panel on the right side of the workflow canvas.
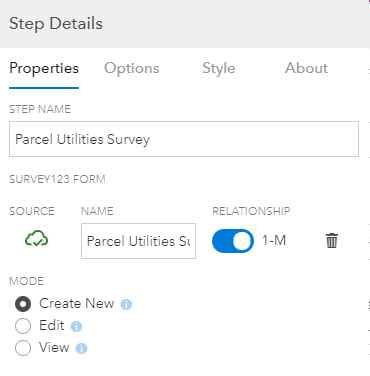
8. Next, you’ll need to decide if you want to allow users to submit more than one record per job using the Relationship toggle button.
Choose the 1-M option to allow multiple records to be submitted per job or the 1-1 option to allow only one record to be submitted per job. Using the 1-M option and the building permit example from earlier, you can assign the survey crew to inspect the building before and after the permit is issued while keeping each record. If the survey crew only needed to perform a final inspection, using the 1-1 option would be OK. In this example we will allow multiple records to be submitted.
9. Lastly, you’ll need to decide how users can interact with the survey by choosing a Mode
In this example, we are going to set the mode to Create New to create a new survey record every time the step is run.
Once you are finished configuring the Survey123 step, you’ll need to save the workflow diagram and activate it. Once activated, you can create a new Job Template for the workflow diagram or associate it with an existing Job Template.
Associate survey data with jobs
Now that we have our survey added to a workflow diagram, we’ll need to create an extended properties table for our Job Template to associate survey records with jobs. Extended properties tables allow you to capture business specific information such as inspection dates, workorder information, or financial data. If you don’t create an extended properties table for the survey, your users can still submit surveys, but the collected data will not be available in Workflow Manager.
1. Edit the Job Template that you associated with your workflow diagram and click the Extended Properties
2. Click Add Survey123 Form.
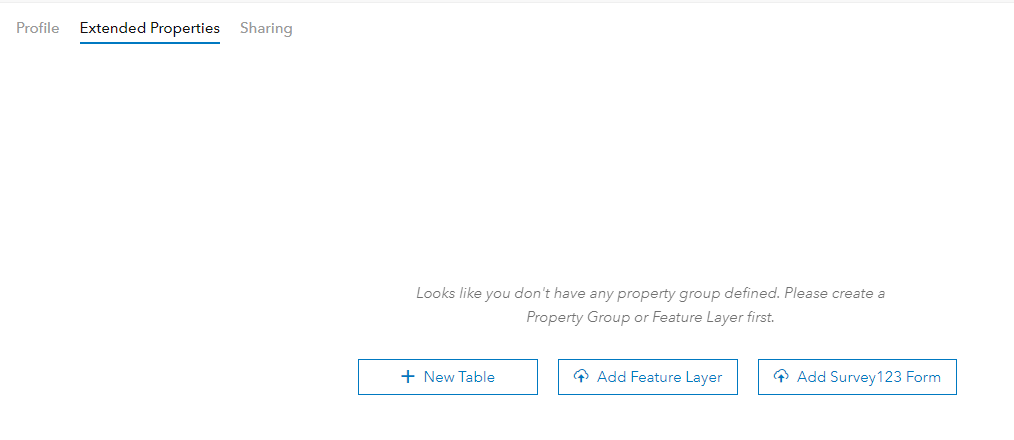
The Add Survey123 Form dialog box appears.
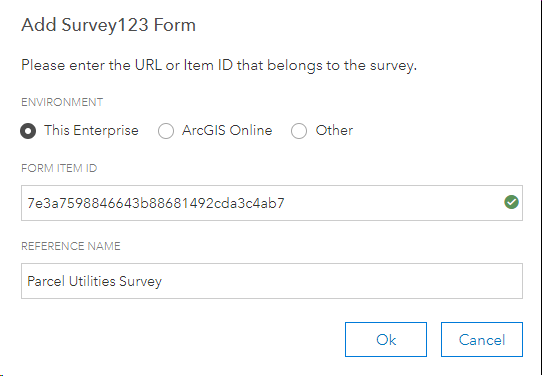
You’ll notice that we are prompted to provide the same information that we provided in steps 4 through 6 of the previous section when we added the survey to the Survey123 step in our workflow diagram.
3. Click OK.
An extended properties table with the fields from your survey is automatically created.
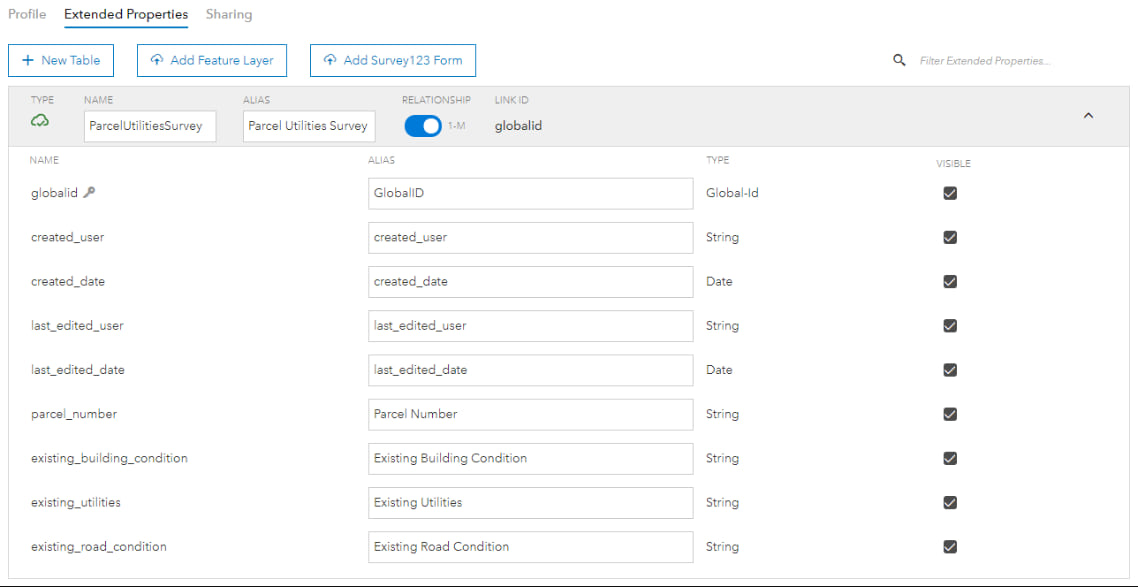
4. Change the relationship to match the relationship configured in the Survey123 step.
5. Change field name aliases or the visibility of fields as necessary, or leave them as is.
6. When you’re done, click Save to save the extended properties table.
Create a job and submit a survey
Now you’re ready to start collecting surveys from jobs in the Workflow Manager web app.
1. Click the Work tab and expand the Create panel on the left side of the Work
2. Locate the Job Template you associated with the workflow diagram and click it to create a new job.
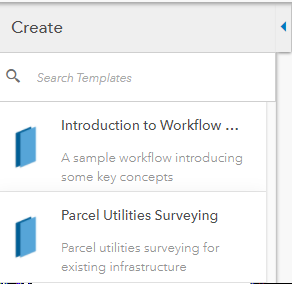
The new job appears in the job list.
3. Complete the steps in the job until you get to the Survey123 step.
4. Start the Survey123
The job tile expands and the survey you associated with the step appears in the job tile.
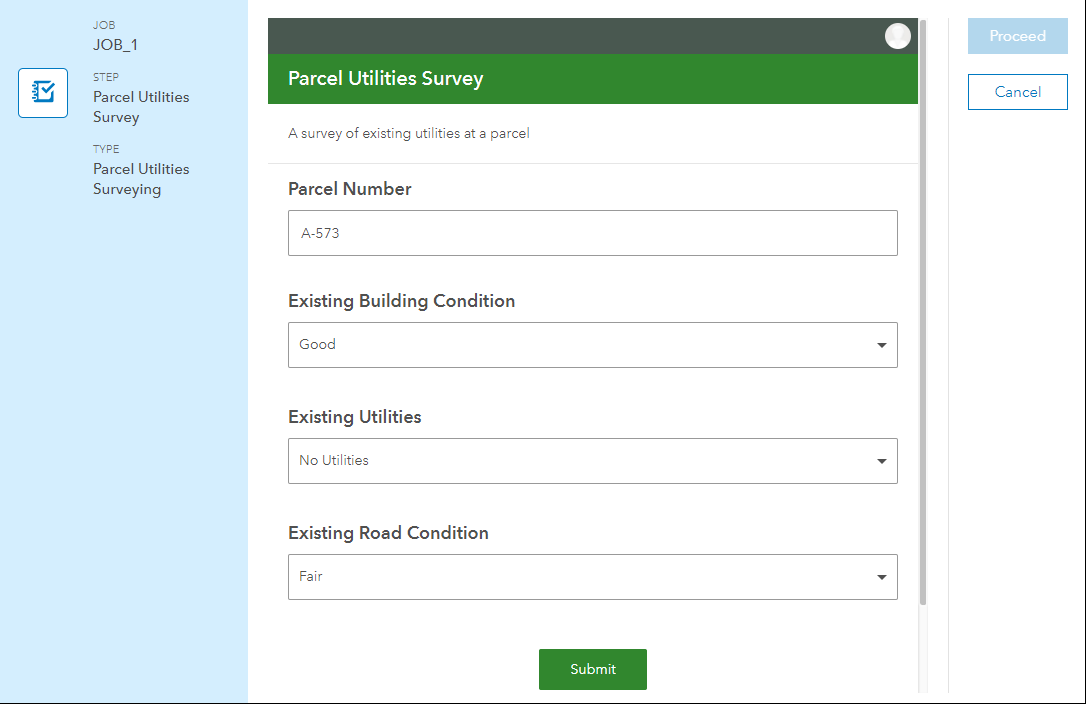
5. Complete the survey and click Submit.
6. After you submit the survey, expand the Details panel on the right side of the Work page if necessary.
7. Click the Refresh Panel button at the top of the Details panel to view the values you submitted in the survey in the job’s extended properties table.
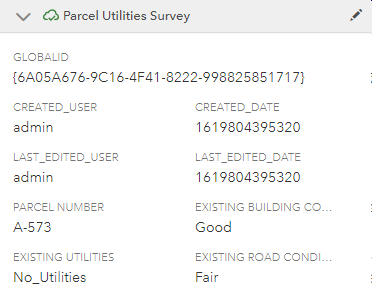
Now you can use the information that was submitted to guide the next steps in the workflow or use ArcGIS Arcade expressions to access the information in other steps such as Send Email or Run GP Service using dynamic job properties. Using our Parcel Utilities Survey example, you can automatically send an email to your organization’s building and safety division with the results of the inspection. You can use an Arcade expression to include the survey information, along with the parcel number, from the extended properties table in the email so they know the status and where the building is located.
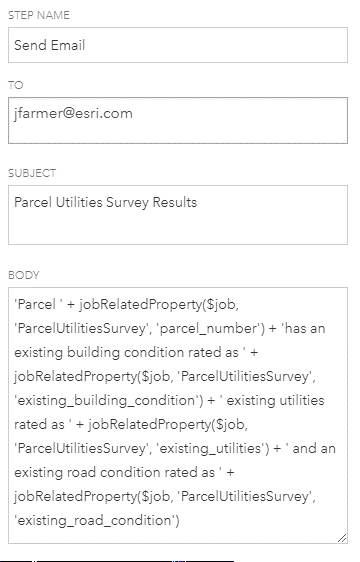

The ArcGIS Survey123 integration with ArcGIS Workflow Manager opens new opportunities for integrating your data collection workflows with larger organizational workflows. To get started or to learn a bit more about Workflow Manager, check out the resources listed below.
Learn More
- Connect with the ArcGIS Workflow Manager Community
- Learn more on the ArcGIS Workflow Manager product page
- Access Workflow Manager documentation
- Check out the Workflow Manager Getting Started video on YouTube
- Sign up for the virtual 2021 Esri User Conference (Esri UC) to attend the ArcGIS Workflow Manager: Overview and Roadmap technical session


Article Discussion: