ArcGIS 10 introduces several new and innovative features that make it easier for you to customize and extend the ArcGIS Desktop applications, including the new Desktop add-in model. The new add-in model provides you with a declaratively-based framework for creating a collection of customizations conveniently packaged within a single compressed file. Add-ins are easily shared between users as they do not require installation programs or Component Object Model (COM) registration; add-ins are added to a system by simply copying them to a well-known folder and removed by deleting them from this folder. Add-ins can also be shared between users within an organization using a centralized network share.
Add-ins are authored using .NET or Java along with Extensible Markup Language (XML). The XML describes the customizations, while the .NET or Java classes provide the custom behavior. The ArcObjects software development kit (SDK) includes an Add-Ins Wizard that integrates with development environments-such as Eclipse, Microsoft Visual Studio, and the free Express Editions of Visual Studio-to simplify development.
Add-in Types
ArcGIS Desktop applications support a fixed set of add-in types, including the most popular types used in the classic COM-based extensibility model introduced in previous versions of ArcGIS. The following add-in types are supported in the current release:
- Buttons and tools
Buttons and tools are simple controls that can appear on toolbars or—in the case of buttons—on menus. - Combo boxes
A combo box provides a drop-down list of items and can optionally provide an editable input area. - Menus and context menus
A menu presents a drop-down list of buttons, submenus, and multi-items. Menu items can come from built-in sources, add-in sources, or a combination of both. Menus are typically hosted on toolbars, but they may also appear independently as context (pop-up) menus and root menus. - Multi-items
A multi-item is a dynamic collection of menu items created at run time. Multi-items are useful when the items on a menu cannot be determined prior to run time or the items need to be modified based on the state of the system. - Toolbars
A toolbar can host buttons, tools, menus, tool palettes, and combo boxes. As with menus, controls that appear on toolbars can come from built-in sources, add-in sources, or a combination of both. Toolbars can be configured to automatically appear when initially added to an application to make their presence more obvious to users. - Tool palettes
Tool palettes provide a compact way to group a related set of tools. The most recently used tool appears on the toolbar alongside a small drop-down button used to access other tools in the group. As with menus, tools that appear on tool palettes can come from built-in sources, add-in sources, or a combination of both. - Dockable windows
Dockable windows are floating or docked windows that appear within the ArcGIS Desktop applications. You can populate dockable windows with any sort of content: charts, slide shows, video, mini-maps, or custom dialog boxes containing other controls—including ESRI controls. Add-in developers have considerable control over where the dockable window initially appears and whether it will be grouped with other dockable windows. - Application extensions
Application extensions are used to coordinate activities between other components—such as buttons, tools and dockable windows—within a containing add-in. Application extensions are usually responsible for storing state associated with the add-in as a whole and are often used to listen for and respond to various events exposed by the host application. Application extensions can be configured to load when needed or automatically when their associated application is started; extensions can also be configured to appear in the standard ArcGIS extension dialog box. - Editor extensions
Editor extensions allow you to customize your editing workflows by plugging directly into the editing framework. As opposed to application extensions, editor extension add-ins are loaded when the edit session starts (Editor>Start Editing). You can customize the behavior of your editing session (for example, listening for edit events) by creating editor extensions.
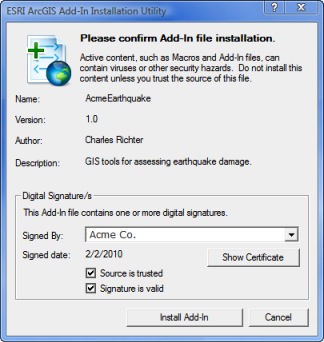
Add-ins can be obtained from a variety of sources including Web-based repositories, via e-mail, or by browsing the file system or network. You can install an add-in by simply double-clicking an add-in file in Windows Explorer. When double-clicked, the ESRI supplied Add-In Installation Utility validates the add-in and copies it to the appropriate well-known folder. Users are given an opportunity to review the author, description, version, and digital signature information of the add-in before proceeding. This validation step ensures that: the file is copied to the appropriate location; name conflicts are handled; and guarantees that any existing version of the add-in file isn’t overwritten by an older version. This utility also works directly on e-mail attachments and Web page links. See the following screen shot:
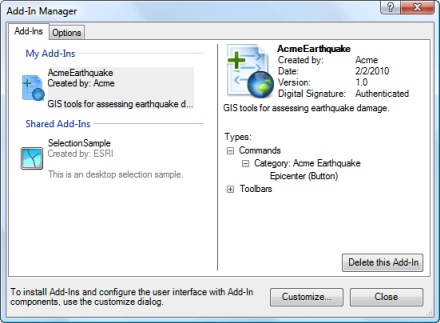

From the Add-In Manager, users can also elect to uninstall a particular add-in. Uninstalling an add-in moves the selected add-in file to the system Recycle Bin where it can later be restored if necessary. The Uninstall button is only enabled for local add-ins. To uninstall an add-in originating from a custom add-in folder, simply delete the add-in from the share or remove the custom add-in folder using the Remove Folder button.
Building Add-ins
Add-ins are built using an integrated development environment (IDE), such as Visual Studio Express for .NET and Eclipse for Java, and simple wizards and templates are provided with the ArcObjects SDKs to automatically generate fully stubbed out add-in projects including the XML and class files. In addition, when these projects are built, they automatically generate an add-in file and copy it to a well-known folder. For the most part, the XML is authored by the wizards; however, if you do need to edit the XML by hand, the associated schema file makes edits easy as it provides IntelliSense and on-the-fly validation. To learn more about developing add-ins and using these wizards and templates, see Building custom UI elements using add-ins and How to migrate from COM components to add-ins.
Commenting is not enabled for this article.