Many users of the Bentley MicroStation CAD platform have asked us how to connect to image or map data that is served from ArcGIS Server. ArcGIS Server can serve various formats easily consumable by non-ESRI clients. One of these popular formats, supported by MicroStation, is OGC WMS (Open Geospatial Consortium Web Map Service).
Support for WMS in MicroStation was added in version V8 XM (08.09.03) and updated in version V8 XM (08.09.04). In V8 XM, access to WMS services requires a manually-created xWMS file. In V8i (8.11), you can connect to WMS services using an updated interface within the Raster Manager. This post describes both techniques.
Connecting to a WMS in MicroStation V8 XM
To connect to a WMS using Raster Manager in V8 XM, you must create an xWMS file. An xWMS file is a simple XML file with the extension .xWMS, which contains some properties about the WMS.
The following values must be contained in the xWMS file:
- URL: The URL to the service.
- REQUEST:
- VERSION: The version of WMS supported. MicroStation only supports WMS version 1.1.1 at this time.
- SRS: The EPSG Code for the service’s spatial reference system.
- LAYERS: The layer name of the service.
- BBOX: The bounding box of the service in the aforementioned spatial reference system.
- WIDTH: Width of the service in pixels.
- HEIGHT: Height of the service in pixels.
- FORMAT: The image format in which the service is to be returned. Examples are image/jpeg or image/png
Most of the remaining values in the file can be left as defaults, but you can edit them as necessary. To identify appropriate values, you can use Get Capabilities on the WMS. For example:
http://eg1119/ArcGIS/services/ambwms/ImageServer/WMSServer?request=GetCapabilities&service=WMS
Below is a sample xWMS file. You can copy this into a text editor and change the values to suit your own WMS. Note that the URL must be entered without the “http://” prefix. This is automatically added by MicroStation.
<?xml version="1.0" encoding="UTF-8" standalone="yes"?>
<BentleyWMSFile>
    <VERSION>1.1</VERSION>
    <URL>eg1119/ArcGIS/services/amberg/ImageServer/WMSServer?</URL>
    <REQUEST>
        <VERSION>1.1.1</VERSION>
        <SRS>EPSG:31494</SRS>
        <LAYERS>amberg</LAYERS>
        <BBOX>4488761.853491,5477485.126490,4491005.146509,5479555.401510</BBOX>
        <WIDTH>850</WIDTH>
        <HEIGHT>1000</HEIGHT>
        <FORMAT>image/jpeg</FORMAT>
    </REQUEST>
    <IMAGESIZE>
        <MINSIZE width="85" height="100" />
        <MAXSIZE width="850000" height="100000" />
    </IMAGESIZE>
    <SERVERCAPABILITIES>
        <MAXBITMAPSIZE width="1024" height="1024" />
    </SERVERCAPABILTIES>
</BentleyWMSFile>
Once you have the above file, follow these steps to add it in V8 XM using Raster Manager
- Open Raster Manager.
- Click File > Attach.
- Navigate to and select the xWMS file, then click Open.
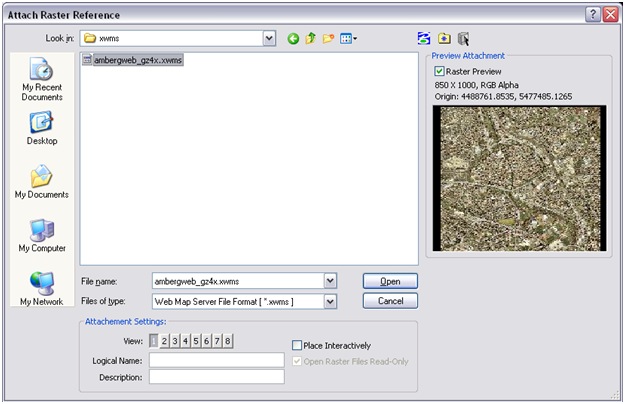
- If necessary, click Fit To View to zoom to the extent of the service.
Connecting to a WMS in MicroStation V8i
Although you can also add xWMS files in MicroStation V8i, it’s easier to use the improved user interface for adding a WMS service interactively. Here’s how:
- Open Raster Manager.
- Create a new WMS connection by clicking File > New > WMS.
- Type in a URL, or click the Servers button and select a service from the server list.
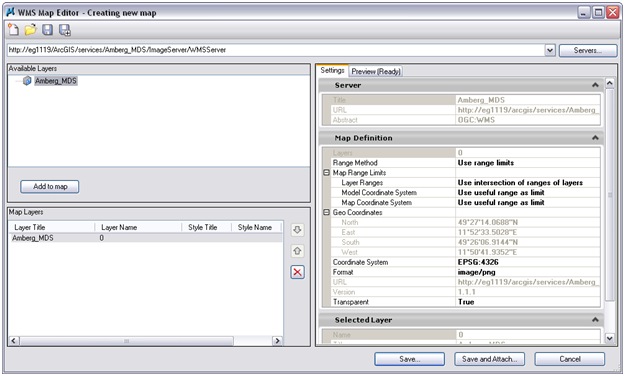
- Select a layer from the Available Layers list and click Add to map.
- Click Save or Save and Attach to add it to the drawing.
Using a jpeg connection for improved performance
By default, the format for the WMS connection is image/png. However, it’s recommended that you make a jpeg connection to ArcGIS Server because the transfer rate is faster.
To change the connection properties in MicroStation V8 XM, modify the .xWMS file prior to attaching it within MicroStation. The XML node to change is:
<FORMAT>image/jpeg</FORMAT>
In MicroStation V8i you can make the change before adding the WMS to the map. See the diagram below.
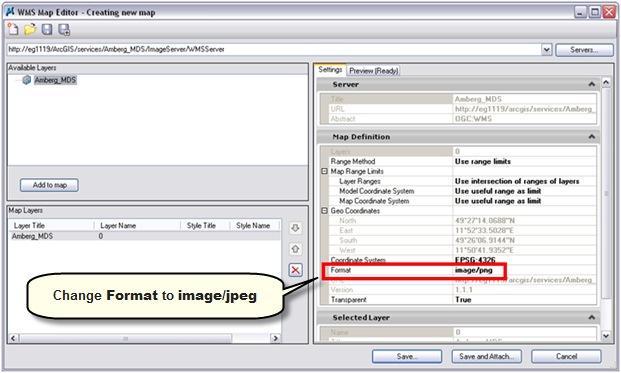
You can also access this dialog for an open connection. Follow these steps:
- Open the Raster Manager.
- Select the WMS connection to edit.
- Edit the WMS connection (From the Open menu, click Utilities, and click Edit WMS.)
- Change the Format to image/jpeg.
Contributed by Randall Rebello of ESRI
Commenting is not enabled for this article.