If you’ve been working in the ArcGIS Pro Python environment extensively, you may have noticed that the Python installation that ships with ArcGIS is fully isolated from any other Python installation on your machine. Although this isolation is intentional, it can be inconvenient for users who want to access conda (and Python) outside the pathways provided by ArcGIS, such as the default Windows PowerShell or Command Prompt (CMD). Fortunately, the conda init command is now enabled for ArcGIS Pro 3.1, which allows users to access conda and Python easily from their preferred shells. In this blog, we’ll explore how the conda init command works with ArcGIS Pro, how to use it effectively, and what benefits it brings.
Conda is a powerful package and environment manager that lets you create isolated environments with specific versions of packages, including Python and other dependencies. Conda is included with ArcGIS Pro and ArcGIS Enterprise and is integrated with the Package Manager interface in ArcGIS Pro.
While the Package Manager is sufficient for many users, some users require the more granular control offered by the Command Line Interface (CLI) for conda. As stated earlier, we purposely keep conda isolated by default. We don’t modify your Windows PATH environment variable, nor do we initialize conda for you. We do this to avoid interfering with any existing installations of conda, allowing other conda and Python installations to work alongside the one provided with ArcGIS Pro. This means that you do not have direct access to conda or Python environments from the standard CMD or PowerShell. Instead, we provide the “Python Command Prompt” for ArcGIS Pro or “Python 3 Command Prompt” for ArcGIS Server (from the Windows start menu or via the proenv batch script), which runs a profile customized to let you work seamlessly with conda and Python alongside ArcGIS. However, some users may prefer to work from the standard PowerShell or CMD.
Up until now, if you wanted to run conda commands from the command line, you had to use the Python Command Prompt or perform some additional manual setup. This gets easier with the conda init command, part of the conda environment model. In a nutshell, the conda init command allows you to easily initialize your preferred shell to use conda without making error-prone or inconvenient changes, which we recommend against, like modifying your PATH manually or specifying the full path to the executable. Behind the scenes, conda init adds startup logic to your preferred shell, ensuring that it is permanently configured to work with conda. You can then activate and deactivate conda environments, install and update packages, and manage your conda configuration, all from your preferred shell.
Be aware that if you are using a separate installation of conda on your machine, the last install that ran conda init will be the default on the shell. It will be up to you to manage any potential for the two independent instances of conda to clash with one another.
Getting set up
We’ll set up both the standard PowerShell and CMD at the same time. Open PowerShell to get started.
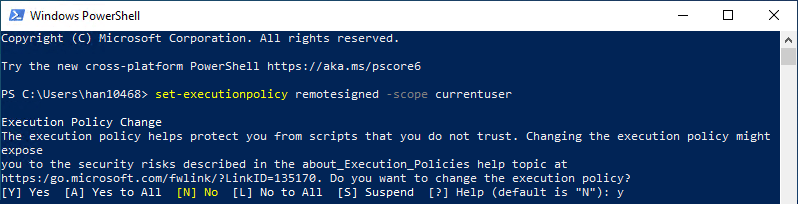
First, you’ll need to set the execution policy to remotesigned to allow the signed conda code to execute. Run the following:
set-executionpolicy remotesigned -scope currentuser
Now you’re ready to initialize both shells. You can do so with the following command:
& 'C:\Program Files\ArcGIS\Pro\bin\Python\condabin\conda.bat' init
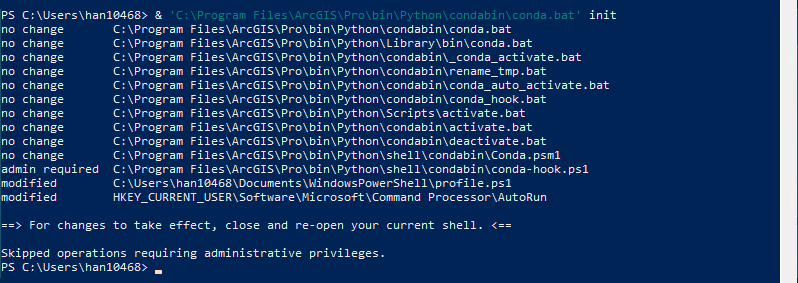
After running conda init, you may need to close and restart your shell for the changes to take effect.
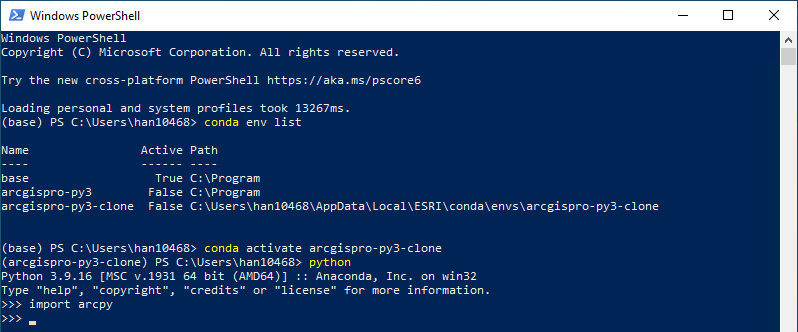
And voila! Next time you open the standard CMD or PowerShell, you will have access to conda.

If you’d like to reverse the conda init operation and return to the ArcGIS Pro conda installation being isolated, run the following:
& 'C:\Program Files\ArcGIS\Pro\bin\Python\condabin\conda.bat' init --reverse
The conda init command adds access to conda commands to the standard PowerShell and CMD. You’ll also notice some differences between your experience in the standard CMD or PowerShell from that in the Python Command Prompt. For example, the standard CMD or PowerShell does not keep the active environment in sync with the environment active in ArcGIS Pro. While PowerShell starts with a conda environment activated, the standard CMD does not. Also, when running conda commands from the Python Command Prompt, you can run some commands like activate without explicitly prefixing it with conda. However, when using your preferred shell, you should start your commands with conda.
Additionally, conda init does not inherently add access to Esri- developed commands such as proswap to the standard PowerShell and CMD. To access these from your preferred shell, you need to activate the base environment or use the full path to their script in ArcGIS\Pro\bin\Python\Scripts. A current limitation is that PowerShell also does not properly support using the conda env export command. Instead, you need to use Esri’s conda-env export command. From PowerShell only, you can use the aliases genv as shorthand for conda env list, etenv for conda activate env, and exenv for conda deactivate.
The Python Command Prompt is slightly more integrated with ArcGIS workflows, and we still recommend using it for managing your ArcGIS environments. For all other purposes, however, having conda available from your preferred shell is still a major convenience.
Wrapping up
We hope this blog post has been helpful in shedding light on how to use conda init to make accessing conda from your preferred shell more convenient. While the Python Command Prompt is still the recommended choice for working with ArcGIS Pro environments, conda init provides more flexibility for users. If you’re ever unsure about using this feature, remember that you can always reverse the changes using the --reverse option. We appreciate you taking the time to read our blog and we hope you found the information useful. Happy coding!

Article Discussion: