Attachment Viewer is a configurable app that provides an intuitive feature-by-feature browsing experience where app users can browse feature attachments and view pop-up information. Whether working with a dataset that already has attachments or incorporating attachments during data collection, you can use Attachment Viewer for datasets with images, videos, or PDF files. The app can be paired with data collection workflows using Esri apps such as Geoform, Survey123, Web AppBuilder, ArcGIS Collector, and QuickCapture.
The National Alliance for Public Safety GIS (NAPSG) Foundation is a nonprofit organization focused on using GIS to overcome public safety challenges. Since 2017, NAPSG has partnered with GISCorps and CEDR Digital on several crowdsourced disaster relief projects with the use of ArcGIS Online web apps and resources. The 2020 Disasters Crowdsourced Photo project brings volunteers together by providing a medium (hosted feature layer and Survey123) to contribute photos from social media, news reports, and those taken by individuals for specific disaster-related events, such as hurricanes and wildfires. The result of user-contributed data through the Survey123 apps is a description of the photo and the photo attachments. This data can be viewed by the public or used by public safety agencies in response and recovery projects. Attachment Viewer allows you to intuitively share and display this data with the public and other stakeholders.
This article describes the process of creating an Attachment Viewer app featuring the GISCorps data using the new Express Setup experience with the configurable apps. Express Setup focuses on a minimal set of key configurations that can transform a map into an intuitive interactive app. For more information about extending the capabilities of your application with the options available in the Full Setup experience, check out Enhance Attachment Viewer Capabilities with Full Setup.
Step 1. Build a map
Create the web map that will be the foundation of your configurable app. In this example, I added a subset of the data collected through the 2020 Disasters Crowdsource Photo project. This subset of features focuses on the city of Guánica, Puerto Rico, which has several features nearby due to an earthquake that occurred there in January 2020. Consider the following best practices when building a web map for Attachment Viewer.
Best practices to create a web map for Attachment Viewer
a. Choose meaningful symbology for your dataset.
The map below is symbolized based on the relative scale of damage reported in each photo. This does not indicate a full assessment of the damage but is based on a visual assessment of the photo collected. The damage indicators (Image 1) range from High (red) to Moderate (orange) to Low (yellow) while No Damage is indicated with green symbols and blue symbols indicate that this field was left blank.

b. Choose an appropriate basemap that enhances the map and chosen symbology.
The Dark Gray Canvas basemap was selected for this map (Image 3) because it provides context to the location while highlighting the chosen symbology.
c. Configure your pop-up to display relevant information for each feature. Ensure that the option to show feature attachments as links is enabled.
There is a lot of information available in this dataset and configuring pop-ups to show relevant information allows the app user to focus on the most important aspects of your data. In this dataset, damage is indicated using a number from 0 to 4. The Arcade expression below was used to assign High, Moderate, Low, and Not Categorized to these values.
The pop-up configuration below (Image 2) includes this Arcade expression to display the Damage Assessment number as a relative ranking along with the description, source, and date and time assigned to the photo.

d. Set the default extent of the map to establish the starting point of the app.
The starting location for this app will be the city of Guánica, Puerto Rico, which has a high concentration of photo locations due to a nearby earthquake in January 2020. Zoom to the area you want to be the default extent of your map, which is the area of the map that will be visible to the app user when the app is launched. Save the web map.

Step 2. Create the app
From Map Viewer, click Share, choose Create a Web App, choose Attachment Viewer, and click Create Web App (Image 4).

Step 3. Configure the App
Once you create the app, a new window appears with the default Express Setup configuration panel (Image 5), which includes the following sections:
- Map— Select the map to display in your app.
- About—Include information to help readers understand your app.
- Interactivity—Provide ways to encourage map exploration.
- Theme & Layout—Custom the look of your app.

Map
The Map section (Image 6) provides the option to select a different map to include in your app. As I created this app from the intended web map, no changes need to be made. Click Next to browse to the About section.

About
The About section allows you to add information that provide context about your app. This includes the ability to update the app’s title, customize the introduction panel and to include the legend on the map. The introduction panel, which explains how to interact with the app, is enabled by default and is activated by clicking the information button (Image 7). The default introduction panel includes information about how to browse location details and attachments as well as information about how to explore the map. Enabling the legend provides app users with information about the symbology on the map. Click Next to browse to the Interactivity section.

Interactivity
The Interactivity section allows you to enable the Search tool and add or remove search sources for your application. For this application, Search has been enabled to allow app users to search for other locations. For instance, a user may be interested in seeing any features around San Juan (Image 8). They can type the city name in the search bar and select the result to navigate to the location of interest. Click Next to browse to the Theme & Layout section

Theme & Layout
The Theme & Layout section allows you to change the app theme colors and overall look of your app. The default Attachment focused layout places attachments in the main panel of the app, emphasizing the amount of space to display the image. Here app users can zoom and pan around the image while the associated features are highlighted on the map and the pop-up information is displayed below. This layout allows users to browse the attachments for each location using the arrows above the map (Image 9).

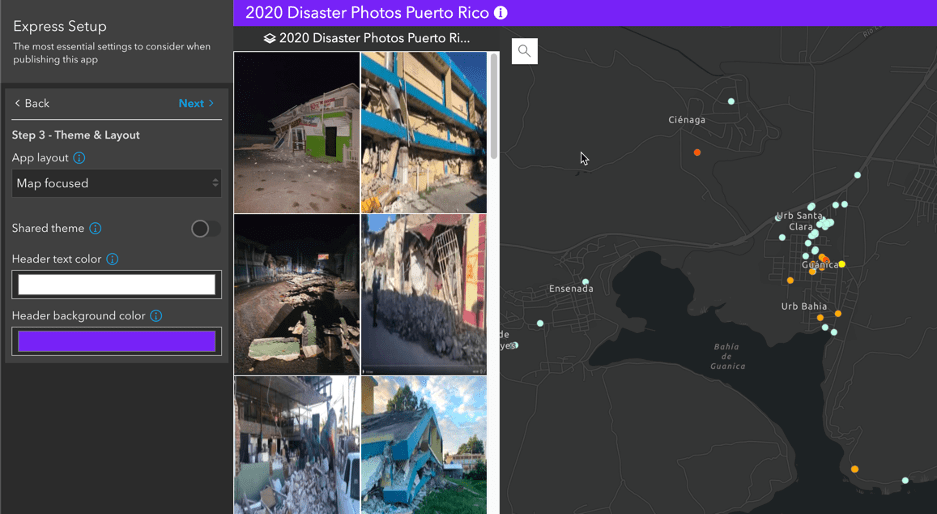
The Map focused layout (Image 10) places the map and map tools in the main panel and displays a gallery of the attachments in the left panel. If the extent of the map changes, the gallery of attachments updates to show the photos associated with features that appear in the current view. App users can click an image to view information in the pop-up and expand the image to zoom and pan around the photo. To allow users to pan and zoom to different regions and view multiple photos at once, this app uses the Map focused layout.
This section allows you to enable a Shared Theme in your app or choose header text and background colors. The background color for this app has been updated to a dark purple color. Click Back to return to the Express Setup options.
Step 4. Share the app
The completed app is ready to share with your audience. Browse to the bottom of the configuration panel and click Publish to open the Publish window (Image 11).

Click Confirm to save all settings and publish the app. The app is now ready to be shared. Share your work on GeoNet so others can see what you can do with Attachment Viewer.

Article Discussion: