For many mobile geospatial applications, showing device location on a map in real(ish) time is crucial. Location provides critical spatial context, so the app can present only the most relevant map information on screen. But we can take that little blue dot for granted! How accurate is it? What do we mean by accurate? Spatially accurate? Temporally accurate? These two types of accuracy require trade-offs from one another! And what about hardware or algorithms – can we use them to improve accuracy? It’s worth taking a few moments to think about accuracy and device location in our mobile apps, all with the ultimate goal of creating the best result for our users.
What follows is a deep dive into the considerations necessary when displaying device location in a geospatial application. These examples are written using the ArcGIS Maps SDK for Kotlin (for Android mobile app development), but many of the same considerations apply to other ArcGIS Maps SDK for Native Apps platforms and devices (such as iOS mobile app development using the Swift Maps SDK).
The simplest way to show device location
Let’s start with what we get out of the box with the Kotlin Maps SDK. There is a sample available which demonstrates how to Show device location, which is as simple as getting a reference to the MapView’s LocationDisplay and calling…
LocationDisplay.dataSource.start()
// Uses the SystemLocationDataSource() by default
This is the most straightforward way to show that humble blue dot on the screen, and already has some very helpful features built in. The dot will show as blue, if the current position is from a recent update, or it will show as a grey acquiring symbol if the location is out of date (effectively marking the last known position).


It will also show a blue circle which expands and contracts around the location symbol, which represents the accuracy of the location. Effectively it’s stating there’s a 68.26% chance (within one standard deviation on a normal distribution) that the actual location is within this circle.

There are also a range of autopan modes to handle location movement within the map view.
For most use cases this API is sufficient. The API can make its own assessment of accuracy, which will be affected by the number of satellites in the GNSS network available in the open sky. When I say “open sky” here, I mean that accurate determination of device position is significantly worsened when the device is under the cover of dense trees, in a valley, or in a city canyon between tall buildings. Why is that?
How GPS (GNSS) works
GPS (Global Positioning System) is a type of Global Navigation Satellite System (GNSS)—a catch all term for these types of systems. GPS was developed by the US Department of Defence in the 1970s. There are other satellite systems, namely GLONASS (Russian), Galileo (EU), Beidou (China) and up-and-coming networks QZSS (Japan) and IRNSS (India). When your device is trying to determine its location, it picks up data from several of these satellite constellations. How does it work? Well, those satellites follow fixed orbits around the earth and are equipped with atomic clocks that are continuously broadcasting “I was at this position, at this time”. To learn more about visualizing satellite locations, check out the Positions of GPS Satellites in 3D post on the Esri Software Engineering Blog.
A GPS receiver on your device takes that information and calculates the difference between the timestamp in the broadcast received and the time right now. From that time difference (and because radio waves travel at a known speed, the speed of light) the distance from the satellite to the receiver can be calculated. But this distance alone isn’t of much use. I like to think of it like this: the only thing you’ve proven with that single measurement is that your position can be anywhere on the surface of a sphere whose radius is the calculated distance.
However, if we were to get a second measurement, then you could be anywhere on a circle created by intersecting two spheres—now we’re getting somewhere. Add another measurement and we’re getting closer to what we need, two points on that circle.
Four spheres become harder to visualize, but effectively as we gather known measurements from more and more satellites the confidence of the position increases. So, if we cast our mind back to some of the challenges that affect determining a good position (where the satellites are obstructed in some way), you can start to imagine why the accuracy fluctuates.
Next, let’s go through some of the ways we can improve positional accuracy—apply some science to figuring out “where I am”. We’ll look at other out-of-the-box solutions (available to Android users, in this instance), how we can use data and things we know about the system to improve positional accuracy, and finally, a look at how we can use some algorithms to help us out.
Correcting for low accuracy with other out of the box solutions
Given the number of sensors available on an Android device, it makes sense to try to use as many of those sensors as possible to improve location. The Fused Location Provider, available in Google Play services, combines other sources of location data, like Wi-Fi and cell mobile towers—both of which are (relatively) fixed in the landscape. Which means location data can be derived in the same way as the satellite examples above. The API may also use other sensors on the device like the accelerometer and gyroscope.
To use this in the Kotlin Maps SDK, implement your own CustomLocationDataSource.LocationProviderand emit into its heading and location flows the positions received from a FusedLocationProvideras demonstrated in the sample Show device location with fused location provider.
If your use case requires positioning indoors, perhaps in aid of navigation through an airport or shopping mall, the Native Maps SDKs also support indoor positioning. Using an array of Bluetooth sensors, the API works a lot like a GPS system—using trilateration to position the device based on input from multiple fixed Bluetooth emitters.
Ok, these were some pretty technical (and black box) solutions. Let’s think about your options if you know something about the system you’re trying to work with.
Using what we know to improve location accuracy
While the location APIs discussed above can be applied to most use cases, if we know how we expect our location-dependent application to be used, we can take steps to improve our location. If our app is for vehicle navigation, we can make assumptions that those vehicles will be on the road network. If you have good data about the road network, you can correct for location by snapping locations onto the road network. In the Kotlin Maps SDK that’s done with a RouteTrackerlike this:
// Define a route tracker which follows the given route result
val routeTracker = RouteTracker(
    routeResult = routeResult,
    routeIndex = 0,
    skipCoincidentStops = true
)

// Create a RouteTrackerLocationDataSource which uses the route tracker
val routeTrackerLocationDataSource = RouteTrackerLocationDataSource(
    routeTracker = routeTracker,
    locationDataSource = someLocationDataSource
)

// Start a new coroutine
 viewModelScope.launch {
    // Start the route tracker location data source
    routeTrackerLocationDataSource.start()
     // Use location updates to track location on the route tracker
    someLocationDataSource.locationChanged.collect { location ->
        routeTracker.trackLocation(location)
    }
}
Alternatively, if position is more important than having the most up-to-date locations, you could consider averaging some readings over time. For example, consider taking 5 readings in a row (let’s say over 5 seconds), averaging those positions, and then emitting those into your location display flow once every 5 seconds. This would be less temporally accurate (positions delayed by up to 5 seconds), while likely being more spatially accurate. An example use case is if the device is being held in one place while a field worker records data. Averaging the location would improve accuracy of the recorded data. However, averaging locations would be unhelpful in a use case where the device is moving quickly and with rapid changes of direction.
Before I wrap up this exploration of device location, let’s take one final deep dive into a more nuanced area – how to use an algorithm to help improve location accuracy by predicting upcoming location updates and balancing those predicted location updates with locations from sensor measurements.
Using a Kalman filter
Kalman filters estimate the state of a system using past observations and current measurements. One of its earliest historical claims to fame was its use in the navigational computer of the Apollo program’s moon lander. It is a type of sensor fusion algorithm, meaning it takes input from multiple sources to give a weighted average result that can self-tune. When balancing between predictions that seem good and measurements that seem bad, the algorithm will put more weight on the predictions and vice versa. This metric is called the Kalman gain. Most GPS chips already have a Kalman filter or similar algorithm applied to dampen noise, so what follows is illustrative of the type of effect in can have on location updates.
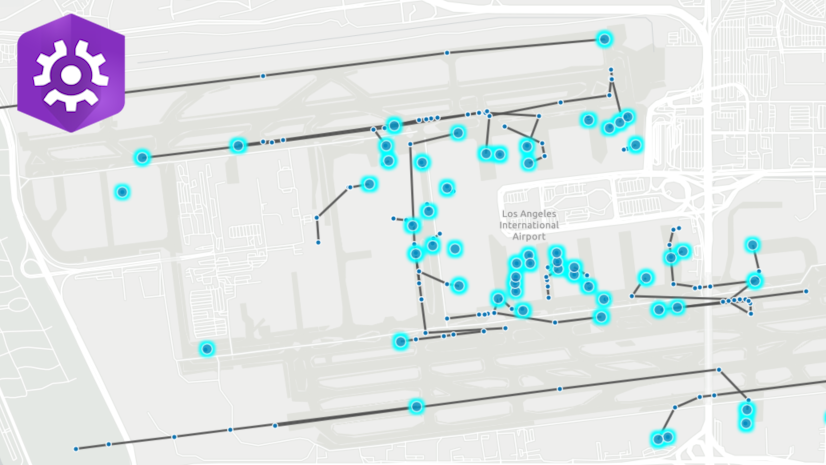
In the case shown below using the Kotlin Maps SDK (and available from this GitHub repo), this implementation of a Kalman filter uses the velocity and heading of each location measurement to predict the next position, and a weighted average between that predicted point and the one measured from the GPS. In the image below, the track shows the predicted location and the green track shows the measured location. The blue is a weighted average of the two using the Kalman gain. Notice how the predicted location is generally quite accurate while the device is moving at a predictable speed and heading. However, on the sharp turn below, you can see the predicted path overshoot the measured right-hand turn. This is a case where the location data is reporting high measurement accuracy against a relatively lower predicted accuracy.

This algorithm really comes into its own when noise (inaccuracy) in one or other of the predicted or measured locations is high, it will tune towards the one believed to be more accurate. A place you might see this effect in your daily life is driving through a long tunnel with a GPS navigation app running. During your time in the tunnel your GPS receiver won’t be receiving satellite information, but it will likely be using a Kalman filter (or similar algorithm) to continue moving your position through the tunnel based on your speed when entering.
The journey doesn’t end here
Improving device location accuracy can mean using different tools and out-of-the-box APIs already available from the ArcGIS Maps SDK for Kotlin or Native Android APIs. It could also involve improving the location information you get by optimizing for the use case. Balancing spatial and temporal accuracy, snapping to a known transport network, averaging measured locations, and more advanced algorithms like Kalman filters can all help improve the reliability of positioning that humble blue dot in your apps.
Summary
I hope these ideas have intrigued you and will inspire you to check out the ArcGIS Maps SDK for Kotlin.
To get started building an app that includes live location, check out the Kotlin Maps SDK tutorial Display device location.
For more advanced implementations, checkout our other Kotlin Maps SDKs samples including how to use the fused location provider, how to process location from NMEA sentences and how to use indoor positioning.
If you’d like to see the code for the Kalman filter I shared above, the link to the GitHub repo is available here.


Commenting is not enabled for this article.