
Introduction
Facility managers in both municipal and private sectors are increasingly requiring digital deliverables—particularly 3D Building Information Models (BIM)—as part of their workflows. When integrated with GIS, these models provide a comprehensive, spatially aware view of assets, allowing facility managers to identify issues, track maintenance history, and visualize potential vulnerabilities. However, there remains a gap in understanding the data structures necessary to fully realize these benefits. This integration will drive the evolution of facility management into a more proactive, data-driven discipline.
Before you begin
- Ensure that all models are already georeferenced.
- Create a single dataset with all the relevant models, using the workflow in Combine multiple digital models into a single building scene layer.
What you need
- The ArcGIS Notebooks notebook included with this post
- ArcGIS Pro 3.3 or later
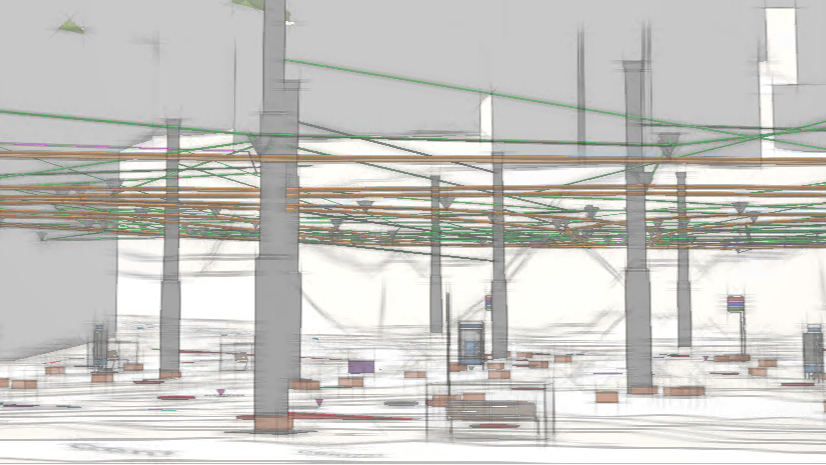
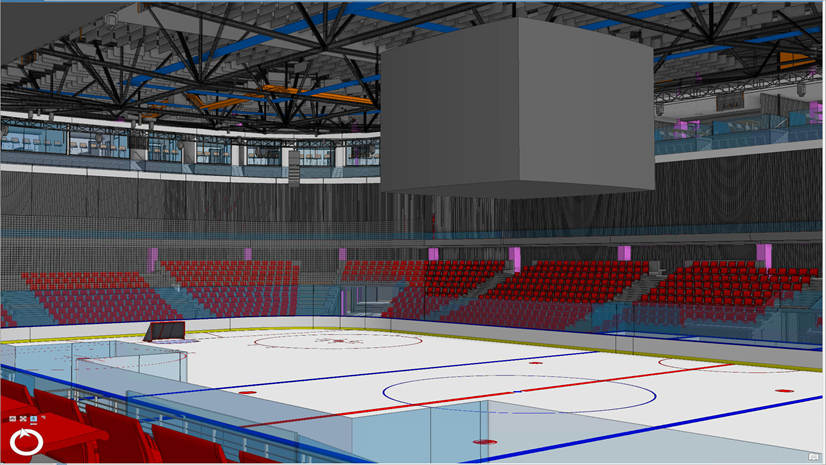
Now that multiple digital models have been combined as a single feature dataset, you can explore the resulting model to see if it meets the requirements for the downstream workflows (in this case operation and maintenance). The images below show a considerable number of elements in the generic model layer, which do not meet the requirements for the workflows.

If you look in more detail at the images below, you can see that the generic model layer includes street furniture, catenary masts, escalators, and more. To meet operation and maintenance (O&M) requirements, you must move these elements to more appropriate and specific categories.

Before you can move elements between the feature classes to fit the requirements, review the Generic Model feature class to find a way to identify the elements in a programmatic way so this process can be automated. After inspecting the feature class Generic Model, use the Family attribute to split the elements from the Generic Model feature class into categories.
Also, to improve performance and facilitate streamlined data management, you will mix the BIM File Workspace schema for Revit and IFC into a single building layer (bl) that will support the requirements.
As you can see below, the BIM file workspace for the Revit infrastructure discipline is focused on bridges while the BIM file workspace for the IFC infrastructure discipline covers rails, roads, and bridges layer.

Workflow
Edit the building layer (Manual)
Complete the following steps to improve the dataset to fit the O&M requirements:
-
- Optionally, make a copy of the Generic Model feature class before making any edits.
- Inspect the Generic Model feature class Family attribute to produce a list of elements that need to be moved or deleted.
| Attribute (Family)* | Feature class (Category) |
|---|---|
| AT_Signage___CSC_PID | Signals |
| AT_Lift_Sign___645x250 | Signals |
| AT_Signage – Pod PID | Signals |
| _CUSTOM_TILE_WALL | Walls |
| 00_Shared Pod Glazing | Walls |
| Masts | Masts |
| railing_1 to railing_13 | Stairs |
| Roof_Upstand to Roof_Upstand1 | Beams |
| 00_Shared Pod 3D_ Jx Structure AU | StructuralFraming |
| 79_Escalator_Travelator_JX | SpecialtyEquipment |
| CRL_57_FUR_4 Seat Bench_JHR | FurnitureSystem |
| 79_Lift_Door_w_Shaft_Pln_JX | Doors |
| 42_Pod_Okoskin_HalfShell_Jx | Doors |
| 00_Shared Pod 3D_ Jx Desk – Side No Ticket | CurtainWallPanels |
| 00_Shared Pod 3D_ Jx Desk – Central Ticket | CurtainWallPanels |
| Thale High Swing Gates | Doors |
| 57_STATION Rubbish Bin | RubbishBin |
| AKL-102-103-13-V1 | CatenarySystem |
| Civil Layout | Site |
| %EXISTING 3D TIN | Topography |
*This is not a comprehensive list of all the elements that could be moved between categories.
3. Inspect the Structural Framing feature class Family attribute to produce a list of elements that need to be moved or deleted.
On the tables above, you see that there are four new feature classes (Masts, CatenarySystem, FurnitureSystem, and RubbishBin) that do not match the BIM file workspace schema for either IFC or Revit and two feature classes that do fit the BIM file workspace schema for IFC (Rails and Signals). You can create custom categories because the building layer allows you to create a building layer tailored to your specific category needs.
You will use the tables above to start organizing the data to fit your needs. This process can be divided into stages: (1) create feature classes and (2) append elements to existing feature classes.
Create a feature class
These steps will apply to the Signals, Rails, Masts, CatenarySystem, FurnitureSystem, and RubbishBin feature classes.
1. Click Select by attribute.
- For Input Rows, select GenericModel.
- For Selection Type, select New Selection.
- For Expression, type Family LIKE ‘%Sign%’.

2. Click Apply.
3. Open the Copy Features geoprocessing tool.
- For Input Feature, select GenericModel.
- For Output Feature Class, select Signals.

4. Click Run.
Only the selected elements copy to the new feature, based on the selection made in step 1.
5. Open the Delete Rows geoprocessing tool.
6. For Input Rows, select Generic Model.

7. Click Run.
Only the selected elements are deleted from the GenericModel feature class, based on the selection made in step 1.
8. Repeat this process for the Masts, CatenarySystem, RubbishBin and Rails.
Append elements to the existing feature class
These steps will apply to the rest of the elements.
- Click Select by attribute.
- For Input Rows, select GenericModel.
- For Selection Type, select New Selection.
- For Expression, type Family LIKE ‘%Escalator%’.

2. Open the Append geoprocessing tool.
- For Input Datasets, select GenericModel.
- For Target Dataset, select SpecialtyEquipment.
- For Field Matching Type, select Use the field map to reconcile field differences.
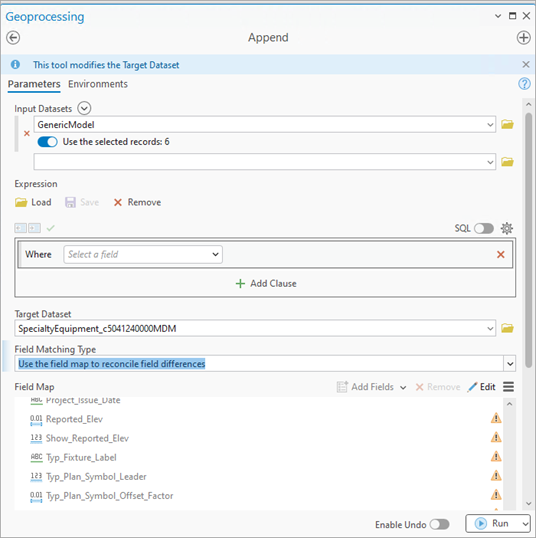
3. Click Run.
In this case, you are not interested in matching attributes between the source and the target as you only need a limited number of attributes, and you know those attributes are present since they were defined on the BIM execution plan.
4. Open the Delete Rows geoprocessing tool.
5. For Input Rows, select GenericModel.
6. Click Run.
Repeat this process for all the elements on the table.

7. Run the Make building layer geoprocessing tool.
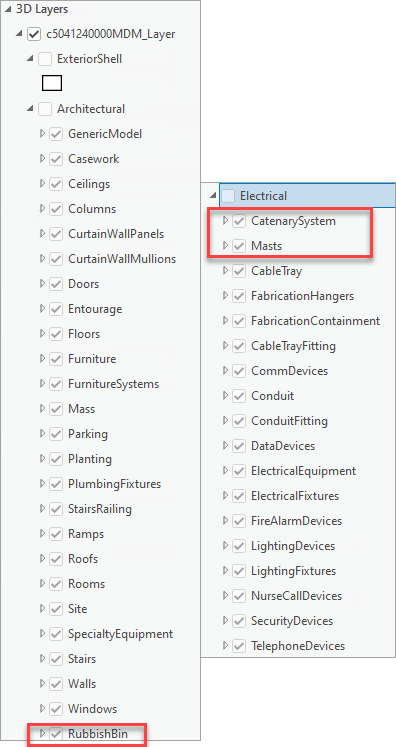
Now that the building layer has been created, look at the three new categories (Masts, CatenarySystem, and RubbishBin) created. The Signals and Rails categories are defined by the BIM file workspace IFC schema so you do not have to change their placement on the building layer. The building layer places custom categories in the architectural discipline, but in this case, you want to place Masts and CatenarySystem in the electrical discipline and leave RubbishBin in the architectural.
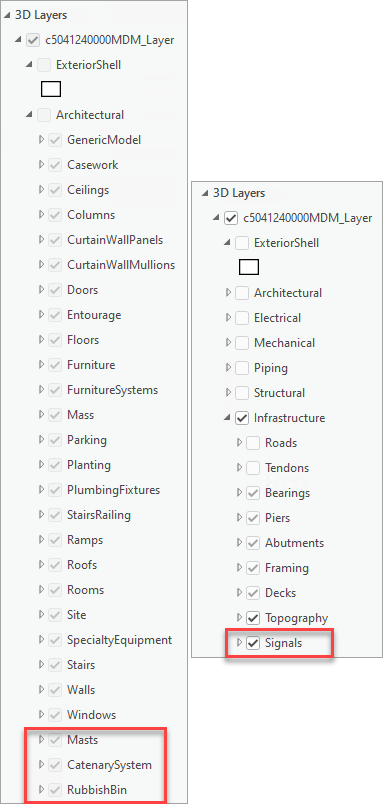
8. Drag the Masts and CatenarySystem layers to the electrical discipline.
You can now share the data to ArcGIS Online as a building scene layer. To learn how to share a building scene layer, read Share digital building models in 3D web scenes.
Edit the building layer (Automation)
The following code allows you to automate improving the dataset to fit the O&M requirements.
# Import necessary modules
import arcpy
import os

# Set input paths and project settings
input_feature_dataset = r'C:\Projects\Puh_NZ1\Puh_NZ.gdb\c5041240000MDM'
arcpy.env.workspace = input_feature_dataset
arcpy.env.overwriteOutput = True
arcpy.env.addOutputsToMap = False

project_suffix = os.path.split(input_feature_dataset)[1]
split_field = 'Family'
scene_name = "TempScene"
output_folder = r'C:\Projects'
building_layer_file = os.path.join(output_folder, "TempBuildingLayer.lyrx")

# Feature class names
generic_model_fc = f'GenericModel_{project_suffix}'
structural_framing_fc = f"StructuralFraming_{project_suffix}"

# Mapping dictionaries
mapping_dict = {
    'Topography': [
        '%EXISTING 3D TIN'
    ],
    'Signals': [
        'AT_Signage - CSC PID',
        'AT_Lift Sign - 645x250',
        'AT_Signage - Pod PID',
        '10_HOS Signs',
        'AT_Signage',
        'AT_Signage - Stair Band1',
        'AT_Station Sign - 1200x300'
    ],
    'Walls': [
        '_CUSTOM TILE WALL',
        '00_Shared Pod Glazing'
    ],
    'Masts': [
        'Masts%'
    ],
    'Stairs': [
        'railing%'
    ],
    'Beams': [
        'Roof Upstand',
        'Roof Upstand Lower Roof',
        'Roof Upstand Lower Roof1',
        'Roof Upstand1'
    ],
    'StructuralFraming': [
        '00_Shared Pod 3D_ Jx Structure AU'
    ],
    'SpecialtyEquipment': [
        '79_Escalator_Travelator_JX'
    ],
    'FurnitureSystem': [
        'CRL_57_FUR_4 Seat Bench_JHR'
    ],
    'Doors': [
        '79_Lift_Door_w_Shaft_Pln_JX',
        'Thale High Swing Gates'
    ],
    'CurtainWallPanels': [
        '42_Pod_Okoskin_HalfShell_Jx',
        '00_Shared Pod 3D_ Jx Desk - Side No Ticket',
        '00_Shared Pod 3D_ Jx Desk - Central Ticket'
    ],
    'RubbishBin': [
        '57_STATION Rubbish Bin'
    ],
    'CatenarySystem': [
        'AKL-102-103-13-V1'
    ],
    'Site': [
        'Civil Layout'
    ]
}
rails_mapping_dict = {"Rails": ["CRL_31_MOD_TRACK BEAM_3D_V5"]}

# Encapsulate the splitting logic in a reusable function.
def split_features_by_mapping(
    input_dataset,
    source_fc,
    mapping_dict,
    filter_field,
    project_suffix
):
    """
    For each key in mapping_dict:
      - If target feature class exists, append matching features from source_fc.
      - Else, create new feature class (with alias), then append.
      - Delete appended features from source_fc.
    """
    fc_list = arcpy.ListFeatureClasses()
    for key, family_list in mapping_dict.items():
        print(f"Processing: {key}")
        target_fc = f"{key}_{project_suffix}"
        # Build where clause for selection
        like_value = next((fam for fam in family_list if fam and '%' in fam), None)
        if like_value:
            where_clause = f"{filter_field} LIKE '{like_value}'"
        else:
            values = [f"'{fam}'" for fam in family_list if fam]
            if values:
                where_clause = f"{filter_field} IN ({', '.join(values)})"
            else:
                where_clause = f"{filter_field} = '___NO_MATCH___'"

        # Create target feature class if missing
        if target_fc not in fc_list:
            arcpy.CreateFeatureclass_management(
                out_path=input_dataset,
                out_name=target_fc,
                geometry_type=arcpy.Describe(source_fc).shapeType,
                template=source_fc,
                spatial_reference=arcpy.Describe(source_fc).spatialReference
            )
            arcpy.AlterAliasName(target_fc, key)

        # Select and append features
        arcpy.MakeFeatureLayer_management(source_fc, "src_lyr", where_clause)
        arcpy.Append_management("src_lyr", target_fc, "NO_TEST")
        # Delete selected features from source_fc
        arcpy.SelectLayerByAttribute_management("src_lyr", "NEW_SELECTION", where_clause)
        arcpy.DeleteFeatures_management("src_lyr")
        arcpy.Delete_management("src_lyr")
    print("\nAll mapping keys processed.")


	# Split features for GenericModel
split_features_by_mapping(
    input_dataset=input_feature_dataset,
    source_fc=generic_model_fc,
    mapping_dict=mapping_dict,
    filter_field=split_field,
    project_suffix=project_suffix
)

# Split features for StructuralFraming
split_features_by_mapping(
    input_dataset=input_feature_dataset,
    source_fc=structural_framing_fc,
    mapping_dict=rails_mapping_dict,
    filter_field=split_field,
    project_suffix=project_suffix
)

# Create Building Layer
building_layer_name = f"{project_suffix}_Building_Layer"

# Create temporary building layer from feature dataset
temporary_layer = arcpy.management.MakeBuildingLayer(
    in_feature_dataset=input_feature_dataset,
    out_layer=building_layer_name
)

# Save building layer to file
arcpy.management.SaveToLayerFile(temporary_layer, building_layer_file)

# Create New Scene and Add Buildling Layer
aprx = arcpy.mp.ArcGISProject("CURRENT")
#if running outside ArcGIS Pro, use the path to your .aprx file instead of "CURRENT"

# Check if scene already exists
existing_maps = aprx.listMaps(scene_name)

# Delete scene if it exists
if existing_maps:
    for m in existing_maps:
        aprx.deleteItem(m)

# Create new scene
new_scene = aprx.createMap(scene_name, map_type="SCENE")

# Add building layer to new scene
new_scene.addDataFromPath(building_layer_file)

# Move Layers (Optional)
target_layer_names = ["CatenarySystem", "Masts"]
reference_layer_name = "ElectricalFixtures"

for target_name in target_layer_names:
    move_layer = None
    ref_layer = None
    for lyr in new_scene.listLayers():
        if lyr.name == target_name:
            move_layer = lyr
        if lyr.name == reference_layer_name:
            ref_layer = lyr
    if move_layer and ref_layer:
        new_scene.moveLayer(ref_layer, move_layer, "AFTER")
        print(f"Moved '{move_layer.name}' after '{ref_layer.name}'.")
    else:
        print(f"Could not find both '{target_name}' and '{reference_layer_name}' layers.")

	# Create Building Scene Layer Package
# Get the building layer by name from the map
target_layer = None
for lyr in new_scene.listLayers():
    if lyr.name == building_layer_name:
        target_layer = lyr
        break

if target_layer:
    slpk_path = os.path.join(output_folder, f"{project_suffix}.slpk")
    print(f"Creating output at {slpk_path}")
    arcpy.management.CreateBuildingSceneLayerPackage(
        in_dataset=target_layer,
        out_slpk=slpk_path
    )
else:
    print(f"Layer '{building_layer_name}' not found in map '{scene_name}'.")
This automation is specific to this project but gives you an idea of how to implement it with your own data.
Summary
After following the steps in this blog article, you can improve visualization, analysis, and downstream workflows of your digital twin.
Acknowledgement
Thank you to Eagle Technology and Auckland Transport for sharing the digital models.
Download the ArcGIS Notebook


Article Discussion: