This article was originally published on September 29, 2023 and has been updated.
ArcGIS Online allows you to share maps and other geospatial content to collaborate with others. As a member of an ArcGIS Online organization, you can share content with all or specific members of your organization, or with the public, depending on your needs.
But what if you want to collaborate with another ArcGIS Online organization? For example, you might work for an emergency response agency that works closely with other local and state agencies to protect and support people and land impacted by a natural disaster. You and other members of your agency and partner agencies need to be able to share and edit maps, apps, and other content to respond to the emergency quickly, efficiently, and securely.

That’s where partnered collaboration comes in.

What is partnered collaboration?
A partnered collaboration is a way to establish a formal relationship between two ArcGIS Online organizations. In other words, creating a partnered collaboration establishes trust between organizations so that content can be shared quickly and securely. In a partnered collaboration, participating organizations use groups and member management tools to collaboratively add and edit content such as web maps and apps.
Collaboration coordinators
Administrators from both organizations in a partnered collaboration designate collaboration coordinators to represent their respective organizations in the collaboration. In this way, collaboration coordinators are the liaisons between the ArcGIS Online organizations participating in a partnered collaboration. They allow members from both organizations to have control over group membership and capabilities, as described in the following section.

Benefits of partnered collaboration
You may be thinking: But I can already share content externally. So why do I need a partnered collaboration?
Yes, you can share content with members of other ArcGIS Online organizations using groups, without establishing a partnered collaboration. However, partnered collaboration expands how organizations can work together by unlocking capabilities not supported through regular group sharing. These additional capabilities include the following:
- Collaboration group members can easily identify the organization name when viewing and searching for external members in the group.
- Members can search for and invite members from participating organizations to a collaboration group.
- Members from participating organizations can edit and update maps, apps, and other content in a shared update group.
- Designating collaboration coordinators streamlines the group invitation process by making them easy to find and add to groups without an invitation.
- Collaboration coordinators can be promoted to group managers, which allows them to invite and add members to collaboration groups and modify group settings.

Set up a partnered collaboration
The previous sections of this article explained what a partnered collaboration is and why it’s such a useful capability. So how do you set up a partnered collaboration?
The steps in the following sections use the emergency response scenario referenced earlier this article to walk you through the process of setting up, using, and ending a partnered collaboration. In this scenario, a wildfire event is encroaching on the fictional city of Montaña Seca. A fictional emergency wildfire response agency called Wildfire Command Corp wants to collaborate with officials from the City of Montaña Seca to respond to the emergency.
Note: Although a partnered collaboration is a relationship between two ArcGIS Online organizations, each organization can establish up to 20 partnered collaborations with other organizations.
For a demo of the workflow outlined below in this article, check out the following video:
Step 1 – Create a partnered collaboration
To create the collaboration, the organization initiating the partnered collaboration (in this scenario, the Wildfire Command Corp) must invite the other organization (in this scenario, the City of Montaña Seca) to join the collaboration. The collaboration becomes active once the following occur:
- The invited organization, the City of Montaña Seca, accepts the collaboration request.
- Both organizations designate collaboration coordinators to represent their respective organizations in the collaboration.
Note: To set up this partnered collaboration, the administrator of the Wildfire Command Corp must have privileges to manage the organization’s collaborations.
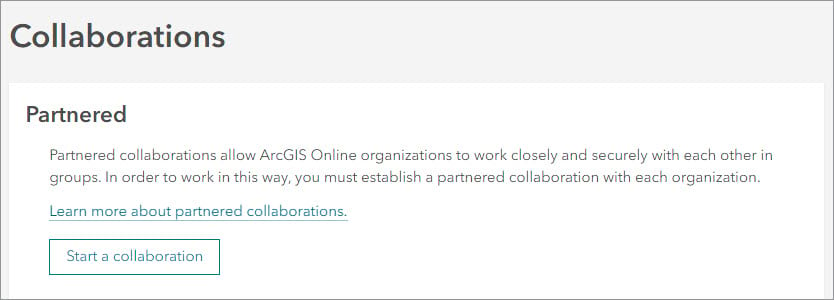
1. After signing in to the Wildfire Command Corp ArcGIS Online organization, click Organization > Settings > Collaborations. In the Partnered section, click Start a collaboration.
2. Enter the home page URL for the organization you are collaborating with (the City of Montaña Seca) and modify the email message that is sent with your collaboration request. Click Start collaboration.
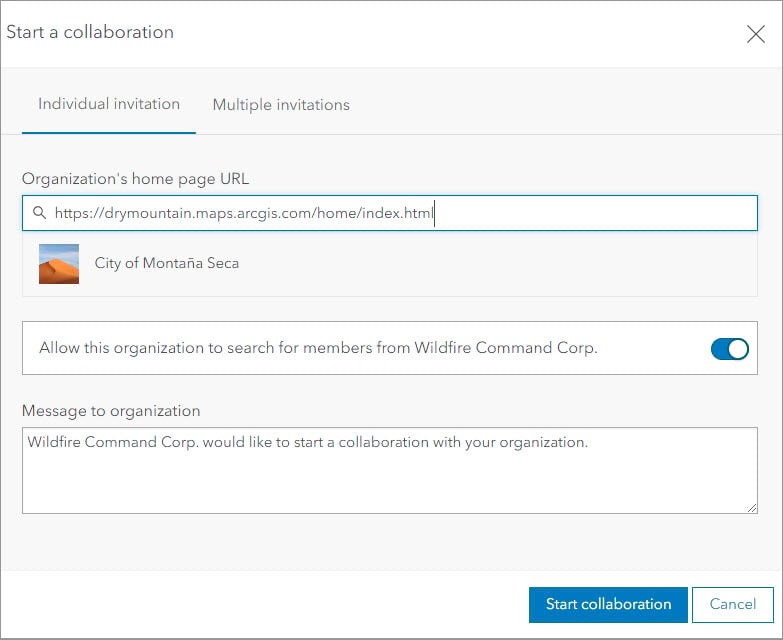
A collaboration request email is sent to administrators of the City of Montaña Seca organization.
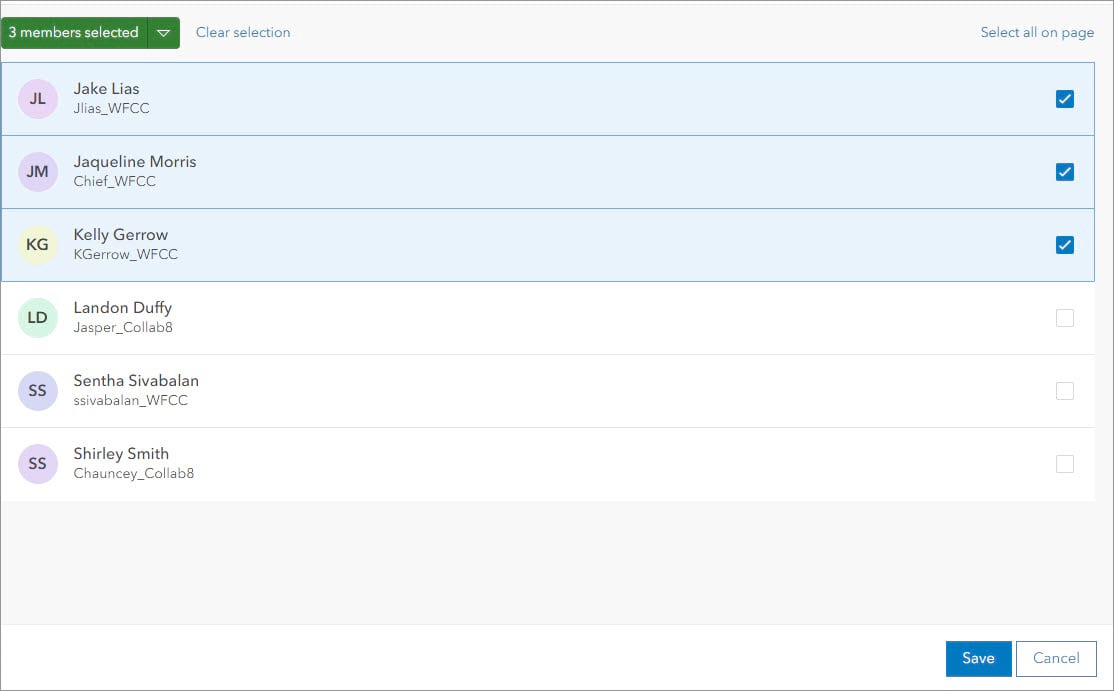
3. Click Set up collaboration coordinators and select up to 20 members to represent the Wildfire Command Corp organization in the partnered collaboration. Click Save when finished.
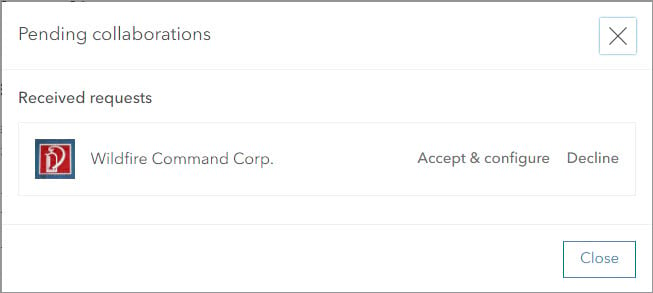
An administrator of the City of Montaña Seca organization must now accept the collaboration request and designate collaboration coordinators to represent the organization in the collaboration. To do so, they must click Organization > Settings > Collaborations > Partnered, click Review collaboration requests, and click Accept & configure.
Note: Only members with the role of Administrator or Facilitator, who have their profile visibility set to Everyone (Public) or Organization, can be collaboration coordinators.
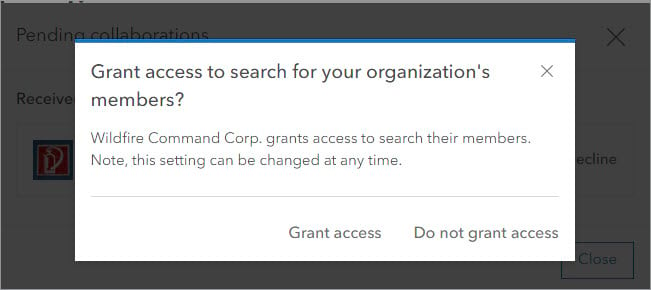
Then, the administrator from the City of Montaña Seca can allow the Wildfire Command Corp to search for members of the City of Montaña Seca organization.
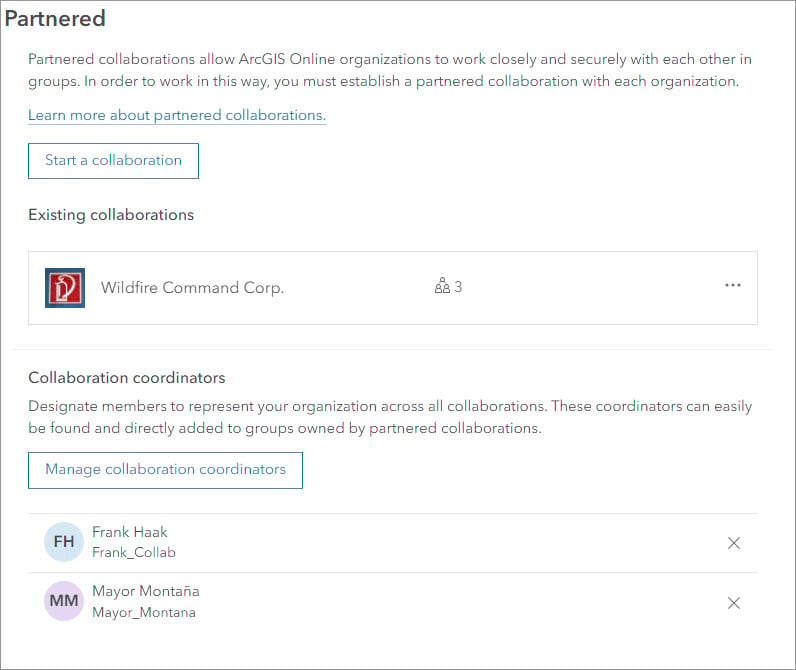
After that, the administrator must choose collaboration coordinators from the City of Montaña Seca organization to represent the organization in the collaboration.
The partnered collaboration becomes active when the collaboration request has been accepted and collaboration coordinators from both organizations have been designated. The next step is to create collaboration groups.
Step 2 – Create a collaboration group
Once you’ve established the partnered collaboration and both participating organizations have designated collaboration coordinators, members with group creation privileges from both organizations can start creating collaboration groups. These groups will be used to collaborate with other members of the partnered collaboration.
1. Ensure you have privileges to create groups.
Note: If you want all group members to be able to edit any items in the group, you must also have the privilege to create groups with update capabilities.
2. At the top of the site, click Groups. On the My Groups tab, click Create group.

3. Add a thumbnail image, name, summary, and tags for the group. Configure the group membership settings.
- For Who can be in this group, choose the Partnered collaboration and my organization’s members only option. This option ensures that only members of organizations participating in the collaboration can join.

- Under Group designations, if you want collaboration group members to be able to edit any items shared with the group, turn on the Shared update toggle button.

4. Click Save to create the group.
Once you’ve saved the group, the group overview page appears with badges showing that it is a partnered collaboration group and, if you turned on the Shared update toggle button, a shared update group.
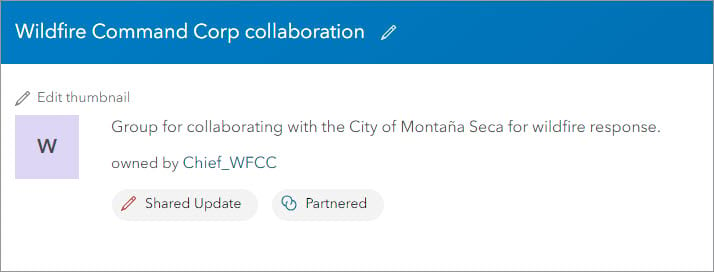
5. Repeat the above steps to create additional collaboration groups as needed.
Now that you have a collaboration group, the next step is adding members to it.
Step 3 – Add members to the group
Once a collaboration group is created, the group owner can start inviting collaboration coordinators and other members to it. You can also promote collaboration coordinators to group managers so they can invite members from their respective organizations to the group.
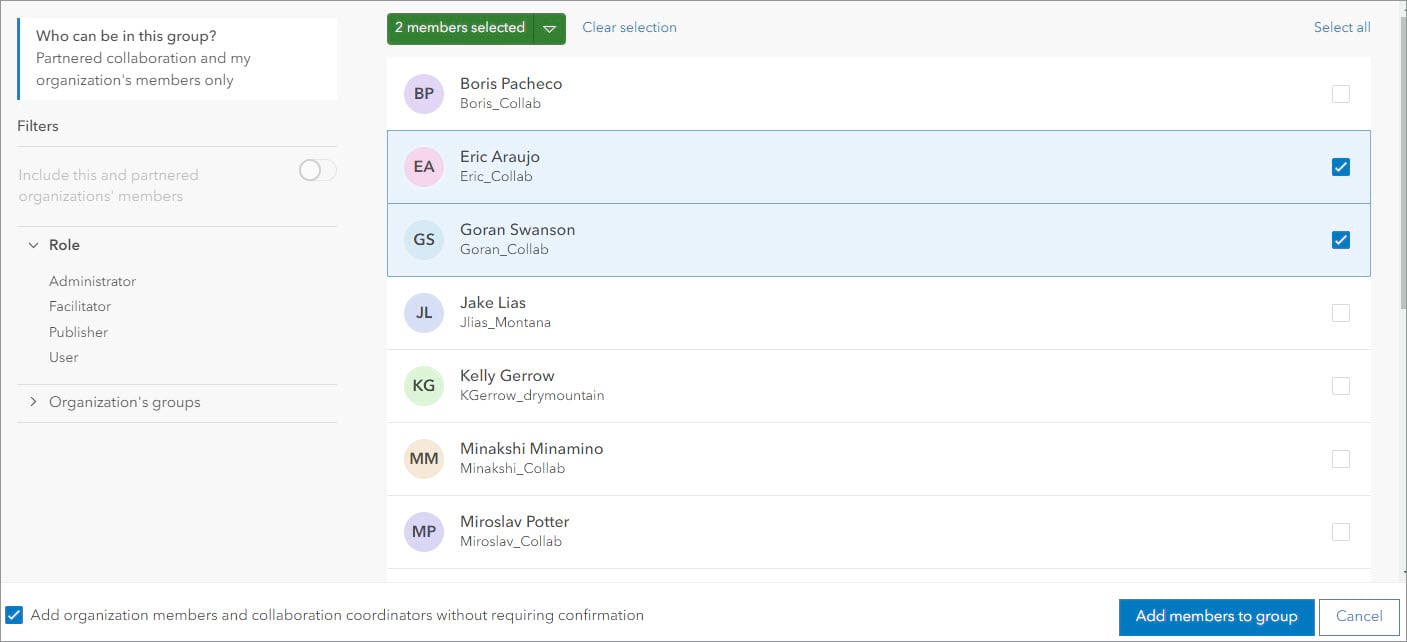
1. On the group overview page, click Invite members. Under Filters, turn on the Include this and partnered organizations’ members toggle button.

By default, only the collaboration coordinators are displayed, along with their organization affiliation.
2. Select the collaboration coordinators you want to add to the group.
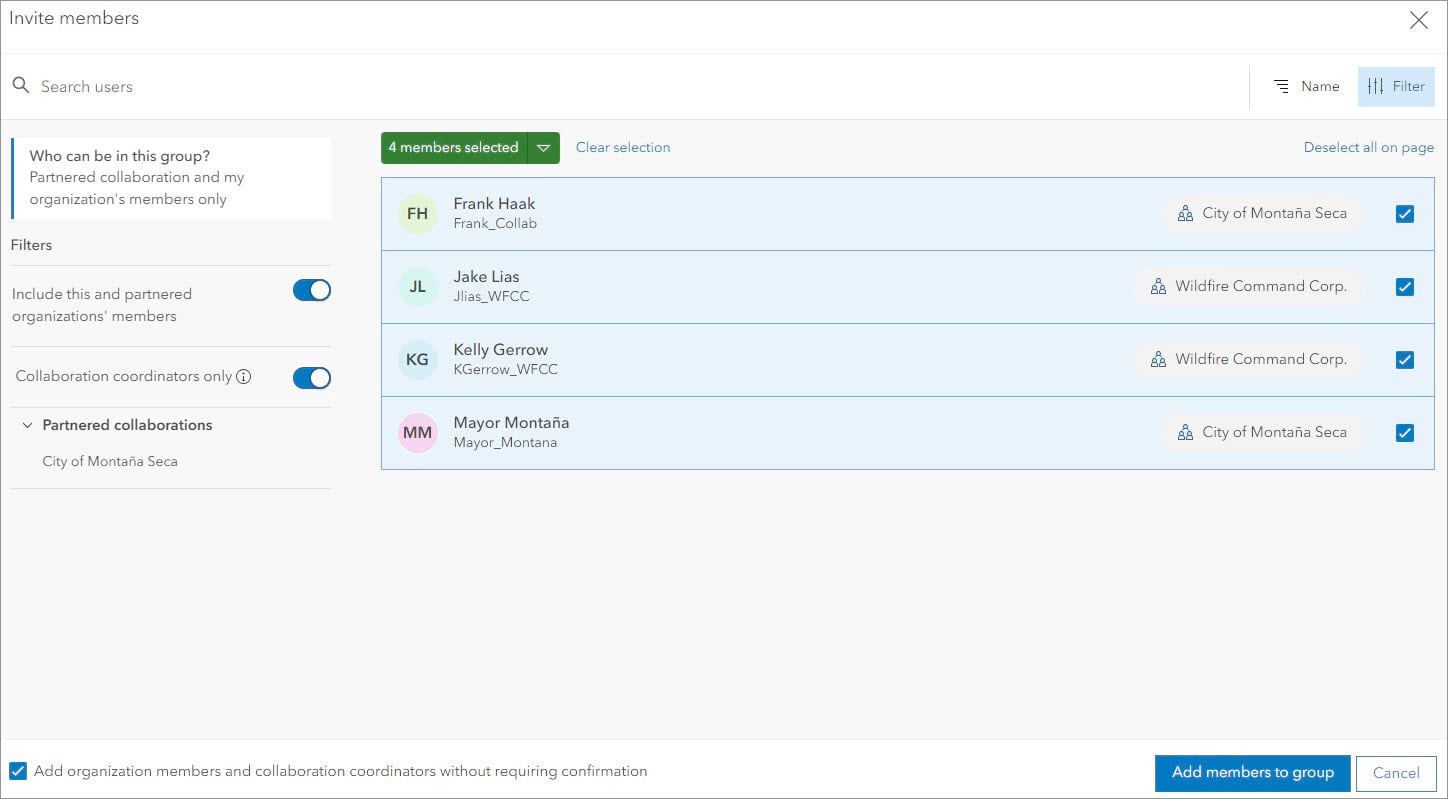
Collaboration coordinators can be added to groups without sending an invitation, so the corresponding check box is checked by default.

3. Click Add members to group.
4. On the group overview page, click the Members tab.
The collaboration coordinators you added are listed, along with their group role and affiliation.
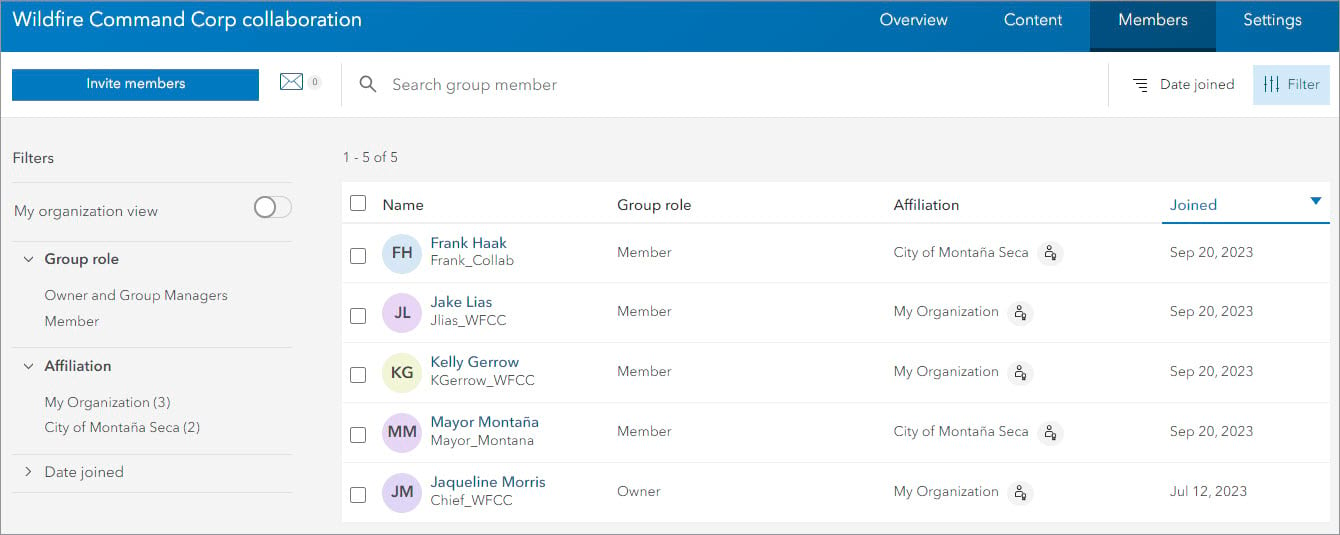
The next step is to promote some of these collaboration coordinators to group managers so that they can add members from their respective organizations to the group and modify group settings.
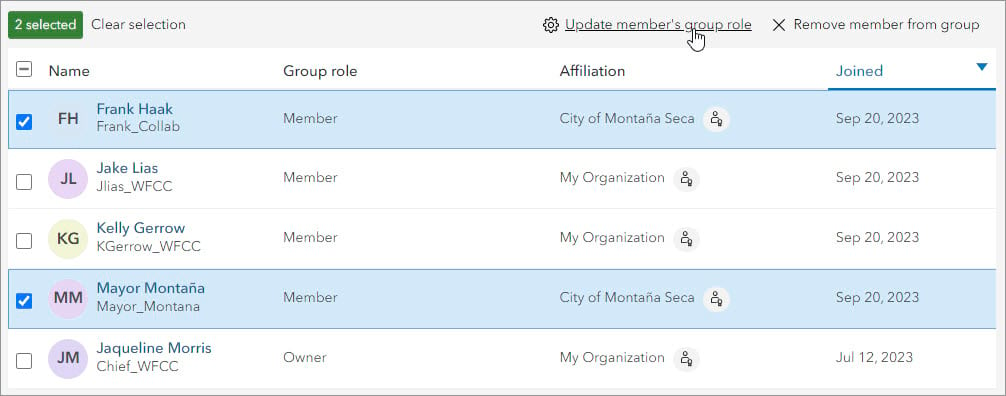
In this example, the group owner from the Wildfire Command Corp will promote collaboration coordinators from the City of Montaña Seca to group managers.
5. Select the collaboration coordinators you want to promote to group managers. Click Update member’s group role.
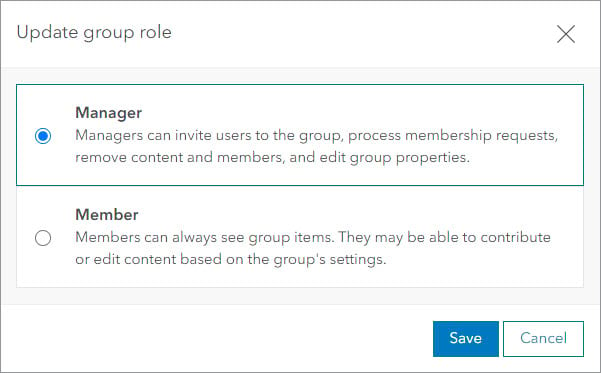
6. In the Update group role window, select Manager and click Save.
Now the group owner and managers can add members from their respective organizations to the group without sending an invitation. They can click Invite members on the group page, select members to add to the group, and click Add members to group.
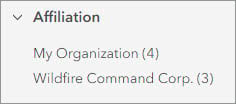
Tip: The Members tab of the group page has an Affiliation filter you can use to filter the list of members to show members of your organization or the partner organization.
7. Repeat the above steps to add members to other collaboration groups as needed.
Step 4 – Add content to the group
Now that members of both organizations have been added to the collaboration group, you’re ready to add content to it. The content you add to the group is automatically shared with the other members in the group. If the group is designated as a shared update group, items that are shared with the group can be edited by all group members. Each organization in a partnered collaboration continues to own and manage its content while allowing the other group members to view and contribute content. Members can also use shared items to create content, such as maps and apps.
1. On the group page, click the Content tab and click Add items to group.

2. Select the items and click Add items.
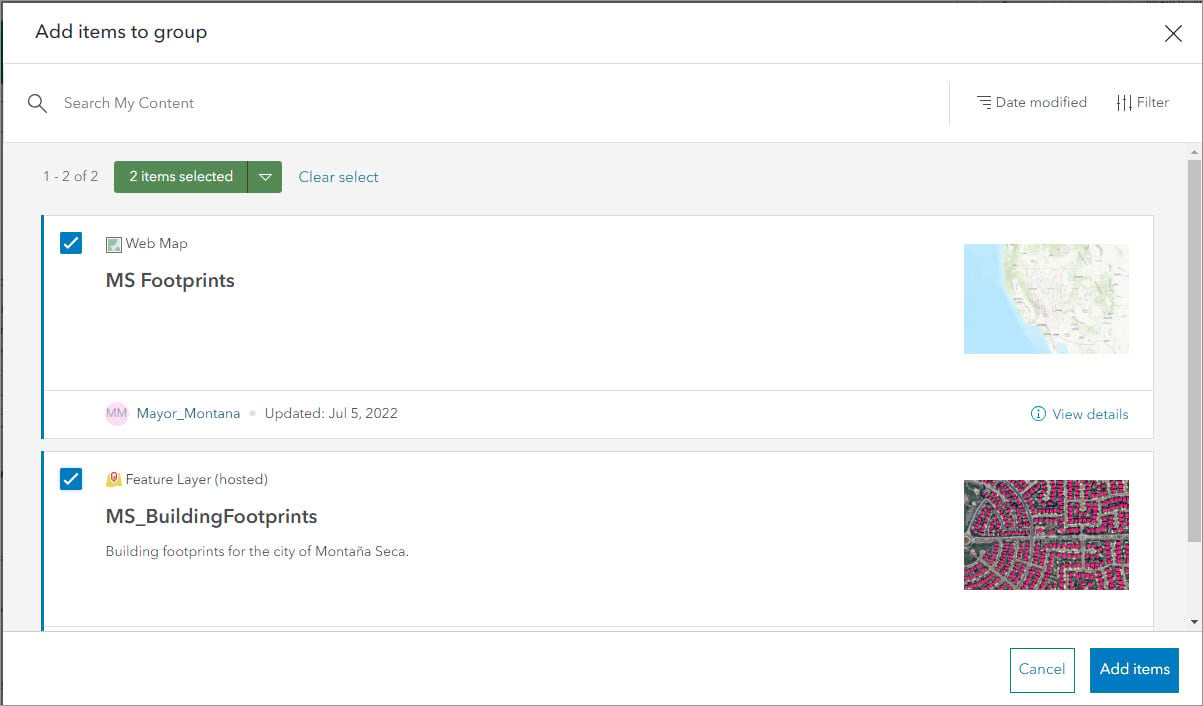
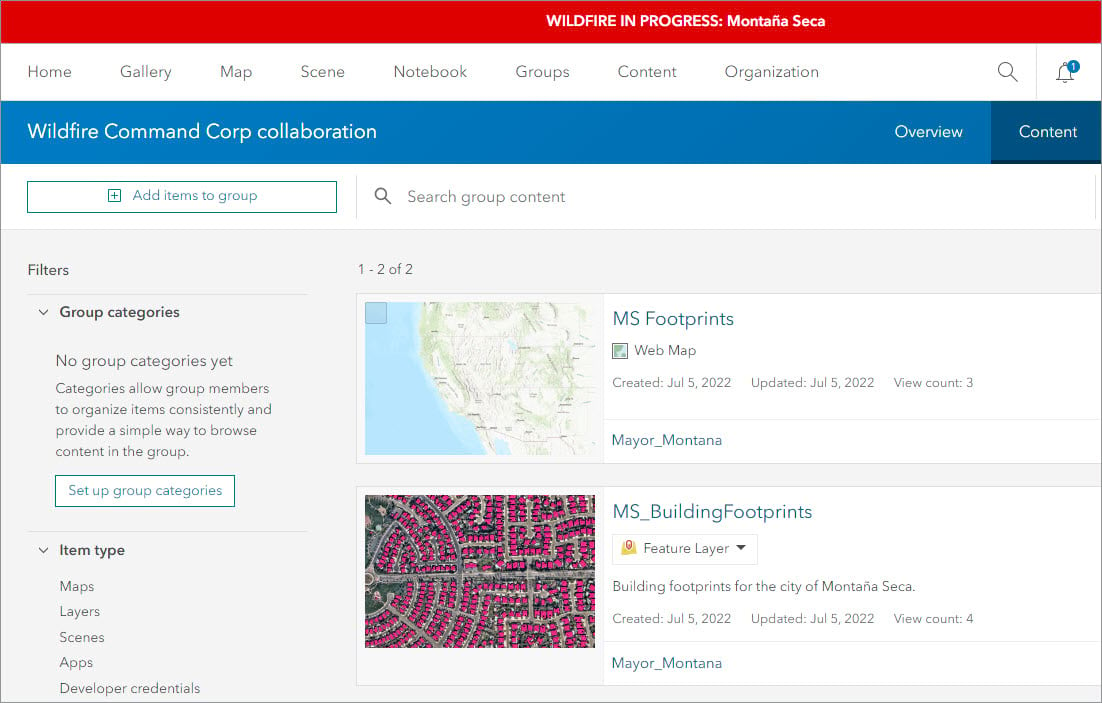
The new items are now listed on the Content tab of the group page and are shared with all members of the group.
Members of both organizations in the partnered collaboration can access and collaborate on the items shared with the group. For example, the City of Montaña Seca can use the group to share critical building footprints with the Wildfire Command Corp to help mitigate fire damage in the city.
3. Repeat the above steps for other groups in the collaboration as needed.
Step 5 – Suspend and end a partnered collaboration
There may come a time when the partnered collaboration is no longer needed. For example, a collaboration that is set up to respond to an emergency, as in the case of the Wildfire Command Corp and the City of Montaña Seca, is not needed once the emergency is over. When this happens, you can suspend and end the collaboration.
Suspending a collaboration effectively pauses the partnered collaboration to prevent participating organizations from continuing to collaborate. This gives you time to clean up items and members in the collaboration. After suspending a partnered collaboration, either organization can choose to resume or end the collaboration.
When you suspend a collaboration, the following occurs:
- Collaboration coordinators from partnered organizations can no longer be promoted to group managers.
- New members from partnered organizations cannot be invited to collaboration groups.
- Existing group members and roles remain unchanged. Members with the appropriate privileges can continue to share or remove items.
When you end a collaboration, the following occurs:
- Groups that are used for collaborating remain active.
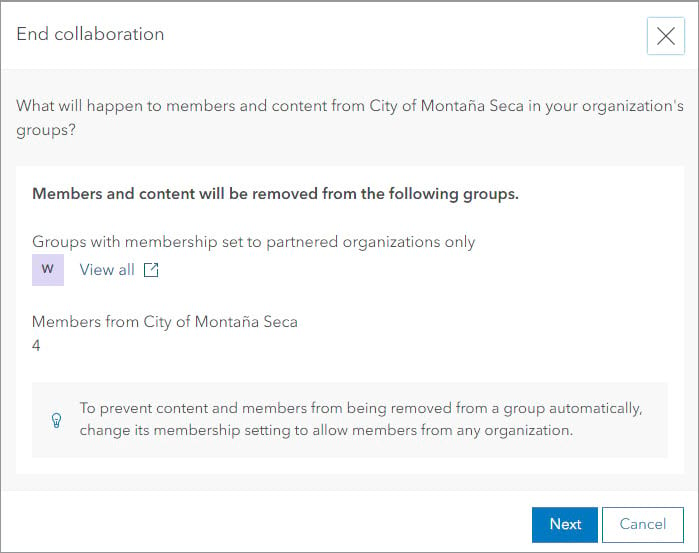
- If a group only allows members of partnered organizations to join, members and content from collaborating organizations are automatically removed.
- If a group allows members from any organization, content from collaborating organizations remains and any group managers that are from collaborating organizations are demoted to group members.
To suspend and end a partnered collaboration, you must have privileges to manage your organization’s collaborations. Either of the participating organizations can suspend and end a partnered collaboration.
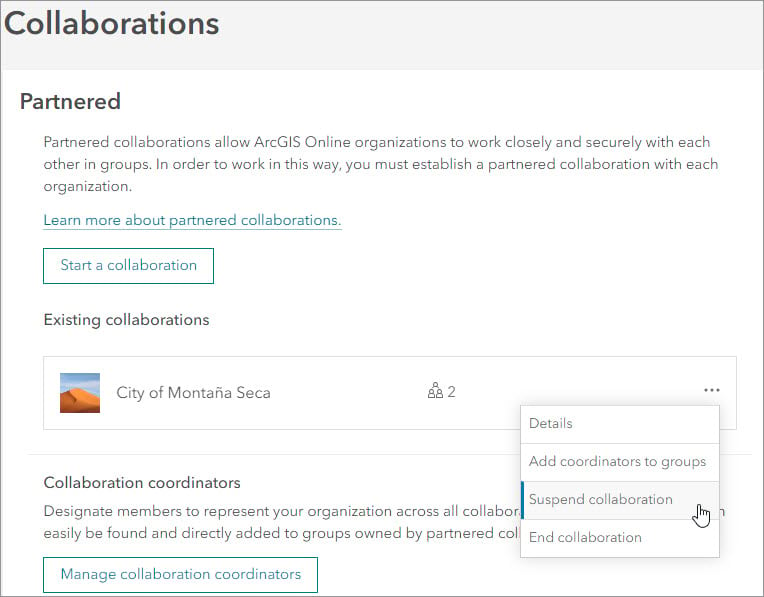
1. Click Organization > Settings > Collaborations. In the Partnered section, click the Options button beside the existing collaboration and click Suspend collaboration.
2. In the Suspend collaboration window, review the impacts of suspending a collaboration.
3. Check the check box confirming that you have notified the partner organization that you are suspending the collaboration and click Suspend collaboration.
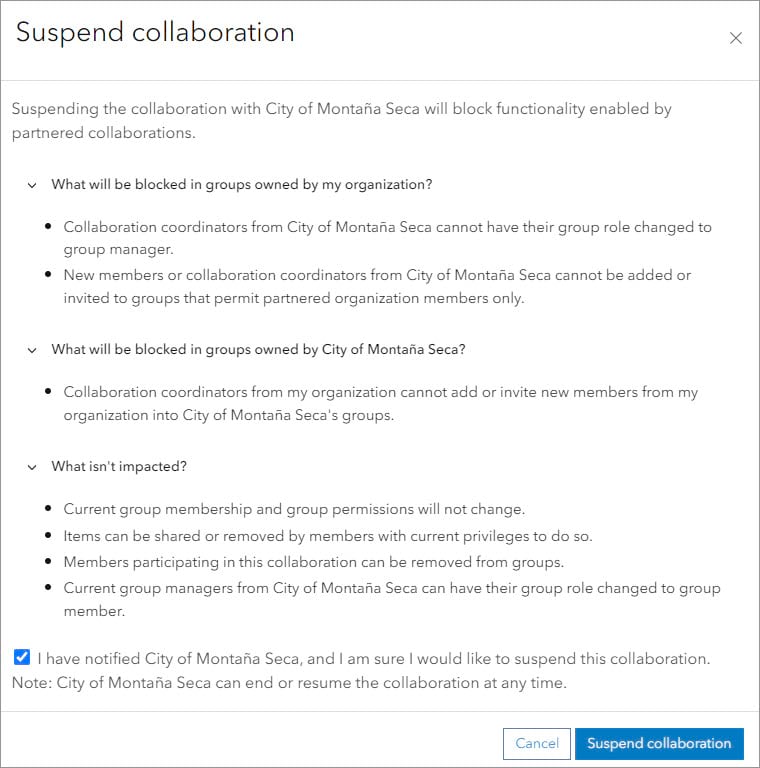
While a collaboration is suspended, administrators from both participating organizations can choose to remove their members, groups, and content from the collaboration. Either organization can resume the collaboration at any time.
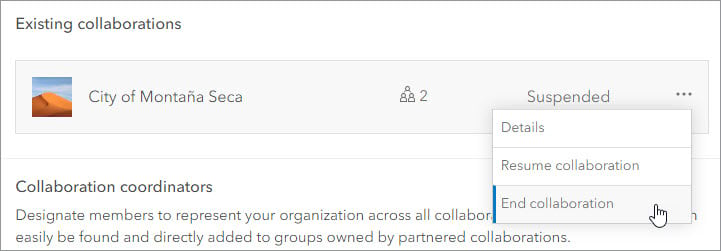
4. To end the collaboration,click Organization > Settings > Collaborations. In the Partnered section, click the Options button beside the suspended collaboration and click End collaboration.
Note: Either organization can end the collaboration once it’s been suspended.
5. Review the list of groups that are set to allow members from partnered organizations only, as well as the members and content that will be removed from the groups. Click Next.
6. Check the box stating that you have notified the collaborating organization that you want to end the collaboration. Optionally, modify the email message that is sent after ending the collaboration. Click End collaboration.
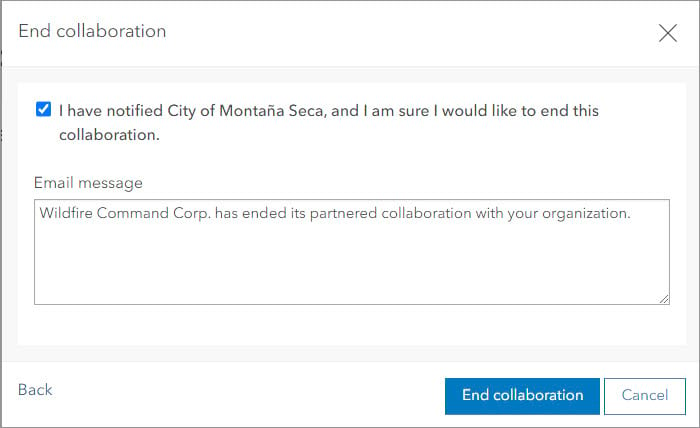
When a collaboration ends, each organization can only see the collaboration groups they own with their content and their organization’s members. They may choose to delete the group once the collaboration ends.

Learn more
This article introduced you to the concept of partnered collaboration and explained why partnered collaboration is useful for ArcGIS Online organizations. In addition, the article covered the basics of setting up, using, and ending a partnered collaboration.
Ready to learn more? Check out the following topics in the ArcGIS Online help documentation:
- Create a partnered collaboration
- Use partnered collaborations
- Manage partnered collaborations
- Create groups
A note about distributed collaboration
Two types of collaboration are supported in ArcGIS Online: distributed collaboration and partnered collaboration. This article focuses on partnered collaboration. Distributed collaboration can be used for many workflows involving ArcGIS Online and ArcGIS Enterprise, including making data visible across different organizations or managing field data collections. To learn more, see Distributed collaborations.


Article Discussion: