Imagine running spatial analysis without all the initial time-consuming work to convert and prepare your data, such as:
- Combining multiple files into a single file for analysis
- Formatting your time and geometry fields before running analysis
- Making a table with Longitude and Latitude columns into a feature class using the XY Table to Point tool
Sounds great, right? With ArcGIS Pro 2.6, big data connections (BDCs) make this a reality. BDCs allow you to connect to collections of datasets without lengthy pre-processing steps to prepare your data for analysis. Big data not required! In this blog, I’m going to give an overview of big data connections, how to create them, and show you an example of how to get started with data you can download and use yourself.
What is a big data connection?
A big data connection is a reference to a folder containing one or more datasets. The BDC contains information about included datasets, such as the dataset names, the schema, and how time and geometry are represented. The source folder being referenced by the BDC has a folder for each dataset.
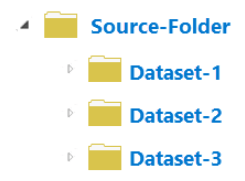
Each dataset can have one or more files. The files in a single dataset folder must be the same file type with the same schema. There can even be folders within the folders – the structure within the dataset folder doesn’t matter!
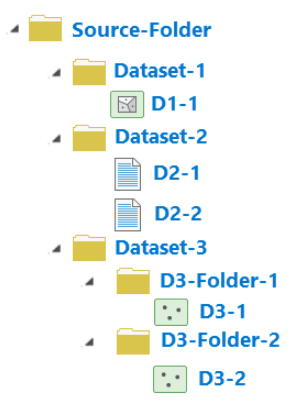
When analysis is run using a dataset from a BDC, all the contents in the dataset folder are used in the analysis. For example, when Dataset–3 in the image above is selected as an input, the files D3-1 and D3-2 are both used in analysis.
How do I create a big data connection?
Before creating a BDC, you need to ensure your data is formatted in the correct folder structure:
- There is a single source folder. In the above example, this is “Source-Folder.”
- There are one or more folders for each dataset within the source folder.
- Files contained within the dataset folder have the same file type and schema.
Once your data is properly structured, you can run the Create Big Data Connection tool, which will register a reference to your datasets (stored in a .bdc file). In this tool, specify where the output BDC file will reside. I like to store mine in a folder that I have saved as a favorite in my projects. Specify a name for the BDC file, and the source location. This tool, like all the others GeoAnalytics Desktop Tools, requires an Advanced license.
When the tool runs, it’s scanning through your datasets to determine the schema, and looking to see if there are any fields that can be used for time or geometry. When it completes, it creates a .bdc file that has these and more properties as references to the datasets. The datasets discovered as part of the BDC are left as-is, they are not copied or moved in any way. The BDC datasets can be used for visualization and analysis.
Now what?
Now that you have a BDC file, you can use it in your favorite analytic workflows or add it to the map to visualize your features.

BDCs provide a powerful new way for Pro to connect and interact with your data. To see how BDCs can fit into your favorite workflows, let’s look at an example.
Creating and using big data connections: An Example
I’ve downloaded 5 years of storm data from the NOAA Storm Events Database and unzipped the files. I now have a folder called BDC-Example that has a folder named Storm-Event-Details. The Storm-Event-Details folder will represent a single dataset that contains 5 folders, each of which has a CSV. Now, I can register the BDC-Example folder as a BDC, and I have a new dataset called Storm-Event-Details.
To register the dataset, I run Create Big Data Connection.
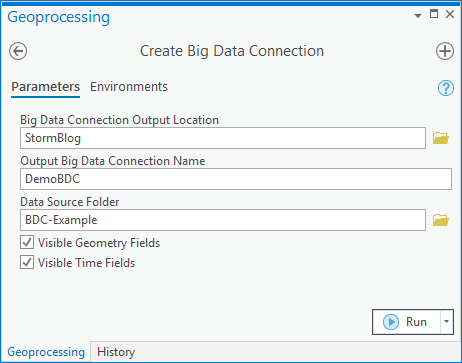
This creates a BDC with a dataset that I can add to my map or use in analysis. Before I use this dataset for analysis, I’m going to look at the field values in my dataset. I’ll use this information to ensure that essential information like time and geometry are correctly configured for my BDC dataset.
To do this, I run the Preview Dataset From Big Data Connection tool. I provide an input BDC dataset and the output is a table in the geoprocessing messages. This is especially useful when using a large dataset that is too big to open.
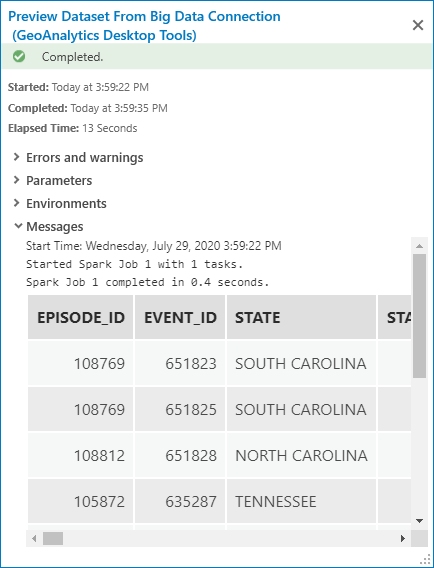

From this preview I see a few things:
- I have a lot of fields (see that scroll bar?). I’m not interested in using all of them in analysis.
- I have a field named BEGIN_DATE_TIME in the format dd-MMM-yy HH:mm:ss. You can see supported time formats here.
- I have fields named BEGIN_LAT and BEGIN_LON that can be used to represent the X, Y location of each feature.
Given the above information, I want to update my big data connection to hide fields I’m not interested in using, and make sure that the time and geometry on this dataset use the fields and formats I’ve outlined above.
To do this, I use the Update Big Data Connection Dataset Properties tool. This tool allows you to change how a dataset is represented. Once I’ve picked my dataset to update, I’ll make changes in the Fields, Geometry, and Time sections.
In the Fields section, I uncheck the Show checkbox for fields that don’t have information that I’m interested in using in analysis. I’m only interested in keeping the EPISODE_ID, EVENT_ID, STATE, EVENT_TYPE, BEGIN_DATE_TIME, BEGIN_LAT, BEGIN_LON, and EVENT_NARRATIVE fields so I uncheck all others. This doesn’t delete anything from the underlying data (no BDC actions will ever delete or modify the existing datasets!), but simply hides the field for use in visualization or analysis.
I want to make sure the correct fields are being used to represent geometry. In the Geometry section, I verify that the BEGIN_LAT and BEGIN_LON fields are used for Y, X, and they are – so no changes there.
The Time section outlines the date time fields and formats to be used in analysis. Here I see that the BDC is using a different field than the one I want to use, so I simply pick the field I’m interested in and include the formatting of in the input time field, in this case: dd-MMM-yy HH:mm:ss.
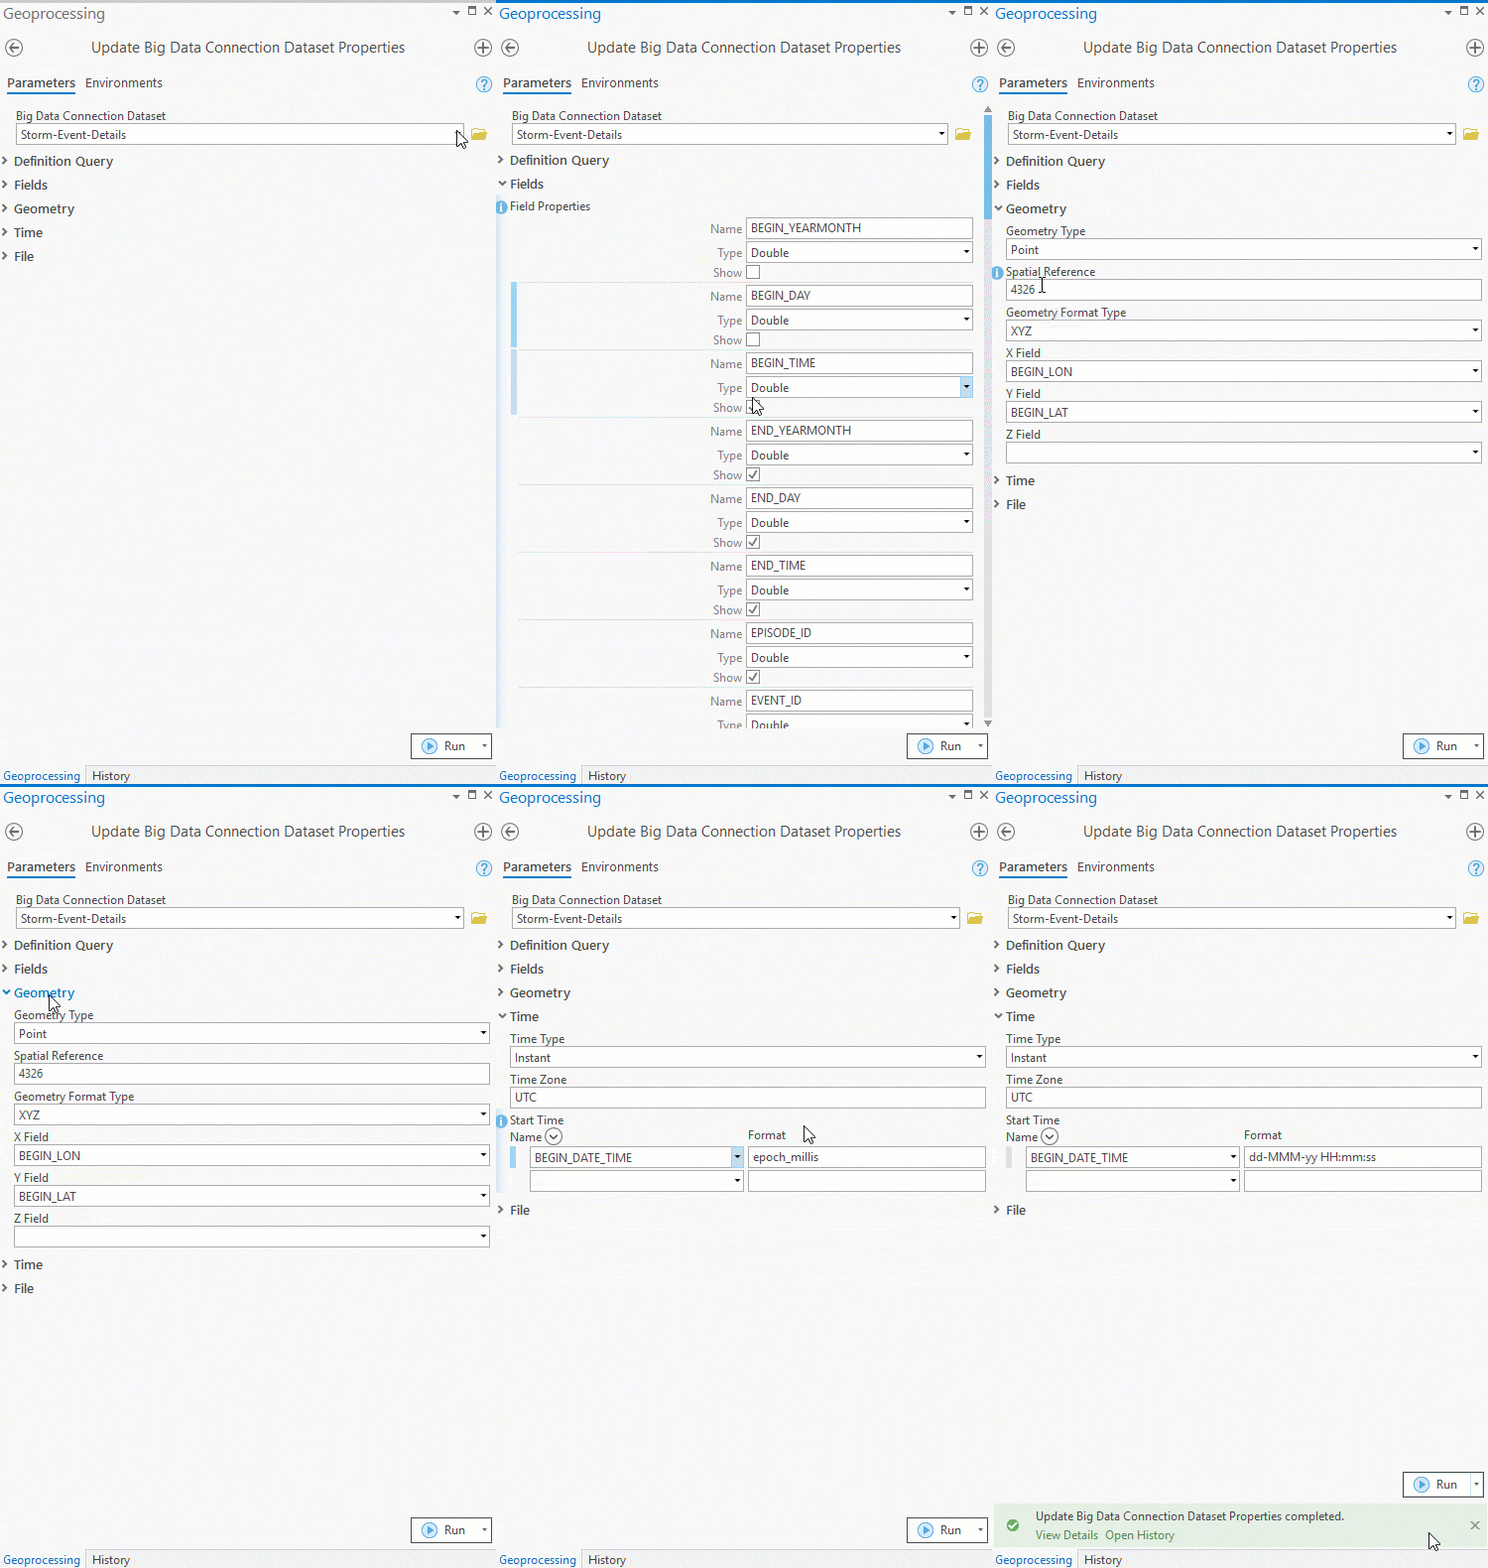
Now that I have made all the changes, I run the Update Big Data Connection Dataset Properties tool and my BDC dataset is updated to use my changes. Want to be sure? Run the Describe Dataset tool. This will produce a summary table of fields, as well as a summary of the geometry and time. To check if time is correct – since it can be difficult to know if your time format is correct – check the time section in the Describe Dataset messages:
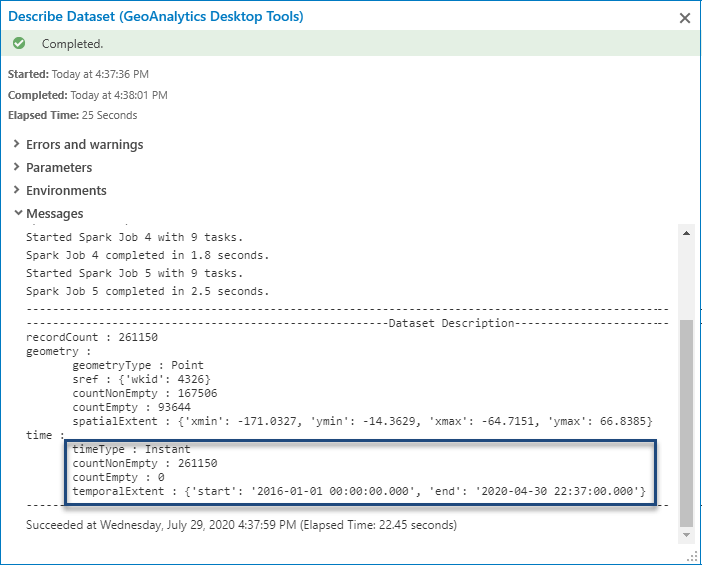
Here we can see that we don’t have any empty time values. If we made a mistake in registration, the time values would show up as empty, and you wouldn’t see a temporal extent.
Now the data is ready for analysis!
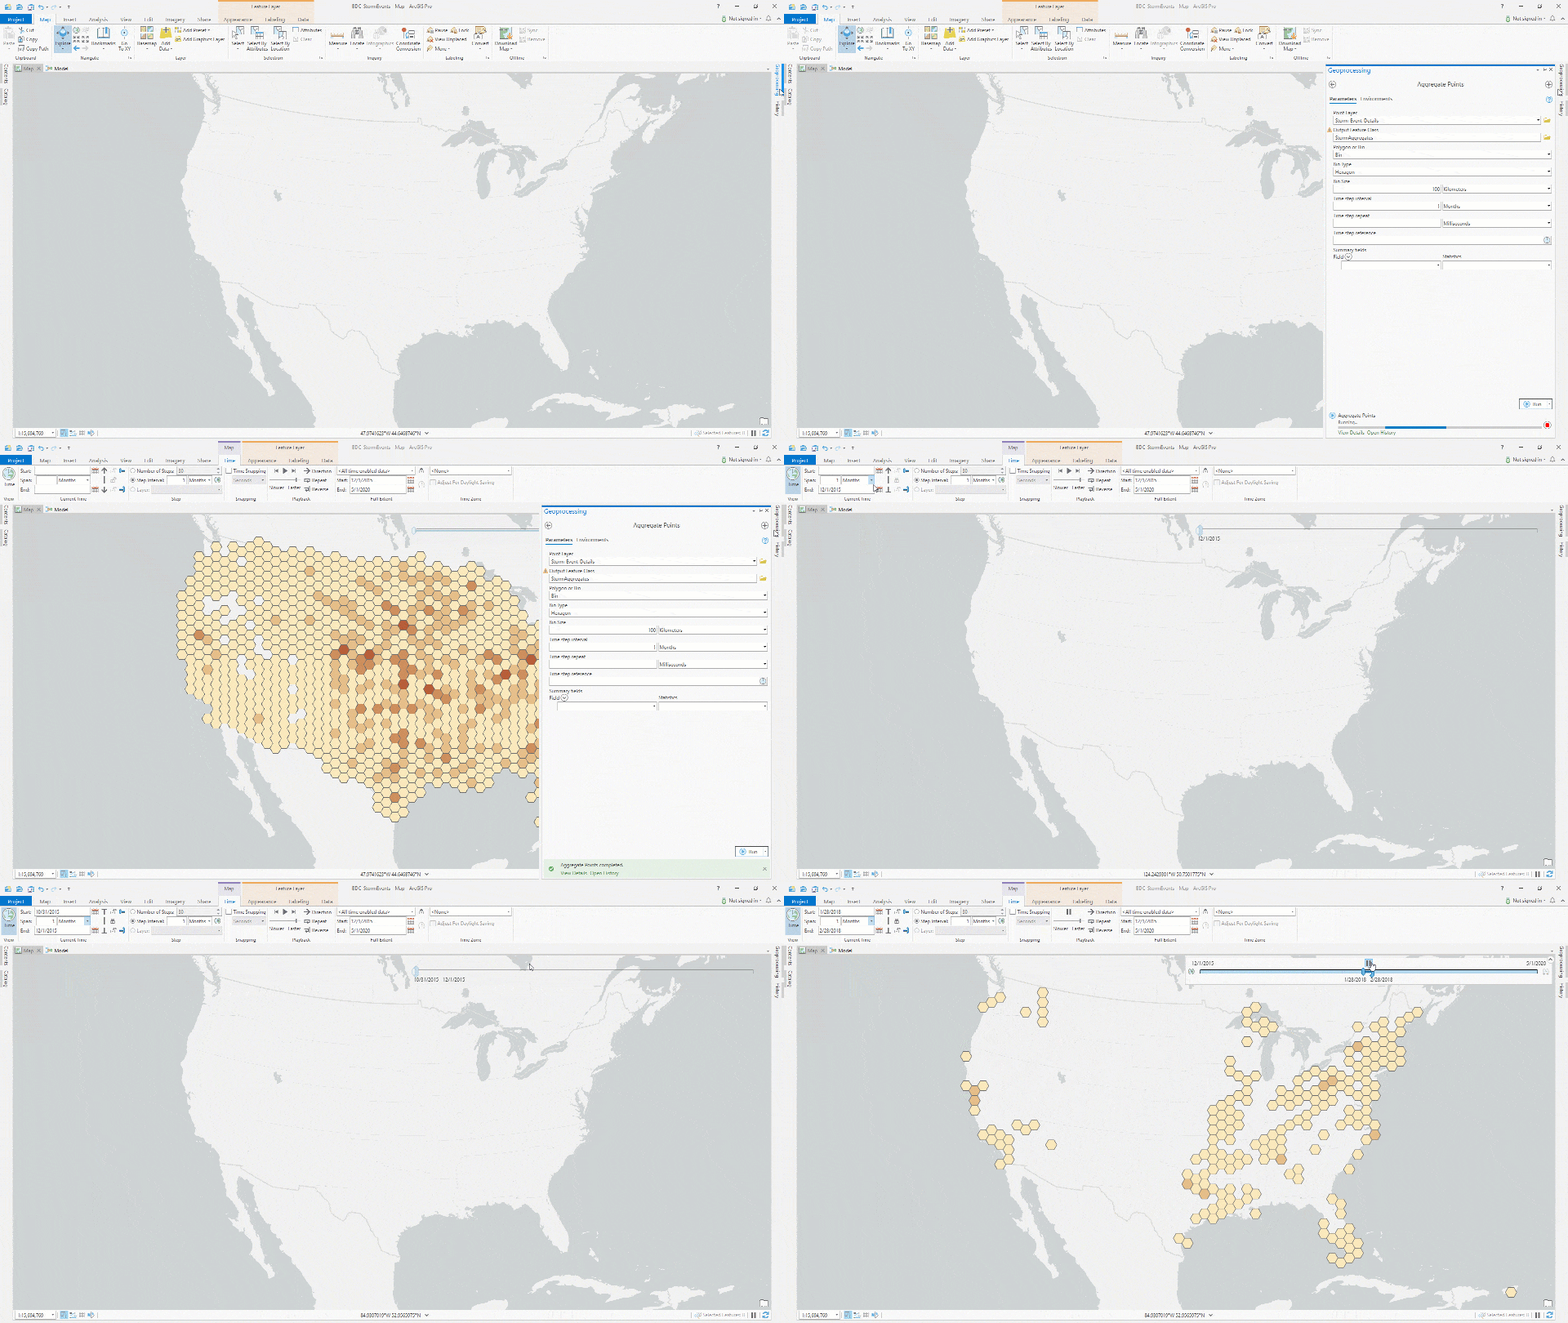
I chose to run one of my favorite tools, Aggregate Points, for a quick understanding of my data and how it looks over time. Other ideas include analysis from the following blog by Kevin Butler that uses the same data. If you want to copy your data to another source, like a file geodatabase or shapefile, use the tool Copy Dataset from Big Data Connection.
With big data connections you can save time and resources preparing your dataset for analysis. Instead of having to merge datasets into a single dataset, converting time or geometry fields, you can use your data as is. Remember, don’t be fooled by the name, big data connections are for all sizes of datasets.

Article Discussion: