Oftentimes, you do not need to add a north arrow to your map. Everyone is going to assume that north is at the top, so if north really is at the top, chances are you don’t need to add a symbol to say so.
But recently I made a map of The Tibbitt to Contwoyto Winter Road in northern Canada, and I chose to rotate it so north (the end of the road) was at the bottom. This map definitely needed a north arrow.
This blog will walk you through making a customized north arrow. If you want to follow along, you can download this project package of the finished map. You can also read the other blogs in this series about making the Ice Road map here, here, and here.
1. Double-click IceRoadToDiamonds.ppkx to open it and look at the Layout.
2. Zoom to the top of the layout. In the Contents pane, turn off the existing North Arrow layer. You can refer to this one later to compare its properties if you like.
3. In the Contents pane, select Map Frame to make sure your north arrow will be associated with the correct map.
4. On the ribbon, on the Insert tab, click North Arrow.

5. Choose Compass North 1.
This snazzy compass rose symbol is new to ArcGIS Pro 2.3, and has customizable text.

6. Drag a box on the map where you would like to place the north arrow. I put mine in the white space above Yellowknife Bay. Resize the north arrow until it looks good.
This symbol knows where north is and points accordingly. The letters are upside down, but you’ll fix that later.

7. Select the north arrow. On the ribbon, on the Format tab, change Fill color to North Arrow green. It is saved in a style in the project, so appears at the top of the color list.

Now the north arrow matches the rest of the map. It is quite large, but not very important, so a faint color helps it to recede into the background more and not draw too much attention to itself.
8. In the Contents pane, double-click on the north arrow to open the Format pane. Click the picture of the north arrow next to Symbol to access its symbol properties.
9. Make sure you are on the Properties tab and the Layers tab and select any of the letter symbol layers.

The rest of this map uses the Gulim font. It would be nice if your north arrow could as well.
10. Under Appearance, change Font to Gulim and click Apply.

Not all text properties are available in this pane. For example, you can’t make the font bold or italic. If you want to do something fancy with your font, you need to save a text symbol to a style first. You can save this in your favorites style, or make a new one. Or you can just look at the ready-made style included in the project.
11. In the Catalog pane, on the Project tab, expand the Styles folder. Right-click on NorthArrow and choose Manage.

The Catalog view opens.
12. Click the North Arrow Labels text symbol, click Properties, and click Appearance to see how these labels are constructed.
- Font, color and outline properties are all set to match the text on the map.
- Horizontal and Vertical alignment are both set to center-aligned, to match the positioning of the letter symbols in the north arrow.
- Rotation is set to 180° to flip the text upside down. The north arrow in this map is upside down, so the text needs to match.

13. Close the Catalog view to return to the Layout view.
14. Reopen the Format pane for the north arrow.
15. Select any of the letter symbol layers, open the Shape text symbol menu and click More text symbols.

16. The upside-down green North Arrow text symbol should be at the top of the list. Click it and click OK.
17. Repeat this for all of the letter symbols and click Apply.

You may find that the letters are not aligned just the way you would like now that they are upside down. Letter alignment is tricky because they are designed to sit nicely inside of words, rather than behave as regular symbols.
18. Scroll down inside the Element pane. For each letter, tweak the values under Offset Distance until you like what you see.


You can do a lot more with this north arrow than just change the font. For example you can also change the Text string to spell out the word North, or to write it in another language. Different parts of the symbol can have different colors, and not all parts need to be shown.

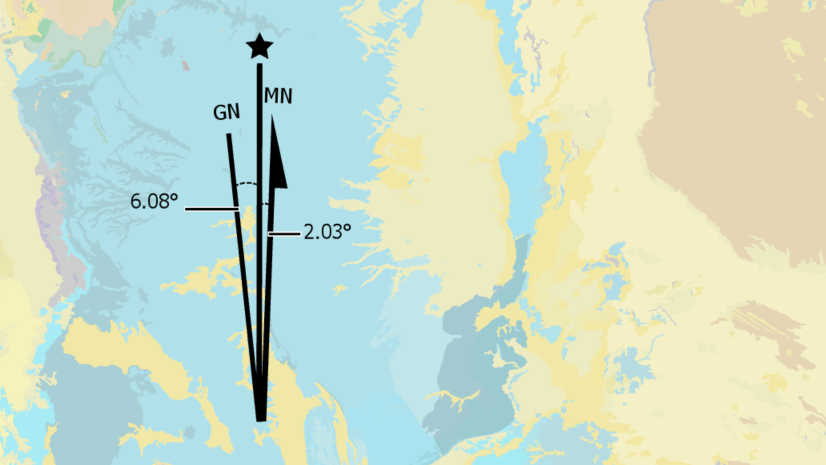
Finally, there are a few other new north arrows in ArcGIS Pro that you can use to build declination diagrams like this:

Read this blog to find out how to build one for yourself.


Commenting is not enabled for this article.