ArcGIS CityEngine provides powerful tools to procedurally create detailed buildings or large cities. For further processing or visualizations, users often need to export these models to a third-party application.
Unreal Engine has become a popular tool for architectural visualizations or to create interactive experiences, but a problem users typically face when exporting scenes from ArcGIS CityEngine to Unreal is the lack of high-quality materials and meshes. Luckily, Unreal Engine provides several asset libraries such as Quixel or Twinmotion Assets for Unreal Engine which are free to use within the Unreal ecosystem.
In this blog post, we’ll guide you through a simple workflow to replace assets in Unreal Engine after importing an ArcGIS CityEngine Datasmith scene. The replacement workflows are controlled by Unreal Engine’s Data Assets (which can be thought of as simple tabular data). These Data Assets can be shared between projects once set up correctly.
To help demonstrate the workflow, we’ve created a template project with additional tools to assist the replacements which will be explained in detail in this blog post, so you can follow along.
We also provide a ready-to-use ArcGIS CityEngine and Unreal Engine sample project that makes heavy use of these replacements. To open the Unreal project, make sure the Twinmotion Content for Unreal Engine Plugin is installed.
Download links
CityEngine Replacement Template Project for Unreal
-
- Replacement project which can be used as a template for new projects
CityEngine Replacement Plugin for Unreal
-
- Replacement plugin which can be integrated into existing projects
-
- Requires the Twinmotion Content for Unreal Engine Plugin to be installed
- Note: large download 3.2 GB
- Minimum system requirements: NVIDIA GeForce RTX 2060 graphics card
Boston Example CityEngine Project
-
- Requires the latest Complete Street Rule example project downloaded to your workspace
Replacement Workflow
In this section, we’ll explain how replacements can be defined in Unreal Engine and how they can be executed in your scene using the provided template project.

First, the scene is exported from ArcGIS CityEngine using the Datasmith exporter. In Unreal, we can either use the Dataprep import workflow, or apply the replacements inside the Level viewport after importing the Datasmith scene.
Typically, this workflow is iterative, meaning we can execute the replacements multiple times until the desired result is achieved.


Exporting from ArcGIS CityEngine
To export our scene from ArcGIS CityEngine, we use the Datasmith exporter. Depending on the use-case, there are several options to consider.
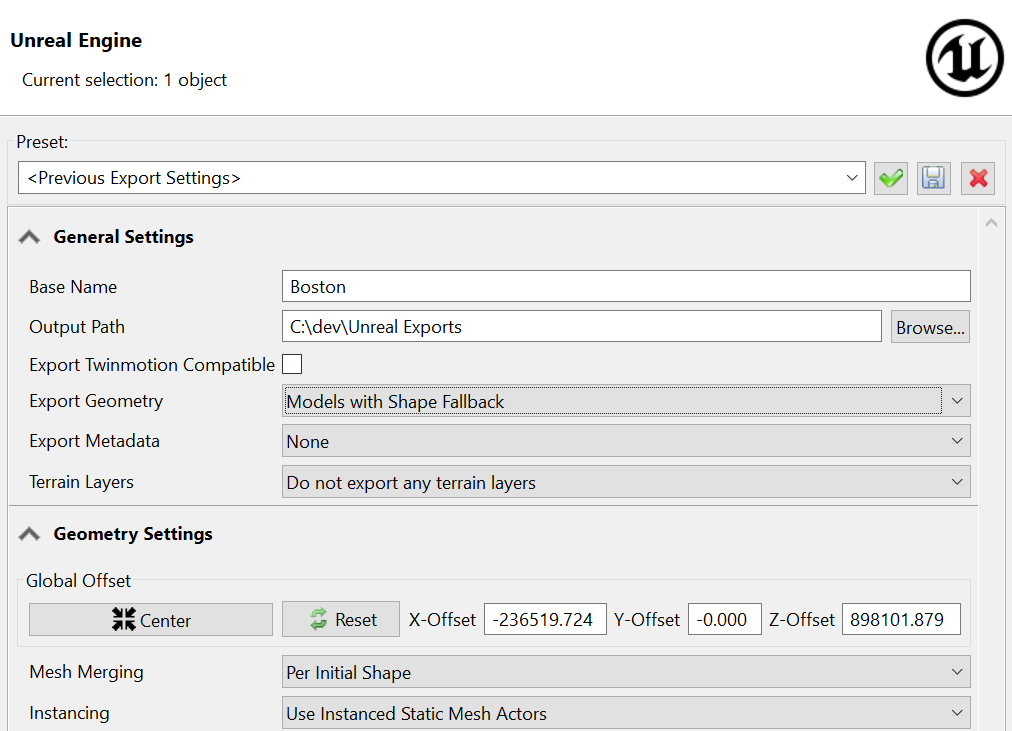
- Global Offset: Global offset should be centered to avoid precision errors due to possibly large coordinates.
- Mesh Merging: For small scenes this should be set to Per Initial Shape and for large scenes to Globally or Globally by Material. Usually Per Initial Shape allows for better handling in Unreal as each building can be modified individually.
- Instancing: When using many instances (e.g., for foliage, grass, or trees) it’s recommended to set this option to Use Instanced Static Mesh Actors. This will use an optimized Hierarchical Static Mesh component in Unreal, which improves performance during the replacement workflow, as well as rendering performance at runtime. Note: if you are using the Visual Dataprep Workflow, hierarchical instances are not rendered correctly in the preview editor.
For additional options, refer to the ArcGIS CityEngine Datasmith exporter documentation.
Hint: To make it easier to configure replacements in Unreal, it is recommended to name CGA materials appropriately using the material.name property (for example, by calling set (material.name, “Brick”)). We can reference these names later in Unreal to replace materials.
Unreal Engine
In Unreal, we can define the replacements and execute them on a Datasmith scene. First, we need to make sure our project contains the necessary tools. We can either use the CityEngine Replacement Template Project for Unreal if we want to start with a new project. Or alternatively for advanced use-cases we can add the CityEngine Replacement Plugin for Unreal to an existing project by copying it to the Plugins folder of the project (see also Plugins in Unreal Engine).
Defining Replacements
The replacement workflow is controlled by Unreal Data Assets. Our template project provides two special types of Data Assets. The MeshReplacement type defines how to replace StaticMesh instances, and the MaterialReplacement type defines how Materials on Meshes are replaced.
Before defining the replacements, these Assets need to be created in the Content Browser, by right clicking and then selecting Miscellaneous → Data Asset and then choosing either MeshReplacement or MaterialReplacement.
Now the replacements can be added and setup with data. There are two ways of setting up the necessary data: either by manual entry in the Data Asset editor, or by adding them in the scene view context menu after importing a Datasmith scene.
Add a Replacement Manually
To add replacement data manually, click the plus sign next to Replacements which will add a new entry to the Data Asset.

The MaterialReplacement Data Asset can replace materials by either matching their name (Material Name Matcher) or looking for a certain texture by name (Texture Name Matcher) used by a material.
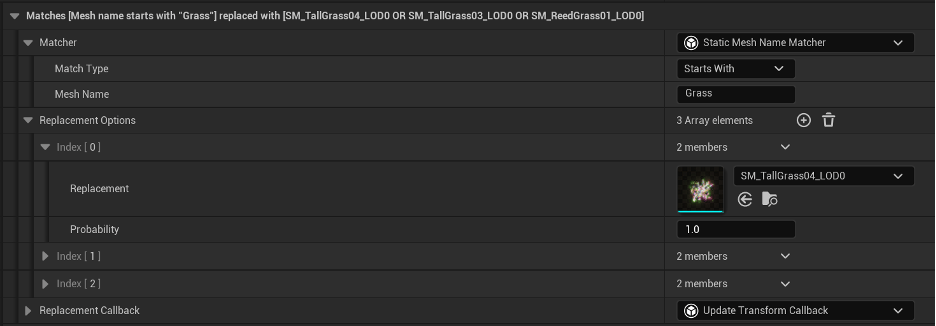
The MeshReplacement Data Asset replaces StaticMeshes by matching their name. We can add several replacement options. If multiple options are added, they are replaced according to their defined proportion (if two replacements are added with a proportion 1 and 2, the first one is chosen with a probability of 1/3 and the second one with a probability of 2/3).
The Match Type provides several options:
- Starts With: Checks if the search option starts with the given text
- Equals: Checks if the search option exactly matches the given text
- Contains: Checks if the search option contains the given text
- Regex: Advanced use-case to match the search option against the given regex pattern
Note that all matching options are case sensitive.
Advanced use-cases: it is possible to add custom Material or StaticMesh matchers by creating Blueprints that extend from the base StaticMeshMatcher or MaterialMatcher classes.
Add Replacement in Viewport
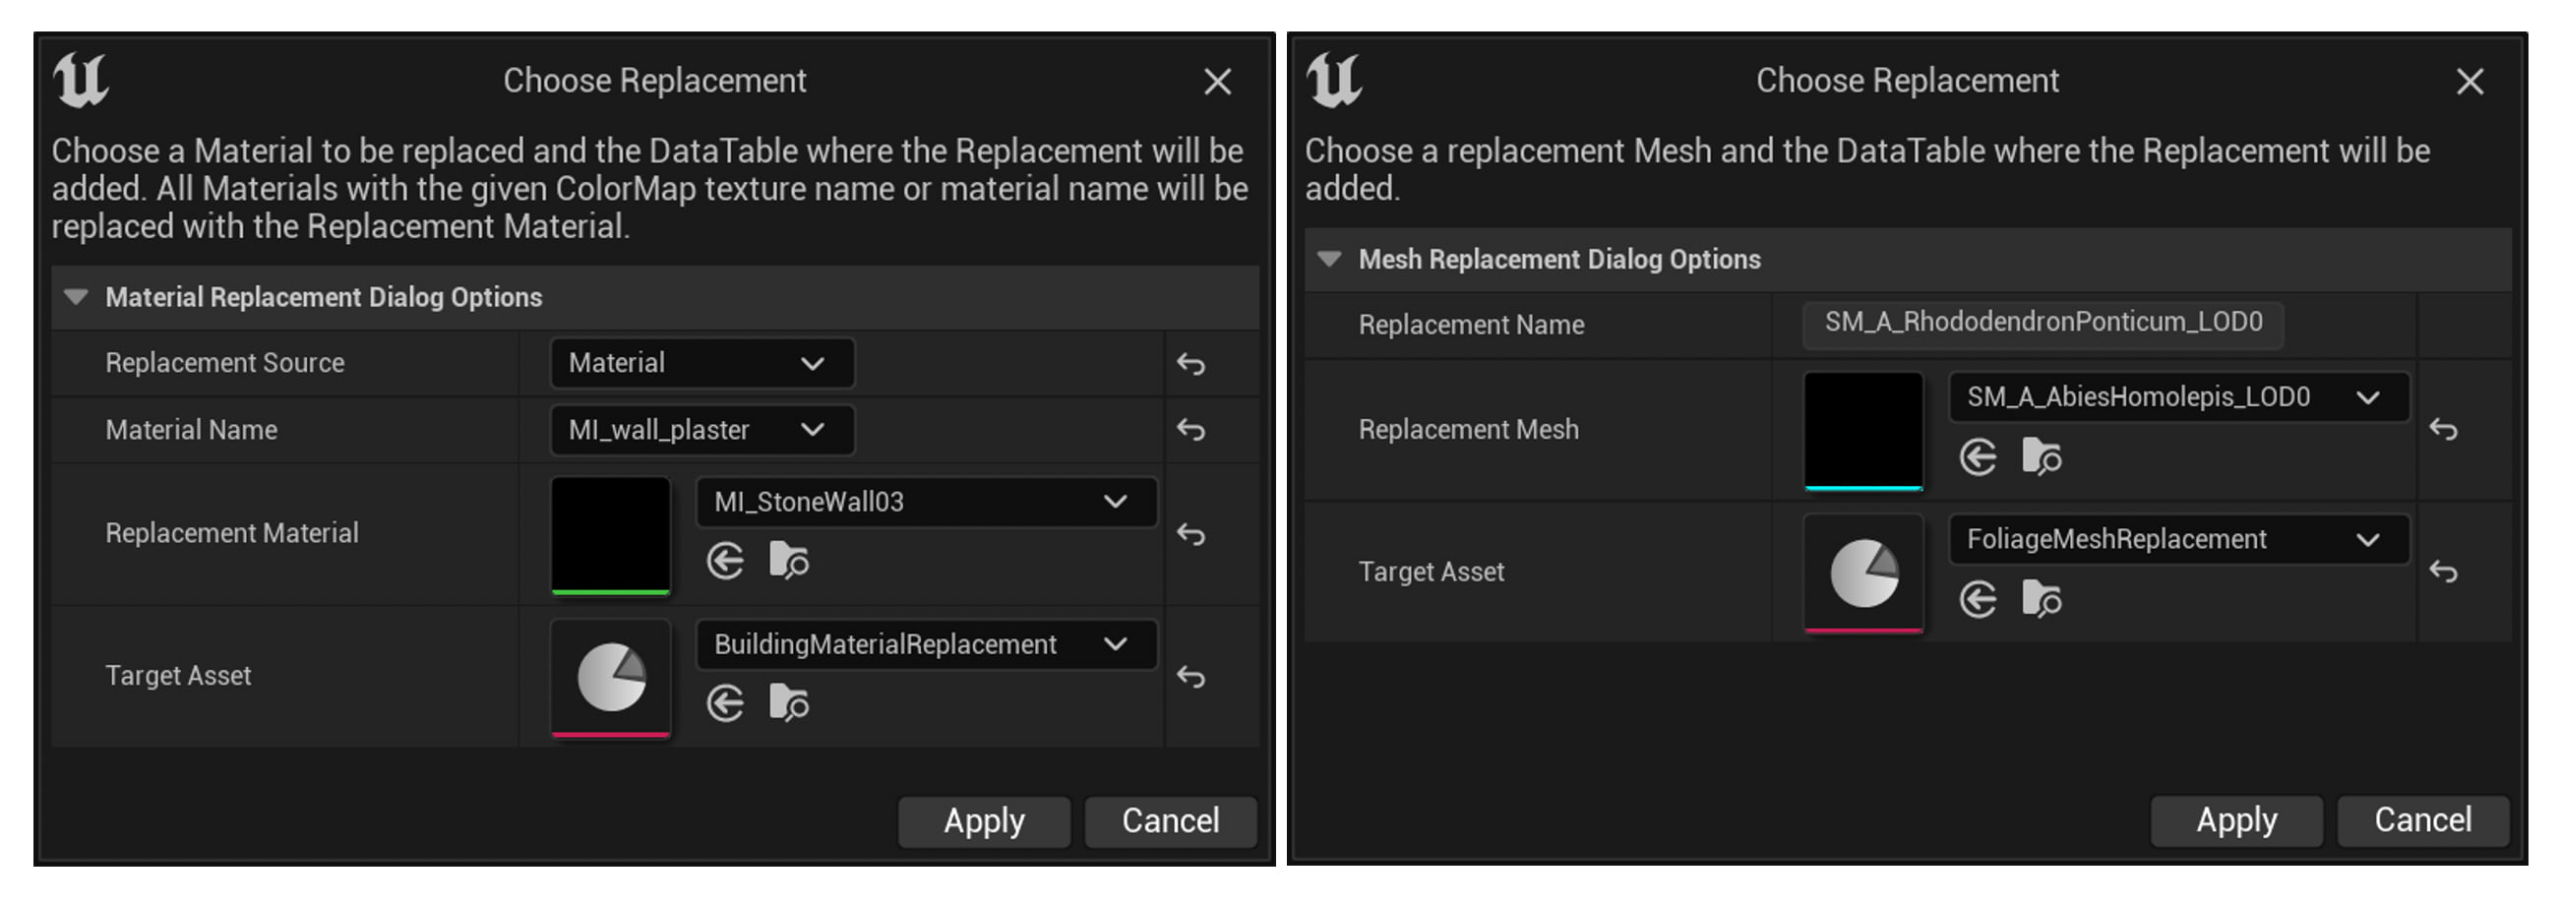
We can also add replacements by right clicking on an Actor in the viewport and either choosing Replace Material or Replace Mesh in the context menu (this is only possible in the Level Editor viewport and not in the Dataprep preview viewport).
Choosing Replace Material will open a dialog which allows you to replace the selected Material in the viewport, and similarly by choosing Replace Mesh, a dialog opens to replace the currently selected mesh. Now we need to choose a target data asset where the replacement will be added, and we can also directly execute the replacement.
Executing Replacements
The template project provides two ways of executing replacements: either by using the Visual Dataprep Editor or by executing them in the level viewport after a Datasmith import. Both workflows have advantages and will be explained in the following sections.
Visual Dataprep Workflow
Visual Dataprep allows us to automate actions during Datasmith imports. The template project adds two new types of actions, which are used to replace assets and materials. The Replace Meshes and Replace Materials Actions both take their respective Data Asset (as described above).
The Visual Dataprep workflow is especially useful if other Dataprep operations are combined into one workflow.
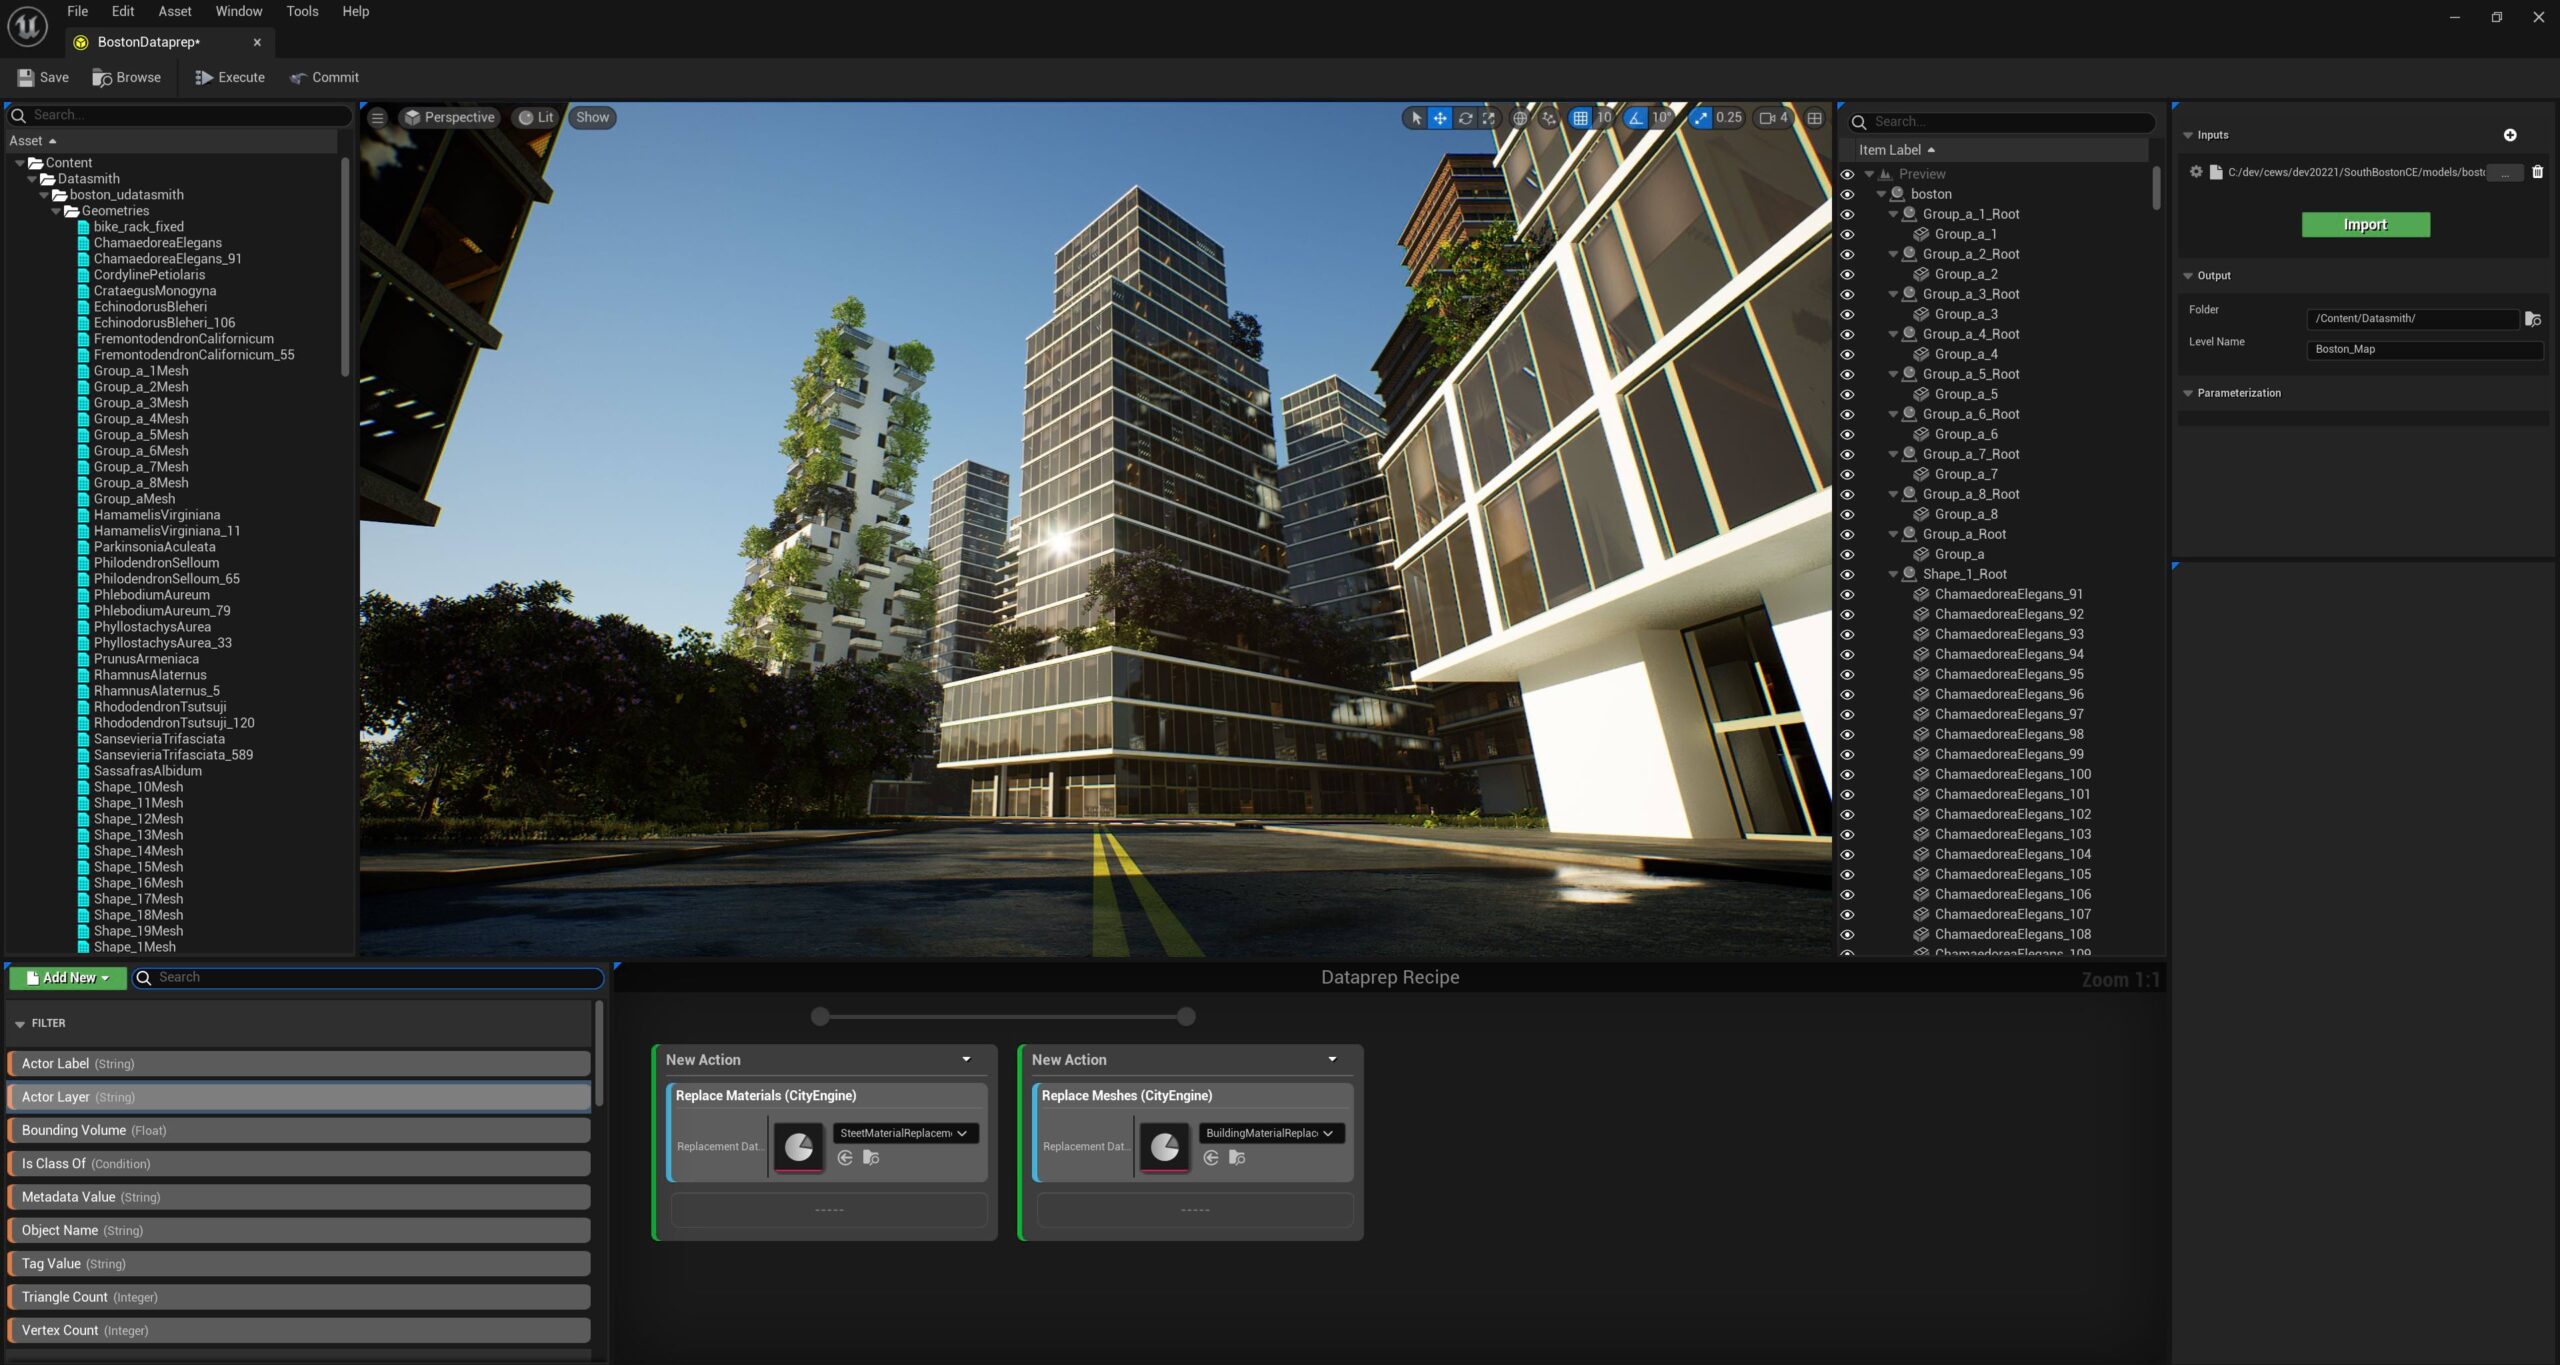
First, we need to create a new Dataprep Asset by right clicking in the content browser and selecting Dataprep → Dataprep Asset and then open this asset.
Then we can add the Datasmith export from ArcGIS CityEngine as an Input to the Dataprep Editor. Press the plus sign in the upper right corner, choose your Datasmith file, and press Import.
After that, we can add the Actions that we want to apply to our imported scene. Usually, we add one Action for each replacement Data Table we have defined in our project.
Then we can Execute the Dataprep pipeline. This step can be repeated as many times as necessary to achieve the desired replacement.
Finally, we Commit the pipeline, which will add the scene to our level.
Note: the Dataprep Editor does not handle hierarchical instances properly, so if you are importing large scenes with many instances, it is recommended to use the normal Datasmith import workflow explained in the next section.
Datasmith Import Replacement Workflow
The Datasmith import workflow works in a similar way. First, we import our Datasmith scene into the current level by clicking on Datasmith → File Import. Unlike the Visual Dataprep workflow explained before, the normal Datasmith import and executing replacements in the Level viewport is also able to handle Hierarachical instances correctly, which makes it preferred for large scenes.
After importing the Datasmith scene, right click on the DatasmithSceneActor in the Outliner, which will open the context menu with new entries in the CityEngine section.

Execute Replacements: This will open the dialog to execute mesh and material replacements. The replacement Data Assets can be added to their respective lists, and we can also restore the Datasmith Scene before executing the replacements.
Reload Datasmith Scene: This will reload the source Datasmith Scene and therefore undo all replacements executed in the scene.
Merge Instances: This will merge all instanced StaticMesh Actors into hierarchical instanced StaticMesh Actors, which is useful if the scene was exported with the instancing option Use Instanced Meshes.
We can now press Execute Replacements which will open a dialog, where we can configure which replacements we want to execute by adding them to their respective list. Restore Datasmith Scene Before Execution should also be set to true to apply the replacements on the original scene
The following video demonstrates the whole workflow in the Boston Example Unreal Project.
Now that everything is configured, you can iterate as many times as you’d like until your scene is perfected!
Explore More
We hope this tutorial helps to improve your ArcGIS CityEngine and Unreal Engine workflows! If you’re interested in more resources for learning how these two products integrate, check out this short introduction to Vitruvio, ArcGIS CityEngine’s Unreal plugin:
To learn more about ArcGIS CityEngine, visit our website or view a list of all ArcGIS CityEngine product integrations that can help support your workflows.
If you’re new to ArcGIS CityEngine, try a 21-day free trial and explore other learning resources to get started!


Thank you Benjamin and Avonlea for this post. It is nice to see a blog post with details and even more template project and tools. Looking forward to more posts like this one