Utilities who are in production with ArcGIS Utility Network have asked how they can leverage the data in their utility network for other external systems in their organization.
Our customers have data-driven workflows with many external systems for different applications as shown below. The data contained within the utility network is vital to these workflows.

When customers migrate to a utility network, these data-driven workflows need to be migrated to adapt to schema and platform changes. The ArcGIS Utility Network is supported on a file-geodatabase and in ArcGIS Enterprise in a services-based platform. The latter is well suited for integrated systems and the ArcGIS platform across the enterprise. Through their IT organizations or working with our business partners that provide solutions, enterprise customers can migrate to full web services integration for their critical systems to attain a complete digital transformation.

For other external systems and file-based utility networks, they would likely continue to use automation and feature extraction or a combination of integration, automation, and ETL.
Feature extraction from services as a primary data source is certainly new to most utilities. Utility network users can use the Export Subnetwork and Trace capabilities of the utility network for this purpose. We have discussed the use of trace and automation to accomplish various workflows in previous blogs. In this blog, we will focus on and discuss Export Subnetwork.
Need for automating Export Subnetwork
The purpose of Export Subnetwork is to provide connectivity information for external systems that have their own graph models. Here we will demonstrate the Export Subnetwork capability of the ArcGIS Utility Network using the REST API. Export Subnetwork is designed to run one subnetwork at a time and return a JSON output.
An automation tool is handy for the following reasons.
- Utilities have hundreds or thousands of subnetworks that feed data to external systems.
- The JSON output of Export Subnetwork may need to be integrated with other data sources that are not part of the utility network.
For the purposes of this blog, I am using an ArcGIS Pro extension, ArcGIS Data Interoperability as my tool of choice for the following reasons. The ArcGIS Data interoperability extension can:
- Integrate data from various sources
- Easily create spatial and non-spatial data
- Write data to multiple formats
- Can be shared or distributed as a geoprocessing tool for use by others
The best part is that you can continue to work in the ArcGIS Pro environment while building your tool without the need to write a single line of code.
This is the first in a two-part blog series that will provide an overview of the configuration and JSON output of Export Subnetwork . There is a lot to cover so I hope you stick with me! To help those starting out, I’ve assumed that you are just getting started using ArcGIS Data Interoperability.
In the next blog, we will refine the sample to automate the export of all subnetworks in a utility network. I will also provide the sample tool for download so that you can try it out in your own environment.
Getting Started
If the ArcGIS Pro Data Interoperability extension and JSON format are new to you, please read through the next two sections. Skip these sections and jump to Building the sample tool section below if you are already familiar with them.
ArcGIS Data Interoperability
The ArcGIS Data Interoperability extension for Desktop was made available for ArcGIS Pro with the 2.1 release. With the release of ArcGIS Pro 2.5, the extension supports the import of FME’s native fmw workbench file created from FME Workbench. The extension requires authorization in your organization’s Enterprise account.
Once authorized, an admin assigns a license to the user in the Enterprise Organization settings. The user then installs Data Interoperability software on the machine where ArcGIS Pro is installed. Once the license is assigned to you, sign in to ArcGIS Pro and the Workbench icon is enabled on the Analysis toolbar.

The work for this sample will be done by building a workbench file using the Workbench application. The application is launched by clicking the Workbench icon on the Analysis toolbar of ArcGIS Pro. When the Workbench opens you see an empty frame called the Canvas. The canvas is where the solution is built by adding visual objects called Readers, Writers, and Transformers.
Readers are used to read input formats, like databases, CSV, JSON or HTML. Writers are objects that write to destination output formats, like XML, Portal feature layers, SQLITE database, or Excel workbooks. A Transformer performs a restructuring of feature or schema. A Transformer is connected from Reader to Writer or other transformers using Connectors.
Review the following links for a quick tour of the Workbench application, the essential vocabulary of terms mentioned above, and additional help. The FME Transformer Reference Guide is also a valuable resource when building your solution. To learn more about writing translations in the workbench, check out this tutorial from Safe software.
JSON
With the REST API, the output of all utility network tools is returned in JSON, so an understanding of this format is essential for this process.
The following examples display a few Data Interoperability blogs using the JSON output as sources:
- This one displays how to ingest a JSON feed using a Data Interoperability Spatial ETL tool.
- Here is another sample that reads from a JSON file to allow the selection of a US State for the conversion of GeoJSON to a local File Geodatabase.
This video also provides a good overview of the JSON format for those just getting started.
In this blog, our data sources are JSON responses from web queries or operations sent to the ArcGIS Server hosting the utility network.
Building the sample tool
Our solution below is divided into six steps. Steps 1-4 are covered in this blog. The final two will be discussed in the next blog in the series.
- Generate Token
- Export Subnetwork
- Download JSON
- Split the JSON
- Feature creation
- Changing domains to descriptions, group features, and write the output
In our canvas, each step will be contained in a colored bookmark. As I discuss each step, I’ll show its bookmark and explain the how and why of the step.
Step one, generate a token
This is a requirement when running web queries using the capabilities of ArcGIS Server’s REST API. We also need a token in our workspace that we can reuse in succeeding tasks. The Generate Token operation needs at least two parameters to return a valid token:
- A user credential with compatible user type and assigned with the Utility Network Service license, and
- A webapp URL of a utility network feature service. The webapp URL will be configured with a choice and text parameter. Additional details on using this parameter during run time and configuring will be explained in the end.
The ParameterFetcher creates the Service attribute from the parameter entered or picked from the drop-down by the user during run time. The StringSearcher then parses the Service attribute to create the _host attribute. These two attributes are added in the data flow for the Generate Token operation and to use for succeeding web queries.


Now we have a service and a token to use for the next step.
Step two, Export Subnetwork
The Export Subnetwork tool is available in various user interfaces. In ArcGIS Pro, we use the Export Subnetwork geoprocessing tool.

In the REST API, Export Subnetwork is a method on the REST end point of the Utility Network Server.

Regardless of UI, the Export Subnetwork tool has many request parameters and output options that require configuration. These can vary slightly by utility network release, so confirm the configuration options available for the version you are using, as well as its limitations.
We add an HTTPCaller transformer into the canvas; connect this transformer to the last transformer output port in the Generate Token bookmark; and, configure our Export Subnetwork web query, as shown on the Query String Parameters section of the transformer notes below.

If you look closely in the transformer notes, all the parameters are hardcoded, except for Request URL which includes the @Value(Service) and @Value(token) attributes from step one. In the example above, we are exporting with the subnetworkName RMT001, which has a tierName equal to Electric Distribution and a domainNetworkName equal to Electric. The resultTypes parameter is configured to return features, geometry, a few NetworkAttributeNames, controllers and connectivity (last two not displayed). The traceConfiguration is the default for Export Subnetwork.
If I run my workspace successfully, it should return a JSON response like the one shown below.

If you look back at the Export Subnetwork bookmark above, I added the JSONFlattener transformer to flatten the response so I can store the url attribute from the JSON, as an attribute in my data flow. We will use this URL in the next step.
Step three, download the JSON
In order to create features from the JSON, we need the JSON result in our canvas so we can shape it. We do this by downloading the JSON using another web operation with the HTTPcaller. A review of the transformer notes beside the downloadJSON transformer shows that the configuration options are also hardcoded with exception of the Request URL parameter – we will configure this with @Value(url), which came from step two.
A token is not needed for this operation.
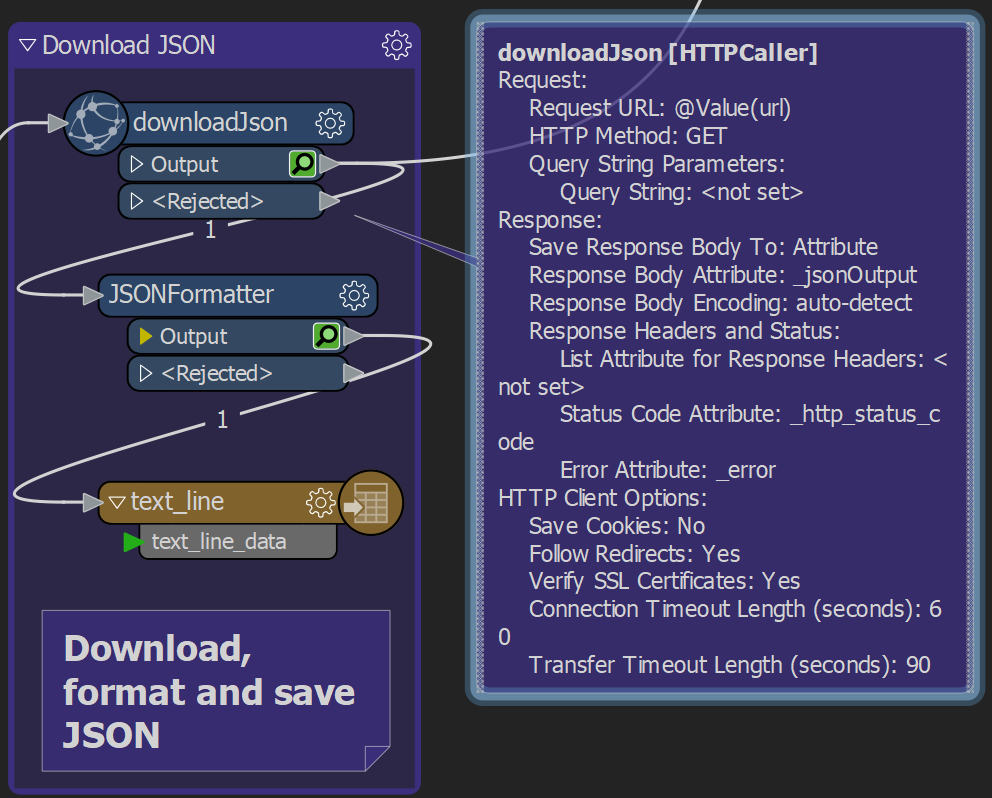
The other parameter I configured is the Response Body Attribute which is set to the name _jsonOutput. The value to this attribute is the Export Subnetwork results from step two stored as JSON object. We will need this attribute for the next step – Split the JSON into Fragments.
Step four, split the JSON into fragments
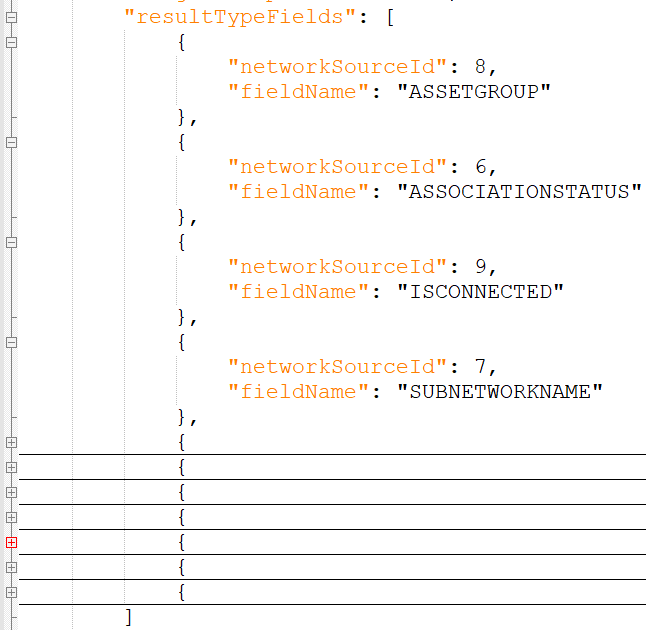
When you open the JSON file for an exported subnetwork you will see a well-structured data set. Depending on your output configuration, your JSON output may have the following fragments: controllers, featureElements, connectivity, sourceMapping arrays, resultTypes, and spatialReference objects.


We must split these arrays into fragments, so we can shape them accordingly to the desired translation. We pick the objects from each fragment that would become features required by the external systems.
Our Split JSON into Fragments bookmark looks like the below example:

I add another JSONFragmenter to split the JSON into fragments and flatten each fragment into arrays or objects. I added two AttributeFilters to create a new data stream for each fragment – by arrays or by objects.
Each array and object are further fragmented so that the desired feature elements are created. The output ports of each JSONFragmenter now show the feature counts: subnetwork controllers (1), feature elements (7,429), connectivity-associations (3,099), result types (1), source mapping (10), and spatial reference (4).
The data flow is starting to take the shape of a recognizable form for users. The fragments are still in JSON but you can see the separation of the data.
- For features and objects, they will come from the JSON array fragments.
- For metadata, they will come from JSON object fragments.
Note that resultTypes array is not needed for this blog as it is metadata for the operation and configuration. With a few attribute cleanups and removing duplicate features, we can move onto the next step of creating features in the next blog.
We’ll take a break here and summarize what we have completed so far.
Summary
So far I introduced how to build an automated solution for Export Subnetwork using the ArcGIS Data Interoperability. I then outlined details on how to configure Export Subnetwork using the REST API and how to download its output and parse the resulting JSON.
In the concluding blog, we will continue to parse the JSON to create features and then complete the sample by writing to the required output formats. You will learn details about the utility network topology index as the source of data used for Export Subnetwork. Lastly, we will finish by creating a Spatial ETL so this sample can be part of your ArcGIS Pro project.


Article Discussion: