This blog article was originally published on October 18, 2022, and has been updated. The last previous update was January 6, 2025.
Layer pop-ups are an important part of crafting the complete map information experience. Pop-ups can transform an otherwise dull list of attributes into a far more meaningful display of intuitive and engaging information for your audience. Arcade can be thought of as a collection of useful tools that can be applied to craft the very best pop-ups, leveraging functions and logic to perform calculations and geometric operations, format text, access data from other layers, and much more.
Quick links
Use these links to jump to a section of interest. Open the Arcade examples map to follow along with the examples shown below.
- About Arcade
- About the Arcade examples map
- Arcade editor
- Pop-up elements overview
- Arcade attribute expressions
- Author Arcade expressions
- Arcade elements
- Author Arcade content elements
- Arcade assistant
- Example Arcade assistant prompts
- Commonly used Arcade
About Arcade
Arcade is an expression language that is supported across ArcGIS. It can be used to perform calculations, manipulate text, and evaluate logical statements. Arcade exists within a profile, or context, that defines the parameters that are available to the script as global inputs and the output expected from the script. This blog article focuses only on the Popups profile and offers an overview of how it is used to craft layer pop-ups.
Arcade in pop-ups can be used in two ways; to create attribute expressions used in elements that can be evaluated like fields, or as separate Arcade content elements that return a complete block of content.
Using Arcade expressions and elements, you can take your pop-ups to the next level. Pop-ups: the essentials provides an overview of pop-ups and how they can be configured.
Why use Arcade?
Arcade enables you to work with data dynamically to perform calculations and manipulate data on-the-fly. If you have improperly formatted attributes, need to do a conversion, need to perform mathematical operations (e.g., sum values or calculate percentages), use logical expressions for branching, or perform geometric operations (e.g., calculate areas or intersections).
Arcade provides a straightforward way to manipulate data without having to go back to the source. This is especially useful if you don’t own the source—Arcade can be applied to any feature layer in a map regardless of the layer owner.
About the Arcade examples map
Open the Arcade examples map to follow along and see examples of how Arcade can be used in pop-ups. The map shows peaks and trails in Great Smoky Mountains National Park (GRSM) and contains the following layers:
GRSM Final Pop-ups — Exclusive visibility group layer containing the fully configured Peaks and Trails layers pop-ups.
GRSM Example Pop-ups — Exclusive visibility group layer containing the example pop-up configurations covered below.
GRSM Boundary — This layer is for display-only for map context and does not include a pop-up.
Counties — Map layer used to show the use of the Arcade Intersects function to retrieve pop-up attribute information from another layer. This layer does not have a pop-up and is not visible.
To learn more about how any pop-up is configured, select a layer then open the pop-ups pane from the Settings (light) toolbar to see pop-up elements and view attribute expressions.
Tip: A great way to learn more about how to author and use Arcade expressions is to open any ArcGIS Living Atlas map or layer, then examine the pop-ups and expressions.
Arcade editor
The Arcade editor is used to create or edit attribute expressions and Arcade elements. It includes the following:
a – Name
b – Expression
c – Run (test) button
d – Action bar with options to display profile variables, functions, suggestions, and help
e – Action pane, with more information about the selected action.
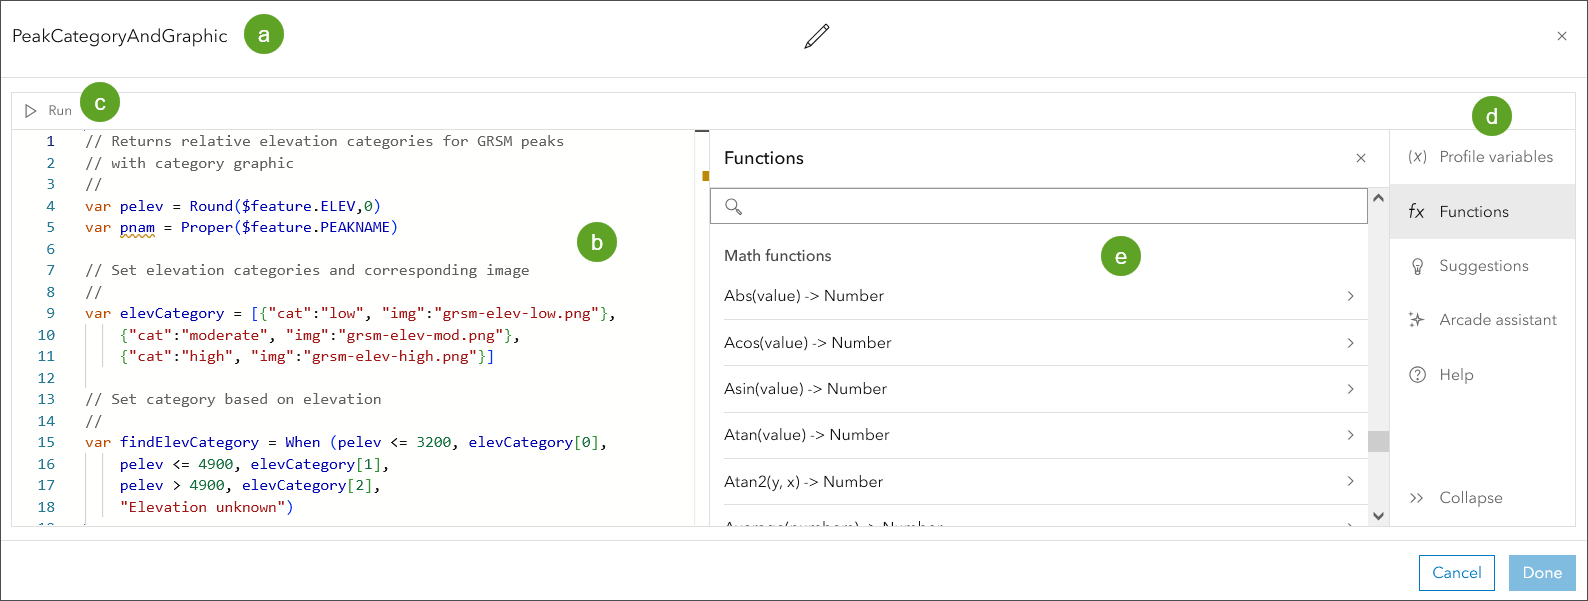
Profile variables are special global variables that can be used in expressions. For example, $feature references the feature you click on your map to open the pop-up. This variable is used to retrieve specific attributes (fields) for the feature. For example, $feature.name returns the content of the field “name” for the feature.
Functions are used to calculate values in expressions. Functions are grouped and categorized into constants, data functions, feature functions, math functions, text functions, and so on. For example, Round is a math function that rounds the input numerical value to the specified number of places, and returns the new rounded number. Each function has built-in help so you can learn how to use them. You can also create your own custom functions for use in expressions.
Suggestions provide a list of existing expressions so that you can copy some or all of an expression into a new one.
Arcade assistant helps you create expressions from natural language prompts. The assistant is very useful when you can’t remember a function or have complicated tasks you want to perform with Arcade. The most effective prompts will depend on your data.
Help links to the Arcade help documentation.
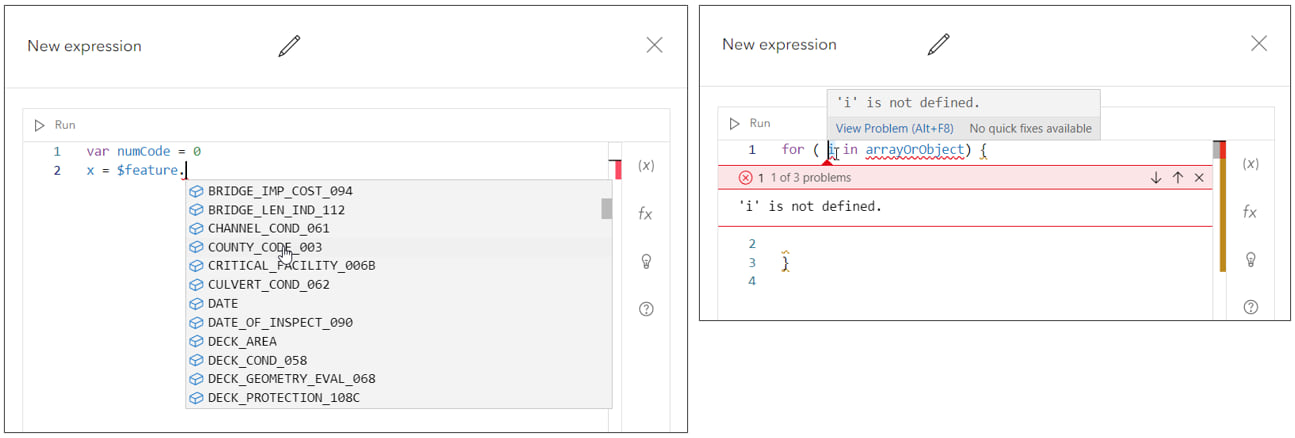
The Arcade editor also includes Intellisense, helping to reduce errors and helping to complete the expression as you write it. Warnings also appear in the editor, helping you understand when there’s something in your expression that could be a problem or could be improved.
Pop-up elements overview
Going beyond styles and effects, layer pop-ups are an essential and important part of crafting the complete map information experience. Pop-ups can transform an otherwise dull list of attributes into a far more meaningful display of intuitive and engaging information for your audience.
Pop-ups are composed of one or more elements, which are the building blocks of pop-up information. While Arcade is a unique type of element, other elements can include Arcade expressions. Arcade expressions accomplish specific tasks, such as converting feet to meters, changing upper case text to proper case text, expanding attribute codes to readable strings, and so on.
Elements
All layers can use certain common elements, such a Title, Text, Fields list, adnd others. However the complete set of elements you will be able to use will depend on the type and characteristics of the layer you are working with. For example, Attachment elements are only available if you attachments are present on a feature layer.
Layer pop-ups are composed of one or more pop-up elements as follows:
Title — The title that appears at the top of the pop-up.
Fields list — A list of fields from the feature layer attributes.
Chart — Add charts to graphically display the values of numeric attribute fields. You can add bar charts, line charts, and pie charts.
Image — You can include images in pop-ups by providing a URL to an image (PNG, JPEG, or GIF format). The URL may also come from a field. The images can include a title, caption, links to related websites or larger images, and alternative text.
Text — Use text, fields, and expressions to display descriptive text. The typography and colors can be changed. Fields and links can be used in conjunction with plain text or HTML.
Arcade — As a unique content element, it can return a complete section in a pop-up, such as a a chart, HTML, or text that has been completely formatted via Arcade.
Attachments — When a feature layer includes attachments in its data, the attachments are added to the layer’s pop-up. You can show the attachments as a list or in a gallery. Clicking attachments in a pop-up opens the attachment in a new browser tab.
Related records — Some layers may contain preestablished relationships to other tables or layers through a common field. If your layers have relationships, they are detected automatically and displayed.
When you add a new feature layer to your map, the pop-up is visible by default and includes Title and Fields list elements. Click Add content to add additional pop-up elements.

Arcade attribute expressions
Arcade attribute expressions can be used in any pop-up element, just like text or fields. The expression is evaluated and the result is returned wherever they have been used. They can be styled using size, color, font family, and more.
All layer attribute expressions will be listed in the Attribute expressions pane. Click any existing attribute expression to open and view it in the Arcade editor, or click Add expression to begin a creating new one.
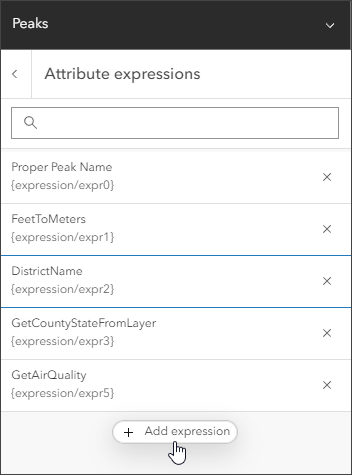
Expressions appear in curly braces – {expression/expr0} – and are numbered starting at zero. Expressions, like any text or field, can be selected and styled.
See the Author Arcade expressions section for more details and examples.
Author Arcade expressions
In this section you will create two very simple expressions: one that converts all upper case text to proper case text and another that converts feet to meters. You can follow along by opening the sample map. Open the GRSM Example Pop-ups group layer, then select and view the pop-up for the Peaks (Text element) layer and compare it to the pop-up for the Peaks (Expressions) layer.

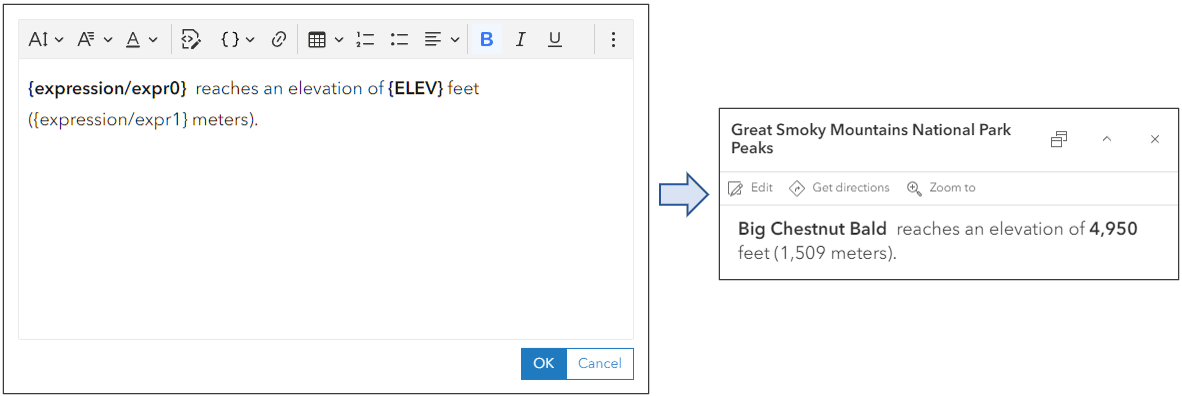
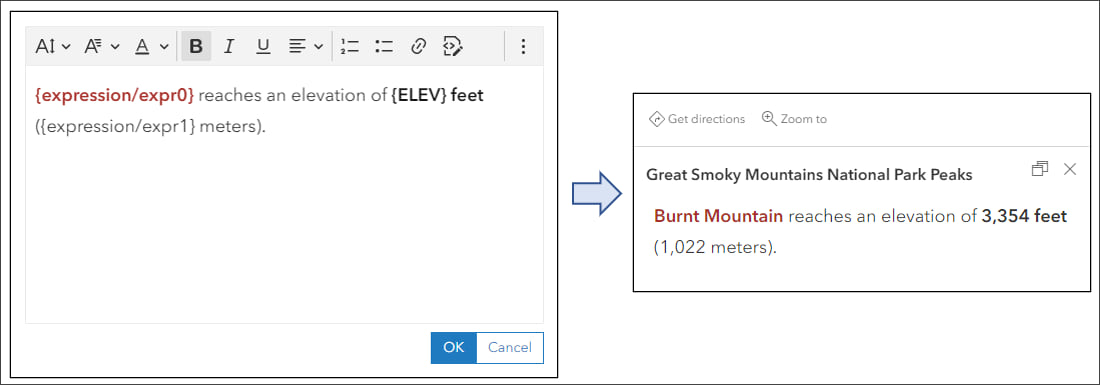
Note the peak name has been changed to proper case and the addition of the elevation in meters.
To see how they have been implemented, select the Peaks (Text element) layer and view the Text element and compare that to the Peaks (Expressions) layer Text element.

Note the substitution of an expression for the peak name and the addition of another expression to display the elevation in meters.
Follow these steps to create the first expression that converts the upper case name to proper case.
Step 1 — Select the Peaks (Default) layer from the GRSM Example Pop-ups group layer. This is an unconfigured layer with the default pop-up configuration.
Step 2 — From the Settings (light) toolbar, select pop-ups to view the Pop-ups pane.
Step 3 — At the top of the Pop-ups pane, click Attribute expressions.
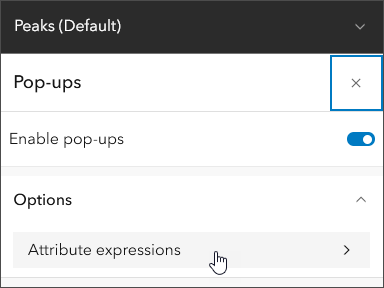
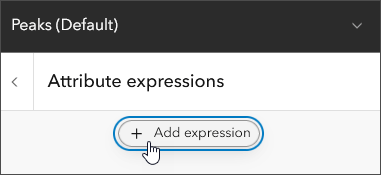
Step 4 — Click Add expression.
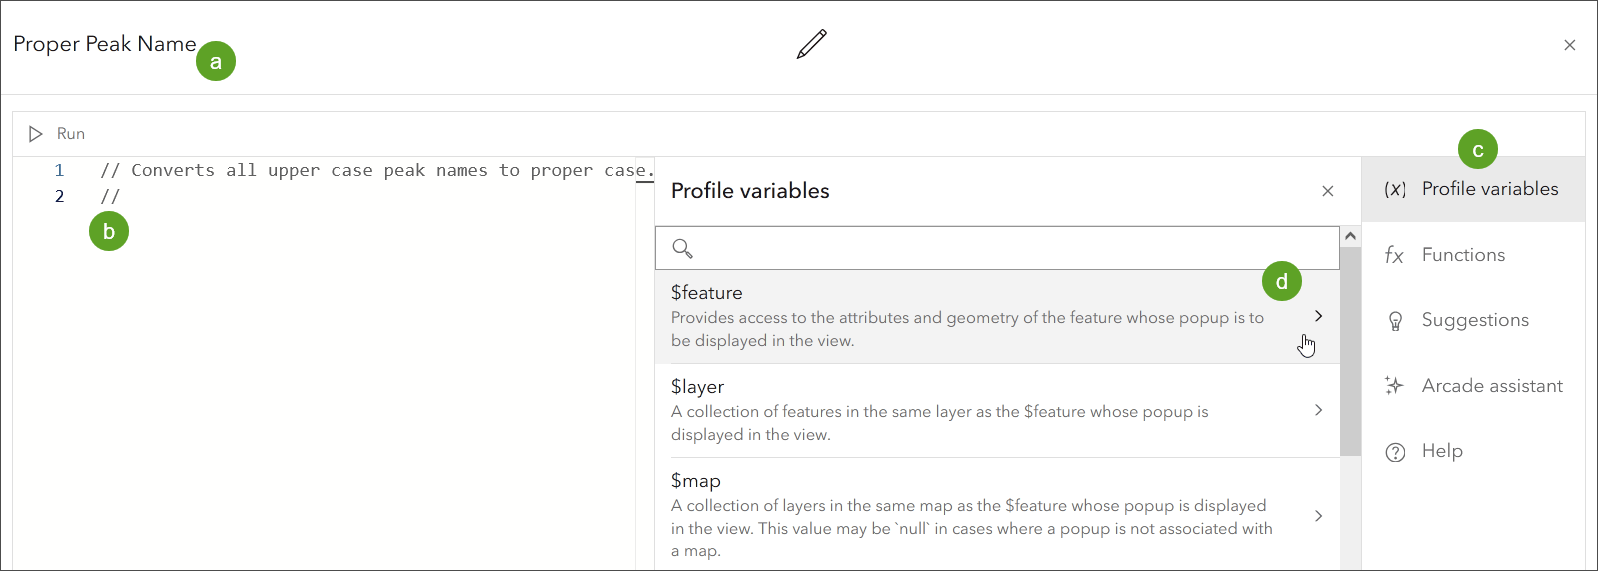
Step 5 — In the Arcade editor, begin by doing the following.
a – Change the default name to something more meaningful and easier to recognize.
b – Add a comment (using the double forward slashes //) to describe what the expression does.
c – Click Profile variables to open the Profile variables pane.
d – Click the arrow to the right of the $feature variable to show all available fields.
Step 6 — Scroll down the list of fields to find PEAKNAME, then click the field to begin the expression. Since we already know the field to use, we could simply have begun the expression by typing $feature.PEAKNAME.

Step 7 — Move on to the next line. Click the Functions tab to view the available functions. Scroll down to the Text functions category to search for applicable functions, or enter the function name to identify possibilities. Click to add the function to the expression.

Tip: Click the arrow to the right of the function to learn more about it. Click More information to go to the complete function help documentation.
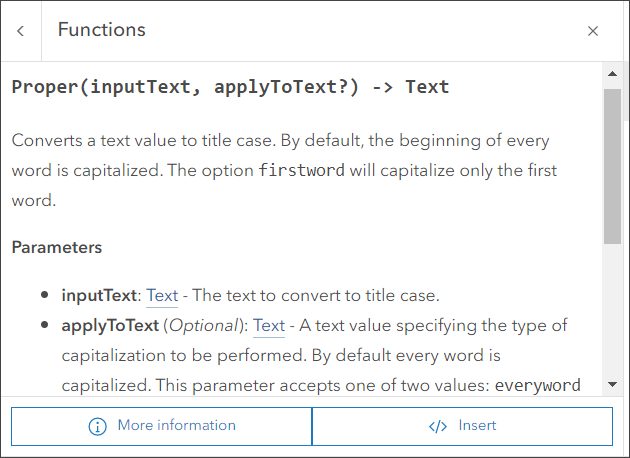
Step 8 — The function takes a text value as the input and returns proper case text. Edit the expression so that $feature.PEAKNAME is the function value input.

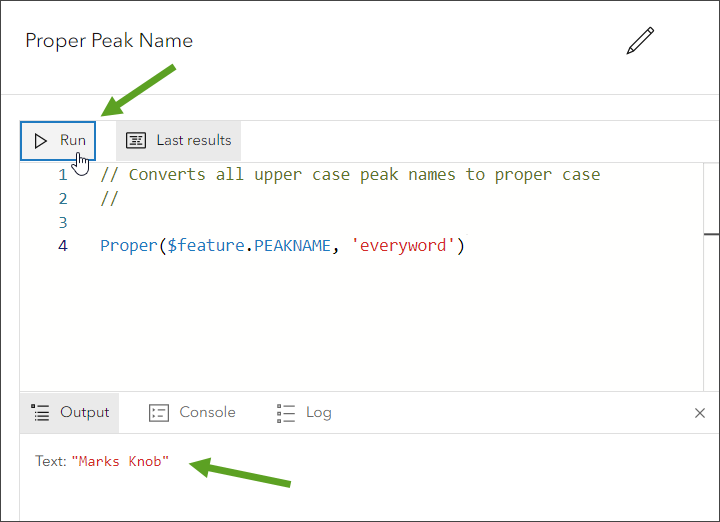
The optional parameter ‘everyword’ isn’t needed, since that is the default. But it makes the Arcade more understandable. The other parameter would be firstword to only capitalize the first word in the string.
Step 9 — Click Run to ensure the expression returns the desired result. Click OK when finished to save the expression.
Step 10 — Use the expression in the text element just like any other field. Enter the curly brace { in the text element to display a list of fields and expressions. The expressions are found at the top of the list.
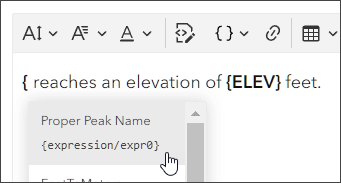
The text elements now returns the proper case peak name.

Step 11 — Use similar steps described above to create another expression that converts the elevation in feet to meters.
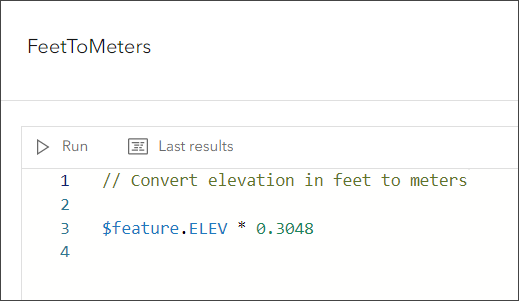
This expression can be used in the text element as shown below.
Format the expression values
To format to the expression, return the height in meters as a string using the Text function and add the desired formatting using the hash notation to the returned text.
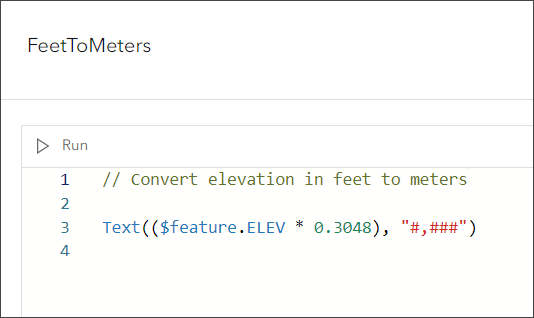
Format expressions
Since expressions are treated exactly like fields, we can format numeric expressions by selecting them in the Fields pane (expressions are found at the bottom of the fields list) and adjusting the formatting like any other field. FeetToMeters returns a string, but if it returned a numeric value we could format it as shown below.
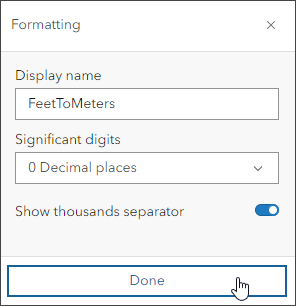
Additional text typography, such as text size, bold or italic text, and color can be applied to expressions, text, and fields to achieve the desired results.
You can use the Arcade assistant to simplify creating expressions. See the Arcade assistant section for details and examples.
Arcade elements
Pop-up content blocks, or elements, are the building blocks of pop-up information. See the About pop-up elements and expressions section for more details.
Arcade elements differ from Arcade attribute expression in that they return a completely formatted block of information. Arcade elements stand alone, and can’t be added to other elements like expressions can.
View an example
In the GRSM Final Pop-ups group layer, select the Peaks layer. In the Settings (light) toolbar, click Pop-ups, then view the list of content blocks. Arcade elements are listed using the code symbol – </> – and are titled Arcade. Click Edit expression to open the Arcade editor to view or edit the element.
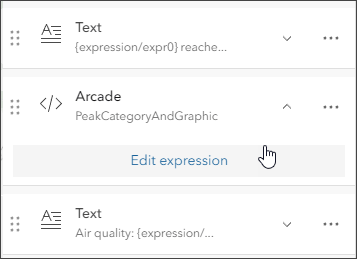
Author Arcade content elements
You can follow along by viewing the sample map and opening the Example Pop-ups layer group, then selecting and viewing the Peaks (Arcade element) layer. In this example the Arcade content element is similar to the pop-up created with attribute expressions above, with some additional HTML styling. Compare Peaks (Expressions) and Peaks (Content Element) to understand the two approaches.
One of the biggest differences between Arcade attribute expressions and Arcade content elements is that attribute expressions are used in text elements, and Arcade content elements are intended to return a complete part of your pop-up, either independently or combined with other elements. While the Arcade behind both expressions and elements is very similar, Arcade content elements are self-contained, so anything you need must be done within the element.
To add a new Arcade content block, click Add content and choose Arcade.
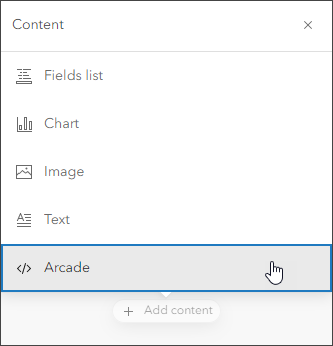
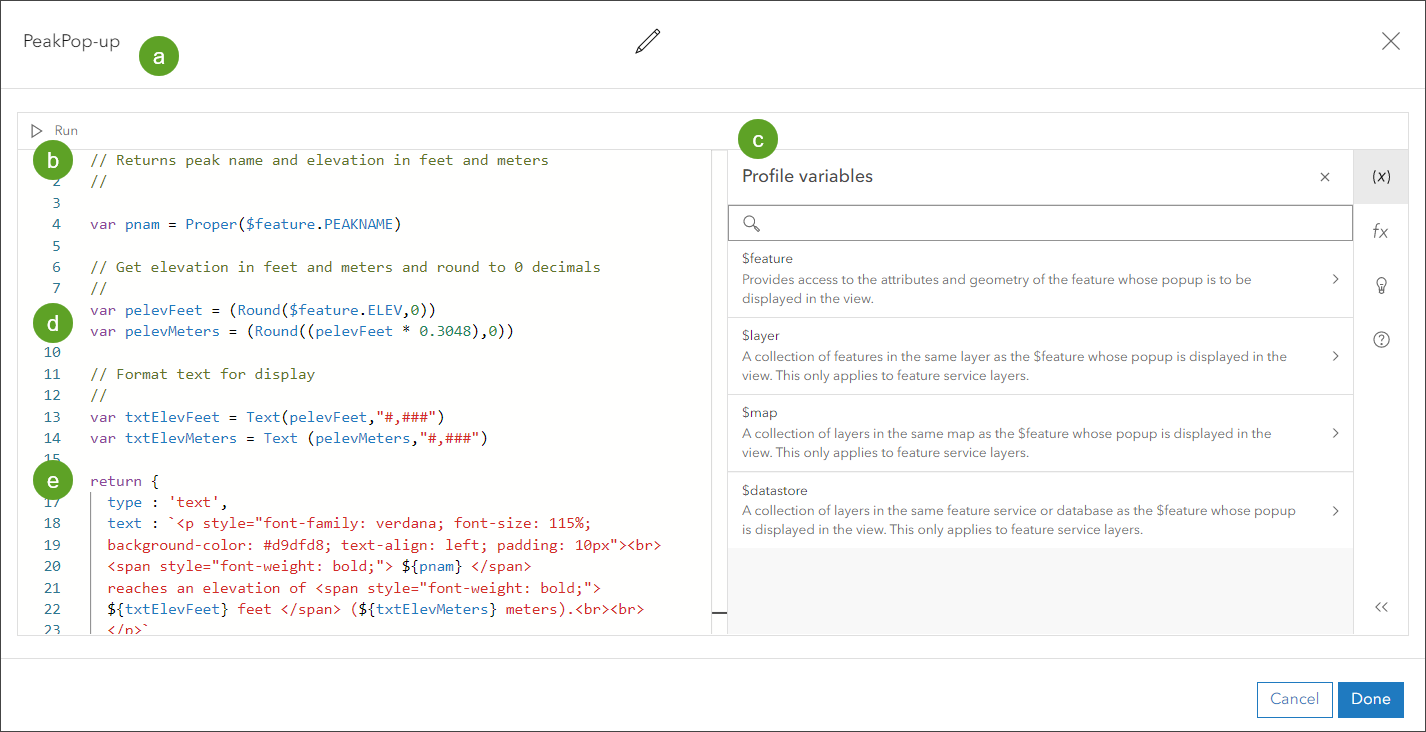
When you open the Arcade editor, there are several templates that help you get started. By default, the Rich text template is opened.
a – Change the default name to something more meaningful and easier to recognize.
b – Edit and add comments to describe what the expression does and also use comments to document the steps along the way. The better you document your Arcade, the more understandable and maintainable it will be.
c – Use the Profile variables and Functions tabs to construct the Arcade expressions. This is the same as is done when creating attribute expressions.
d – Use Arcade functions to assign variables that will be used in the returned text. The goal of all functions, profile variables, and variables in the context of explicitly returned text is to create the building blocks to be used to construct the final returned text.
e – The explicit Return is the block of rich text that the Arcade content element displays in the pop-up. In the case of rich text, this provides full HTML styling to craft the returned content.
The final result is the pop-up shown below.
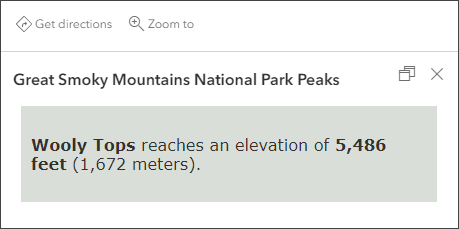
This is a simple example using Arcade content, but there is lots more potential to go beyond the basics. See the Peaks layer in the GRSM Final Pop-ups group layer for more examples of using Arcade.
The Arcade assistant can generate Arcade for both expressions and elements, see the Arcade assistant section for details and examples.
Arcade assistant
The Arcade assistant uses artificial intelligence (AI) to generate Arcade from instructions you type using natural language. The Assistant can be used to author Arcade attribute expressions and Arcade content elements.
To use the Arcade assistant, your organization must Allow AI assistants. If enabled, in the Arcade editor do the following:
a – Click Arcade assistant from the Action pane (right side of the editor) to open the Assistant pane.
b – Enter a prompt to generate the Arcade.
c – Click Generate.

d – Add the response to the editor, or replace everything currently in the editor.
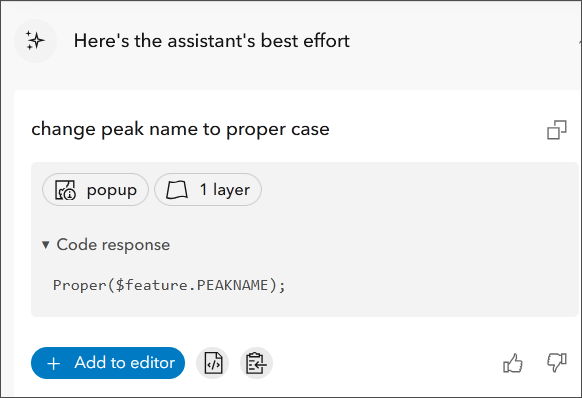
Recent prompts are saved during the editing session and can be copied and pasted for reuse, or saved for future use. Effective prompts will depend on your data. Here are some examples used in other maps:
- Change the values in the field “NAM” to sentence case and append “, Bucks County, Pennsylvania.” to the string.
- Compute the change in oil production from the current feature with the average of all features within 5 miles. Include the production value for the current feature, the average production within 5 miles, the total change and percent change. Use HTML to format values in bold and colored so an increase uses green text and a decrease uses red text.
Tip: The more information you provide in the prompt, the better the result. Often this is an iterative process; generate the Arcade, try out the result, and modify your prompt as needed to improve the result.
Example Arcade assistant prompts
All example prompts shown below can be used with the Peaks (Default) layer in the GRSM Example Pop-ups group layer.
Arcade attribute expression prompts
Prompt:
Convert {PEAKNAME} to proper case
Result:
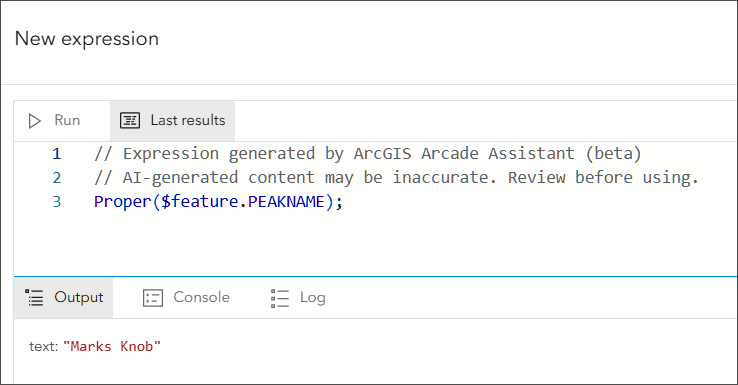
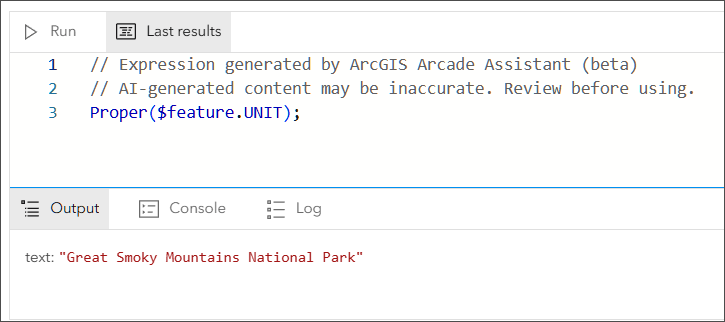
Prompt:
Convert unit name to proper caseResult:
Prompt:
Convert the peak elevation to meters.
Return the meters with 1 decimal place
and no thousands separator and add the string "meters."
Result:

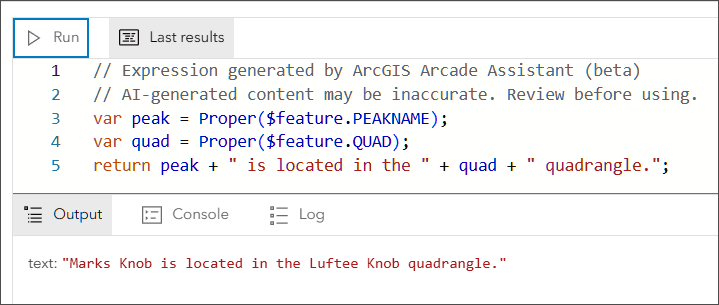
Prompt:
Change the peak name and quad to proper case.
Return a sentence that starts with the peak name, adds the quad it is located in
and  completes the sentence with "quadrangle."
Result:
Arcade content element prompts
Arcade content elements return a complete section in the pop-up, with all formatting, variables, and functions defined within the element.
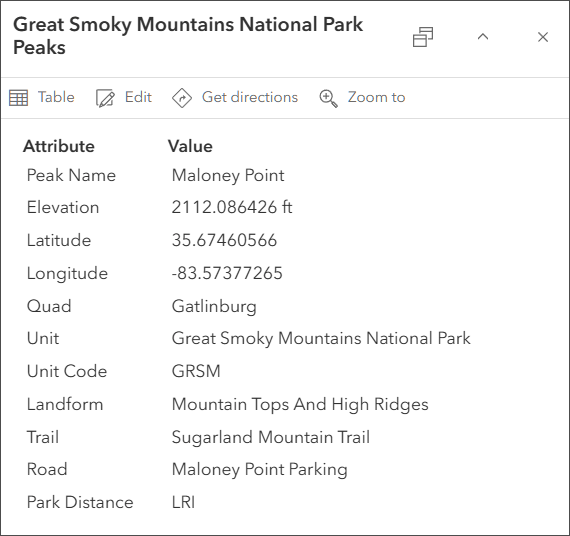
Prompt:
Create an html table that describes each peak.
All strings should be proper case.
The table should fill the width of the pop-up.
Result:
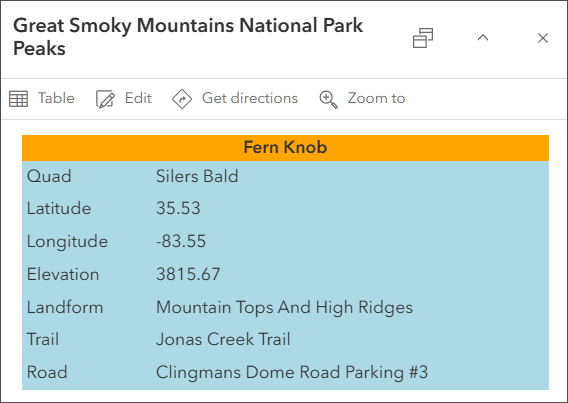
Prompt:
Create an html table that describes
each peak and fills the pop-up.
All strings should be proper case
and all numeric fields should use only 2 decimal places.
Omit unit code and park distance from the table.
Make the first row background color light orange with centered bold text
and make the columns light blue.
Result:
Experiment with different prompts by trying them, then iterating and making modifications to get the desired results.
Commonly used Arcade expressions
The following are examples of common uses of Arcade in pop-ups. Many of these are used to configure pop-ups in the Arcade samples map used in this blog article. Other examples can be found in ArcGIS Living Atlas maps and layers or the Arcade Function Reference.
Proper case text
This expression will return proper case text. The Proper function has two options – capitalize all words or capitalize the first word only. If COUNTY contains the string “SAN DIEGO COUNTY” the expression returns “San Diego County.”
var txtProper = Proper($feature.COUNTY, 'everyword')
return txtProper
There are many other text functions for working with text. For more information, see Text Functions.
Convert codes or abbreviations to a readable string
Converts an abbreviation or code number to an understandable string. For example, if the field value is “CAC” the expression will return “Cades Cove.”
var distNam = $feature.PARKDIST

When (
    distNam == "CAC", "Cades Cove",
    distNam == "CAT", "Cataloochie",
    distNam == "COS", "Cosby",
    distNam == "DCR", "Deep Creek",
    distNam == "LRI", "Little River",
    distNam == "OCO", "Oconaluftee",
    "Unknown")
Units conversion
This expression will convert feet to meters using a simple conversion factor. The units in feet are in the field ELEV.
Text($feature.ELEV * 0.3048, "#,###")
Remove blanks or empty values
This expression checks the contents of AFIELD and will return “Unknown” if it is null, the field has spaces, or the feature is empty. Otherwise, it returns the field contents.
var valField = $feature.AFIELD
var boolEmpty = IsEmpty($feature.AFIELD)

When(
    valField == NULL, "Unknown",
    valField == " ", "Unknown",
    boolEmpty == true, "Unknown",
valField)
Another approach is to use DefaultValue to compare against null.
DefaultValue($feature.AFIELD, 'Unknown')
To also catch spaces, add Trim.
DefaultValue(Trim($feature.AFIELD), 'Unknown')
Create a link by combining an attribute value and a root URL string
You can combine feature attribute values with a string to create a URL link to open another web site or to retrieve more information. For example, a parcel map may have a unique parcel ID which can be linked to the assessor records by creating the unique URL that points to the information,
// Return link to unique property recordvar txtLink = "https://app1.pinal.gov/Search/Parcel-Details.aspx?Parcel_ID="+$feature.ParcelID return txtLink
Get attributes from another layer in the current map
Using expressions, you can combine attribute information from other layers in the same map into a single pop-up. Use FeatureSetByName to find the layer using its name.
// Get layer named "Counties" in the map
var fsetCounties = FeatureSetByName($map,"Counties")
Other functions can be applied to the feature set to retrieve the desired information, such as Count or geometry functions such as Intersect.
var numCounties = Count(fsetCounties)
var feaCounty = (First(Intersects(fsetCounty, $feature)))
Get attributes from a layer not in your map
In this case a feature set is returned from another layer that is not in the current map, referenced by its ID. This can be used to retrieve attributes from Living Atlas layers such as current weather, demographic information, air quality, and more.
var fsetStates = FeatureSetByPortalItem(Portal('https://www.arcgis.com/'),
"774019f31f8549c39b5c72f149bbe74e", 0)
Apply color to text
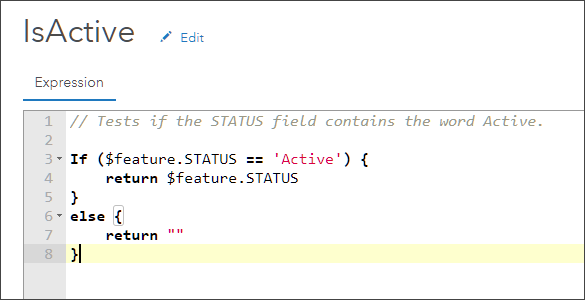
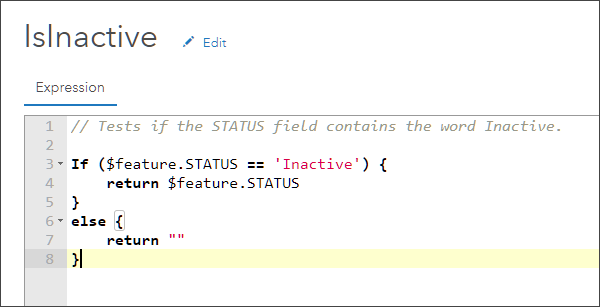
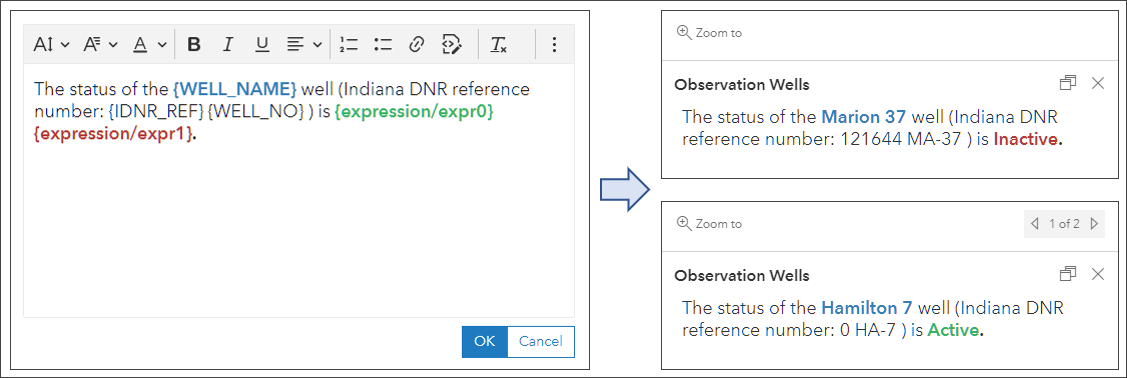
In text blocks you can add color to expressions in the same way as coloring text or attribute values (select the expression, then use the color picker). In this example two expressions were constructed to evaluate the {STATUS} field which contains one of two attribute values; Active or Inactive. While the logic here may initially seem confusing, we are creating two expressions which return the string value Active or Inactive. If the expression does not evaluate to True, Null is returned and it will not appear in the text block.
The first expression, titled IsActive, evaluates whether the field for the feature contains the word Active.
The second expression, titled IsInactive, evaluates whether the field for the feature contains the word Inactive.
Color is applied to the expression, which is treated like a field, in the text editor. The results are shown below.
More information
For more information, see the following:
- Pop-ups: the essentials (Blog)
- Arcade Getting Started (Documentation)
- Arcade Function Index (Documentation)
- Arcade assistant (Help)
- Introducing the new Arcade editor in ArcGIS Online (Blog)
- Try ArcGIS Arcade (Learn ArcGIS)
- Your Arcade questions answered (Blog)
- What is Arcade and why use it? (Story)
- ArcGIS Online: Web mapping with expressions (Video)
- Enhance your pop-ups using Arcade + Living Atlas (Blog)
- Part 1: Introducing Arcade pop-up content elements (Blog)
- Part 2: Introducing Arcade pop-up content elements (Blog)
- Use Arcade geometry functions to provide spatial context (Blog)


Commenting is not enabled for this article.