Do your workflows incorporate version management? This can be an effective strategy to support multiuser editing of your feature services. Implementing a version management workflow poses many questions, particularly how to allow multiple users to view and interact with versions securely.
With ArcGIS Workflow Manager 11.0, we’ve introduced the Claim Version step to help you answer this question. When you run the Create Version step, that newly created version becomes a job-specific version. A job can have a single job-specific version, or it can have multiple job-specific versions of multiple data sources. The Claim Version step switches ownership of job-specific versions to the current user. When you configure the step, you can decide whether to claim the job-specific version(s) of one or more selected data sources, or to claim all job-specific versions.
Typically, as with any version, only the current owner or administrator can change the job-specific version’s ownership. One advantage of the Claim Version step is that it supersedes these permissions – the user running the step can simply claim the version on their own. Versions often pass through several hands in a data editing workflow, so claiming ownership in one simple step is a powerful capability.
For example, let’s imagine that your team has been tasked with updating a utility company’s powerline layers for a fire hazard assessment. Each analyst creates a private version of the data source to make edits, which then gets reviewed by a QC (Quality Control) team. A member of the QC team then simply claims the version to review edits, reconcile and post changes, and safely delete the branch.
To see how easy it is to use the Claim Version step, let’s set up a basic data editing workflow that incorporates version management.
Getting started
First, we’ll create a new diagram and select a feature service that supports version management to add as a data source. Note that since the Version Management capability only supports branch-versioned data, our workflow is specific to branch versioning. For traditional versioning scenarios and options, you can find more information here.

Next, we’ll configure a Create Version step to create a new version of our feature service for the job. The user who runs this step will be the version’s owner. The step creates a job version for all data sources by default – since the diagram only has one data source, we can keep this setting. We can also keep our access permissions set to Private to maintain security.

Next, we can lay out the process for making our edits. Feel free to configure this process in whatever way that best suits your needs – if you’re looking for inspiration, you can try adapting the Route Edits sample workflow. In my case, I’ll configure an Open Pro Project Items step to allow me to edit the job-specific version. If you choose this approach, be sure to select the Repoint Version option so that you’re viewing and editing the correct version.

The Claim Version step
Now that we’ve set up the data editing process, the next step is to have another team member claim the version and review the changes before posting them.
First, we need to switch version ownership to a member of our QC team. To do this, we’ll add a Claim Version step to our diagram and connect a path to it. In the Path Details panel, we’ll update the path assignment so that the Claim Version step is assigned to the user or group who will be handling review. In my case, I’ll assign the Claim Version step to my QC group so that any member can claim the version and proceed.

In the Step Details panel for Claim Version, we have the option to select the data sources for which we want to claim the version. This will become important when you have jobs with multiple data sources and versions. For example, the utility company I mentioned above may have the powerlines split into multiple layers – perhaps one layer for transmission lines and another for distribution lines. In that case, our workflow may have multiple data sources with parallel processes established for updating each one. If we’re assigning two separate users to conduct QC for edits on the respective layers, we would want to ensure they’re only claiming the job-specific version for their own layer. As you can see below, you can designate your datasource with either the Select Sources option or the Arcade Expression option. If you choose Arcade then you can enter an expression that returns the datasource’s Portal item ID. In the example below, I’ve saved the item ID as a User Defined Setting and used the setting() expression to retrieve it.

In our case we can simply leave the default option to claim all job versions since there will only be one. When we run the step, it will search for the job-specific version for that datasource and switch that version’s ownership to the current user.

Finish the workflow and try it out!
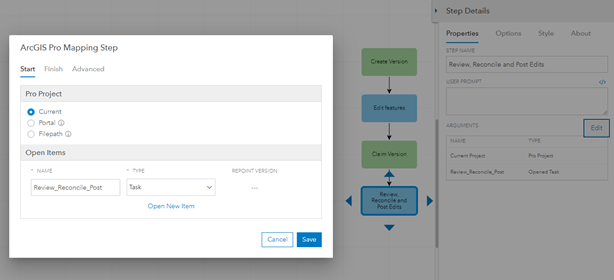
Next, the user who’s claimed the version must review, reconcile, and post the changes. There are several ways to tackle this – if our user was editing in a web environment, we could use a geoprocessing service or a series of Send Web Request steps to reconcile and post the changes through the REST API. However, since my user will be making edits in ArcGIS Pro, I’ll configure a task to carry this process out using the Versioning tab. I can open this task using another Open Pro Project Items step.
Finally, we can add a Cleanup step to delete the job-specific version we created. All paths after our Claim Version step should be set to maintain the job assignment, so that the version owner is the one to make the edits, reconcile and post the changes, and delete the version.

Once we’ve activated the diagram and created a job template, we’re ready to create and run a job to test our data editing workflow out. Run the Create Version step to create a job-specific version. Since the Claim Version step is not assigned to you, the job should no longer be available to you.
The user to whom you assigned the Claim Version step can now run the step to assume ownership of the job-specific version. Once your user has claimed the job version and posted their edits, they can remove it by running the Cleanup step. The job will close once the Cleanup step is finished.
The Claim Version step is extremely helpful when designing workflows that involve multiple users creating and managing versions of your data sources. This has been a basic walkthrough of how to configure and run the step, and we hope you can now see its potential to simplify your version management. You can now have users quickly and efficiently take ownership of a version to make edits, reconcile and post changes, and safely remove the version without having to get the version’s current owner or an administrator involved. If you have questions or would like to learn more about Workflow Manager, you can reach out to us on the Esri Community and check out the resources below.
Learn More
- Learn more about the Claim Version Step
- Connect with the ArcGIS Workflow Manager Community
- Learn more on the ArcGIS Workflow Manager product page
- Check out the Workflow Manager Learning Plan on Esri Academy
- Access Workflow Manager documentation
- Check out the Workflow Manager Getting Started video on YouTube

Article Discussion: